Learning Tips
| Site: | ART Online |
| Course: | Learning Tips |
| Book: | Learning Tips |
| Printed by: | Guest user |
| Date: | Thursday, 21 November 2024, 5:22 PM |
Focus!
From years of experience as a primary school teacher, I know that children are wired differently to adults – if a task is not fun, they get bored and shift their attention to something more interesting, unlike most adults who have learnt to complete a task, whether they like it or not. Although, I have observed that very intelligent people sometimes act more like children when disinterested.
Ringing bells takes a lot of concentration. The average adult is unable to concentrate continuously for more than 42 minutes – just about time for a quarter peal, but nowhere near long enough for a peal. So how do we learners improve our concentration and lengthen our ability to remain absolutely focused?
If I was helping kids to lengthen their concentration spans, this is what I would do:
- Play focus games to build attention. In an adult context this might be a daily crossword, or learning a poem by heart.
- Prepare a distraction-free environment – soft music (ha!), soft lighting, a comfortable temperature (ha! ha!) and remove all gadgets (do any of your gadgets actually work in an isolated rural tower?)
- Fix a routine. If you know what is likely to happen next, you can focus more easily on the now.
- Recommend that they eat beans on toast for breakfast. The idea of 12 or more adults gathered together in a confined space who have all consumed baked beans recently does not bear thinking about.
- Divide bigger tasks into smaller tasks. Manageable chunks make learning less overwhelming. This is more sensible advice than the bean-eating one.
- Naps and breaks boost concentration. Perhaps not practical in a tower situation, but frequent opportunities to rest are possible. Probably best not to nod off, though.
- Recognise preferred learning styles. This helps the learner to understand information better.
- Prepare individuals for the next task. If you warn someone of what is coming up next, they can be better mentally prepared.
- Set short time goals for better concentration. It is more effective to concentrate fully for 10 minutes, than vaguely for 20 minutes.
- Set up a reward system – for many adults it is called the pub!
- Allow time for distractions. Kids are naturally energetic and exuberant and need to vent their energy. It may actually help them to focus better on the next task. How about adult laps around the churchyard... loser buys the first round?
- Use energy effectively. Some people function better at different times of the day. If you are a morning person, an 8pm practice session might not be a wise choice. Can you fit your ringing around your circadian rhythms? Simulators can help vary practice times and this might also tick the distraction box.
- Deep breathing and imagery. Combine simple relaxation techniques such as deep breathing, or in some cases, remembering to breathe at all, with positive visual imagery.
So there you have it – my top tips for improving concentration. Please don’t try the baked beans one.
Mary Jones, author of The Accidental Ringer blog and ringer at Reedham, Norfolk
Staying right!
In the previous learning tip, Mary Jones gave some tips for improving concentration. We all do our best to stay on our line and keep our bell in the right place, but what are we to do when our concentration lets us down? How can we both minimise mistakes and and get back on our line quickly when they happen? Better still, can we actually put ourselves right before anyone notices?
The skills to put yourself (and others) right come from a detailed knowledge of what you’re ringing. This means looking beyond what you actually need to ring it. Just knowing ‘the line’ isn’t enough, you also need knowledge of how a method ‘fits’ together, or a grasp of where everyone is in Called Changes and not just you. If you want to make yourself more reliable here are some tips:
- Learn to call – just start with calling “Stand” after some Rounds to begin with. Then call some simple Called Changes and progress to pieces of ringing where you just say “Go…”, “That’s All” and “Stand”. This encourages you to start to look at what others are doing (so you make the calls in the right place) and to develop an appreciation of the ringing as a whole.
- Stand behind as much as you can. Standing behind is not the sole preserve of those supporting ringers who may need some help; much can be learnt from standing behind experienced ringers who are ringing something that you are learning.
- Your brain will be engaged, but there’s no risk of going wrong!
- Do your homework. I cannot emphasise this enough. Once you can ring something and keep yourself right ringing it, don’t stop there. Try to look further to see what other bells are doing when you are ringing to see how it all fits together.
- Equip yourself with more than one way of staying right. If you’ve learnt Plain Bob Doubles by the order of the work, but then forget where you are, you’ll go wrong unless you’ve something to use as a backup. So, try to learn where you pass the treble before each piece of work so you still have a signpost if you forget the line. Even if there’s a learner on the treble who may not always be in the right place you’ll still have your knowledge of the line to fall back on, and the more you ring things the more signposts you’ll be able to spot and use to your advantage.
- Look for new things all the time; don’t rest on your laurels. Get to know a method so well that you can say “I’m doing abc so I reckon they must be doing xyz”. Look at the line afterwards to see if you were right.
- Learn to look for the nods and winks from others that confirm you’re right and acknowledge them in return. Sometimes these are the most important signposts because not only can you confirm that you are right, but you may also be confirming that the other person is right too!
- Maintain eye contact. This might sound obvious, but all that nodding and winking is pointless if nobody is looking.
- Take your time. It’s better to be able to do something simple well than something complex poorly.
- Smile. I’m serious. Smile. We do this for enjoyment right? So let’s enjoy it. Don’t be too self-critical if you make a mistake, just analyse it to find out why you went wrong so you can eliminate (or at least minimise) the risk of repeating the error.
There is nothing better than a ‘steady’ ringer. Someone who may be relied upon to ring well and not go wrong. Better still, someone who can stay right when others make mistakes, and even better still than that are those with enough knowledge to assist conductors with any ‘putting right’ that’s needed, even if it’s done silently with a nod or a wink. These people are not superhuman, they’ve just done their homework, and been willing to look beyond the blue line.
Jonathan Williamson, ART Member, Ipswich
Ringing round the back
16-year-old Ewan rings in York, and was taught by his parents, David Hull and Alison Edmonds. He rang his first quarter peal aged 7 and his first peal aged 8. As well as being an accomplished ringer – he has rung the tenor to young band peals of Cambridge Royal and Bristol Maximus and has rung three quarter peals on the 3-ton tenor at York Minster – he is helping to teach several learners in York and is the current leader of the Yorkshire Tykes youth band.
Here he explains his approach to ringing the back, or bigger bells:
- Use your whole body: arms, legs and core; with both strokes.
- Keep your back as straight as possible. If you bend it then it may start to hurt.
- Keep tension in the rope all the way down at backstroke to give an even pull throughout the stroke. This will allow you to pull less sharply and more fluidly. This will reduce friction with the rope and may reduce blisters!
- Think ahead! If you are ringing a heavier inside bell – try and prepare for each bit of work.For example, pull harder in seconds place before leading to make it easier to turn around to hunt away from the front.
- Let the bell do the work. Only pull as hard as you need to. Consistently over-pulling can make ringing a heavy bell so much harder and will wear you out quickly.
- Dictate the pace of the ringing (when you are on the tenor). If the lighter bells ring too quickly, resist the temptation to speed up.
Ewan Hull, ringer at York
Lessons from mindfulness
Pam Ebsworth has been attending a Mindfulness course, and we asked her to pass on a few tips from that which could be applied to ringing.
Don't forget to breathe
Strange to say, in any form of ‘meditation’ breathing does seem to be the most important part of learning to relax. In mindfulness we were taught to be more aware of our breathing; breathing out for longer than we breathe in, to make sure that our lungs are empty. Feel the cooler air coming in and the warmer air going out.
A deep breath in and a long sigh out seems to work well for me.
Forgive yourself
We were taught to let ourselves just be in the moment and to enjoy it; not to think about what has happened or what might happen. Most important is to forgive yourself, and others, for past mistakes!
Be kind
To yourself and to others, to create an atmosphere in which we can all achieve without stress.
Stress? Or excitement?
I have read that feelings of stress can be converted into excitement. When I learnt to ring at 16 years old I did find it exciting and the adrenaline was my friend. Nowadays I try very hard to turn my feelings of stress into excitement.
Pam Ebsworth from Woolpit, Suffolk
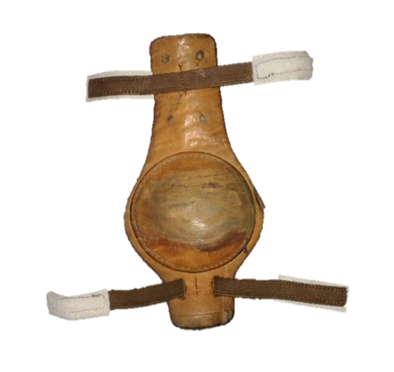
Muffling bells
The sound of half-muffled tower bells is unmistakable. In Rounds it’s like a normal descending scale followed by an eerie echo of that sound. This is why bells are usually rung half-muffled in mourning: for funerals and other solemn occasions such as on Remembrance Day, or to mourn the old year before the New Year is rung in. Some churches ring half-muffled during Lent.
 To make this sound, a ‘muffle’ is fitted to each bell. A muffle is simply a pad of resilient material attached to the ball of the clapper in such a way that the impact of the clapper against the sound bow is greatly reduced. This has the effect that, instead of hearing the ‘strike note’ of the bell, we hear the ‘hum note’ instead.
Complicated? Well, all you need to know is that the sound of a tower bell is actually composed of five (or more) different notes which are all tunable by a skilled lathe operator in a bell foundry so as to produce a pleasant tone. The muffle simply causes these notes to be heard in a different ratio and volume.
Muffles are traditionally made of leather. Leather has always been a widely available material which is easily worked and will survive the repeated impacts it receives and which provides a suitable degree of damping to make an appropriate sound. It will give many years of service if kept supple with the sparing use of dubbin.
A muffle can be anything from a simple square of thick leather tied on at the corners with leather boot-laces threaded through punched holes, to a carefully shaped, multi-layer pad that can be rapidly positioned with straps and industrial Velcro. I’ve even heard of gardening knee-pads being used in an emergency!
Because Called Changes take effect at handstroke, a muffle is usually placed so that the handstroke sounds ‘open’ and the backstroke sounds the muffled echo. This means that the muffle has to be placed on the side of the clapper away from the rope and the ground-pulley. Once fitted, check that the muffle cannot rotate and that the muffle ties cannot come between the clapper and the bell – otherwise you will have a bell muffled on both strokes until the tie breaks under the repeated impacts and the muffle falls off completely! Also be aware that if a bell goes up ‘wrong’ the handstroke will be muffled instead of the backstroke and you will have to correct that before ringing. Don’t leave it until the last minute if you’ve not fitted them before. Practise it now!
Fitting a muffle to just one side of the clapper is what we mean by half-muffled. Fully muffled bells (on both sides, except for the tenor) are considered reserved for the death of the Monarch, the Bishop of the diocese, or the incumbent Vicar.
For safety reasons, muffles should always be fitted and removed with the bells down. Work in pairs, and take precautions to ensure that no-one in them ringing room will try to pull on a rope while you’re working underneath the bells.
Mike Rigby, ART Teacher and Tower Captain at Lighthorne, Warks
Learning call changes
Call changes are the building blocks of all change ringing. It’s important that you feel really comfortable with these seemingly simple changes, but it takes time. There is a lot to think about, even for one call, so don’t underestimate how much time and practice you need.
Here are a few things to remember:
- The call is made on a handstroke pull
- Wait! Stay focused on the bell you were following and don't rush to change as soon as you hear the call!
- The actual change is made on the next handstroke, so keep following the same bell for the next backstroke after the call
- This takes quite a bit of practice, as often you really, really want to move straight away!
- This is an important skill in its own right
At a call, you may have to follow a different bell, but you might not have to ring in a different position. For example:
1 2 3 4 5 6
Call is ‘2 to 3’
1 3 2 4 5 6
At this call, the bells which change places are the 2 and the 3. They are the ones which have to change speed.
The 4 rings in the same position, in 4th place, but the ringer needs to follow a different bell. In this case, it will be the 2, but it doesn’t have to change speed.
Understanding the difference between changing places and following different bells is key to ringing smooth and enjoyable call changes.
Here are some ways you can do this:
- Stand behind someone ringing call changes and, at each call, tell them whether they are changing position or just following a different bell
- Call some simple changes yourself
- Write out some changes on paper or a whiteboard
- Instead of calling out the bells to change, try calling out the places which change. That’s quite a challenge!
There is so much to call changes and they are so rewarding. It’s really worth putting in the effort to get them spot on.
Ruth Suggett, Bardwell Teaching Centre, Suffolk
Calling changes
So, you think you’ve got the idea of how to ring call changes! But what about you calling some changes?
It’s true that, for many, adding another activity to ringing a bell causes problems with handling or striking or even both. A ringing medic has said that bell ringing causes intense activity in the brain which has to co-ordinate arm movements, seeing the ropes and hearing the sounds in addition to what it normally controls. You even have to remember to breathe! Now add to that the need to speak and call some changes, then it’s not surprising that things can go to pot.
 One place at a time – start simply, call yourself down or up just one place and back again. Remember that you need to be heard by your fellow ringers above the sound of the bells. You could always practise this bit in front of a mirror at home! When you’re confident with that, increase the scope by calling yourself two or three places from the starting place and back again. So far, you’ve involved your bell in the changes, but what about calling another bell to move? Could you call the bell in 5th place down to the lead position?
You could use pencil and paper and write down the calls, either calling up, down or by places – whichever method is preferred in your tower. However, the visual device (illustrated right), which was invented by aringer at my home tower, might help because it shows which bells are in which places as you call the changes. The inner set of numbers represent the bell places and the outer numbered door knobs represent the bells which can change places. You could replicate this model on a sheet of A4 paper with numbers 1 to 8 as fixed places and cut out some bell shapes and number them 1 to 8. So, start your plan by working out the call to swap bells 4 and 5. Your model should now show bell 5 in 4th place and bell 4 in 5th place.
Completing your plan should not be too difficult, but ask your tutor if you need help. Once you are confident of the calls to make, try it on the bells. No need to get the bells back to rounds, just call stand and cheekily ask each ringer if they know which place they are in!
Once you feel confident about moving other bells, then try calling the bells to some of the musical rows below.
Roger Coley
Quirky call changes
“Which bell do I follow?” is often asked during call changes. This is probably because conventional calling methods focus on bell number, but variations of call changes can be rung to shift the focus from which bell to follow to developing the skills required for Plain Hunt and methods: bell control, place awareness, counting, rhythm, listening and ropesight. They can involve ringers of all abilities, add interest and great fun to your ringing, and can sound great too. Here are some quirky ideas.
Note: n = number of bells.
Switch calling method. If you normally call up in your tower, call down for a change to get ringers thinking about what is happening. It could also help them when they visit other towers where they may call differently.
Call by ringer’s name instead of bell number. At Christmas inject some fun with silly seasonal nicknames, resulting in hilarious calls, e.g. ‘Baubles to Rudolf ’.
Quiz ringers during ringing to develop ropesight and awareness of where other bells are in the change. e.g. ‘Which place are you in?’, ‘Who is following you?’, ‘Who is 2 places in front of you?’, ‘Who is leading?’, etc.
Call by place instead of bell number. All the ringers need to know which place they are in and are encouraged to use listening skills to work that out and ropesight to find who they are following. Calling by place in a Plain Hunt sequence, then writing it out on the board, can be a useful way to explain how place notation works.
Conduct by place. Whichever calling method is used, helping a ringer by telling them which place to ring in rather than who/which bell to follow should encourage them to listen and look at the whole change rather than just following one bell.
Facing outwards from the rope circle should encourage ringers to count and listen to their striking and place. Initially try just one or two facing outwards at a time, then involve more of the band. As they should be counting places and listening rather than looking at a bell to follow, call and conduct the call changes by place.
Call to move at backstroke to introduce changing speed at backstroke.
Dodgy call changes: At each call, the pair of bells affected dodge into place i.e. they swap over at handstroke, swap back to the original change at backstroke, then swap again at handstroke (into where they would be if it was a normal call change) and remain in that place.
Rounds and crosses: From rounds, call pairs of bells to swap and call that change ‘crosses’. Alternately call rounds and crosses at intervals, then speed up the calling frequency to places (swapping every whole pull). Finally ring crosses at handstrokes and rounds at backstokes so that everyone is dodging.
Kaleidoscope exercises such as continuous dodging mixed with call changes enables different skills to be practised at the same time.
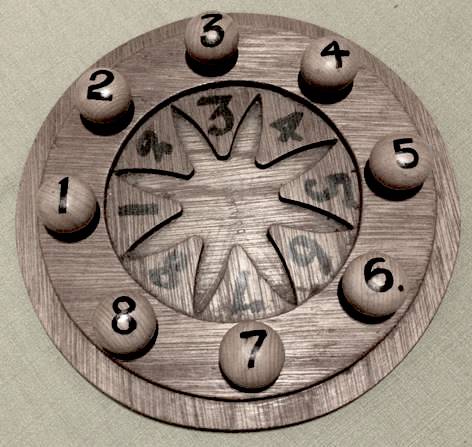
 Give those sitting out a ‘biscuit tin lid’: Take a metal tin of biscuits up the tower to share! Inside the lid stick a circle of places and add magnetic numbers (see photograph). Ask those sitting out to follow the changes by moving the magnets correctly at each call, checking that they get back to rounds at the same time as the bells. Then ask them to use the biscuit tin lid to work out and call their own changes whilst sat out. As a challenge give them a specific change to aim for. When they no longer need the biscuit tin lid to work out what to call, let them call when sat out. Young ringers, including those still working on bell handling, are often good at this and it can keep them involved.
‘Judging’ call changes when sat out. Ask them to listen to the striking and suggest how it can be improved.
‘Rhubarb’ call changes: Each ringer in turn calls out one call change. The only rule is that they do not call the reverse of the previous call.
‘Morden’ call changes: Each ringer in turn calls themselves from lead out to the back (or n-1). This can start from rounds or, for a challenge, from another change, e.g. Queens. Also try calling from the back down to lead.
Pull off in a different change. Ask each ringer to draw a (playing) card numbered 1 to n (or n-1 if you want to keep the tenor at the back). The number drawn is the place that they ring in when they pull-off. To make it harder each ringer does not disclose their place before pulling off. Challenge a ringer to call it back into rounds.
Jump changes into any change, e.g. from Rounds to Queens, for place awareness and bell control.
Whole pull and stand for bell control. The tenor keeps ringing throughout and all of the other bells alternately ring a whole pull then wait on the balance for a whole pull. This can sound mournful so could be ideal for funerals and Remembrance Sunday, especially when half-muffled.
Rounds and reverse rounds. To go from rounds to reverse rounds the tenor keeps ringing at the same speed, the n-1 holds up and waits on the balance for the tenor, the n-2 waits even longer for the n-1, etc. From reverse rounds to rounds the treble does not change speed.
Firing and cross-firing. To be allowed to clash your bell on purpose can be rather enjoyable! And it may be easier to hear if your striking is spot on when ringing at exactly the same time as another bell. For cross-firing (on an even number of bells), go from Queens, then all of the odd bells fire on n-1 and the evens fire on the tenor.
Sonic mapping, where bells are called to ring in various creative chords can be fantastic on higher numbers.
For 6 bells consider Twinkle Twinkle or Cambridge chimes, particularly with young ringers, as fun ways to practice holding on the balance at handstroke and backstroke.
Combine some of these call change variations to make it more challenging and interesting, e.g. dodgy Morden call changes, rhubarb Christmas name call changes or a mixture of jump changes, whole pull and stand and firing.
Quirky call changes are inclusive, useful and fun and could be used in any tower to great effect.
Susan Hall, Old Brampton, Derbyshire
Odd one IN
Why is it that some bells are harder to strike well than others? It is probably because they are odd-struck. So, what is odd-struckness? It's ‘a different delay between handstroke and backstroke of the same bell’ (taken from the Ringing World 5/11/2004).
This could happen for a variety of mechanical reasons – rarely are the bells we ring all part of a perfect set! Sometimes the odd-struckness is very pronounced and ringing needs to be adjusted to compensate for this.
The effect of odd-struckness is that you need to leave either bigger or smaller visual gaps. The bell you are ringing could be odd struck at either handstroke or backstroke – or both, and the odd-struckness could mean the bell is either quick or slow at either of the strokes. The situation can be compounded if the bell that you are following is also odd-struck. If you always ring the same bell, you may get used to how you need to ring to strike in the right place. However, when asked to ring a different bell or if visiting a different tower, how can you sort out the odd-struck bells?
Here are some tips:
- Listen to any advice that you are given before you catch hold. This will particularly be the case if the bell is notoriously odd-struck.
- Listen out before you ring to see what instructions other people are being given. If someone else is being told continually to “keep their back-strokes in”, then there is clearly an issue and you can learn from this.
- Don’t forget that you should be holding up slightly at handstroke on any bell. This is for the handstroke gap. Everyone needs to do this, not just the treble.
- Count your place in the row when you are ringing rounds so that you can identify the sound your bell is making.
- Are the gaps between your bell and the ones before and after the same? If not, is it because you are ringing too soon or too late? This can be confusing, as you may be leaving a perfectly nice ‘visual’ gap but to overcome the odd-struckness, you have to leave a much bigger gap, or ring almost at the same time of the bell you are following!
- Having identified that you are not striking your bell evenly, you need to identify how to correct this.Is it the same at both strokes? If it is not the same, the bell you are ringing is probably odd-struck. If you find that you need to hold the handstroke up, you will have to make the opposite alteration to your backstroke and vice versa.
- Sometimes it is useful to NOT look at the bell you are following for a few blows so that you do not get confused by any potential odd-struckness in that bell. This allows you to concentrate on listening.
- It is always fine to ask for advice and help!
Janet Horton, Teacher at the Birmingham School of Bell Ringing
Looking after number one

It’s often the case that many novice ringers are never told how to lead, just told to do it. OK… so, how do you lead? Here are some tips for getting to grips with just that.
The rhythm of the lead
The first thing to get to grips with is the rhythm. You pull off on a handstroke and when you pull the next stroke – backstroke, there’s no pause. However, when you get to the next stroke – handstroke again – you have a tiny pause. If, say, you’re ringing on six bells, it’s like this:
123456123456 (pause) 123456123456 (pause) 123456123456 (pause) – and so on.
The pause is as long as the ‘dings’ that make the rest. It’s as if you had a 7th bell popping in every other stroke like this:
123456123456(7)123456123456(7)123456123456(7)
Right-oh then, to get a feel of what it sounds like, clap your hands together 12 times, say to yourself “pause”, and then clap again 12 more times. The time it takes to say “pause” to yourself should be the same as the time it takes to clap once.Keep doing it until you feel confident about it. Next, try it for real.
The pull off
We all know the lines we have to say before pulling off, but it’s worth getting this right too:
- “Look to.” Look around and check that everyone is ready to ring. Then bring your bell to the balance.
- “Treble’s going.” Start pulling the bell off.
- Then, “She’s gone.” just as the bell starts its swing.
This first bit is crucial. Practise pulling the bell gently from the set position to the balance.If you aren’t sure how to do this, ask someone to show you so you can feel what it’s like. It will feel very different to when the bell is set.
So, why bother? Reason is: it’s very easy not to start pulling until you’ve said “She’s gone”. Even if the bells are not deep set or heavy, there can still be too much of a delay while you heave the bell off.
Keeping it right
So now you’re actually ringing. You pull off at handstroke, and the backstroke follows. That’s OK – but how do you stay in the right place and lead correctly? It’s a combination of looking and listening.
Look for the last bell down; in rounds of course this is the tenor. You’ve just completed your backstroke and have caught the sally. As the last bell down completes the backstroke and has caught the sally, you pull off your handstroke lead. The timing will be nearly right, and there will be a gap between the last bell’s ‘dong’ and your ‘ding’.
But now you really need to LISTEN. Can you hear that rhythm with the gap – what I call that imaginary bell? If not, watch the last bell down at backstroke and pull off a bit earlier or later, as need be. You may well need some help from your Ringing Teacher or a sympathetic person to help you here, until you get it right.
As with everything in bell ringing, it’s all about practice. Don’t worry if you have bad times when it just doesn’t seem to go well. This happens!
Remember a famous sportsman was once interviewed on TV and the interviewer said, “Yes, but isn’t your success just luck, really?” The famous sportsman replied “Oh yes, it is luck, but you know, the more I practise, the luckier I get”.
Martin Kitson, Teacher at Bottisham, Cambridgeshire
Handling lighter bells
One of the 50 Ringing Things is to Ring on a bell lighter than 3 cwt (152 kg). My home tower is a six with the front three less than 3 cwt, so we do get the occasional visitor who comes along to collect a thing.
What do I tell them before they catch hold?
There is one component of a bell mechanism which doesn’t weigh ever so much, but the weight of which starts to matter more and more as the weight of the bell gets less and less. This is because the weight of this bit doesn’t reduce much as we go from a heavy bell to a lighter one. Perhaps surprisingly, this is the rope itself!
Think about what happens to the rope as we ring a bell. The image may help you to visualise it.
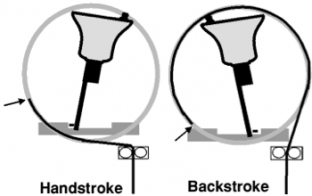
When you pull the sally at handstroke the wheel turns and the rope comes down, then it goes back up and is wound right around the wheel ready for the backstroke. But, because the sally has risen to a higher point now, more rope is wound onto the wheel than before – and you need to have provided enough energy to add to the momentum of the bell to get all that rope up there. With a light bell there isn’t much momentum, so you have to pull the handstroke relatively firmly to get the rope to do that. At backstroke, however, the weight of the rope itself will help you to turn the bell, and the additional energy this provides will easily lift the shorter length of rope back up again. If you’re ringing in a tower with a long draught the effect is even more obvious because a longer rope weighs more.
So here are some things to think about:
- Try to feel the point of balance, even though it’s less obvious than with a heavier bell.
- At handstroke you will probably have to pull quite a bit more firmly than you expect, but start gently as you don’t want to endanger the stay.
- Keep tension in the rope at backstroke, but try not to add any more energy – it probably won’t be needed.
- Keep your arms high at both handstroke and backstroke, and accurately adjust the rope length, so as not to bump the stay.
Another time when a difference is obvious is when raising or lowering a light bell in peal. When raising, it’s very easy to go up far too quickly, and lowering often catches people out because heavy bells have enough momentum to stay up without much work from the ringer. Whereas with a light bell you really have to work to keep the bell far enough up even as it’s coming down – you’ll probably find that you need to add energy at every stroke, even when you’re ringing one-handed. It also helps if you can make or release coils without thinking, so you can concentrate on accurately following the bell in front of you on every stroke.
One final point: one of the other things is to Ring on a Mini Ring with a tenor less than 1cwt or 50kg. What I’ve said here doesn’t really apply to a mini ring because they are engineered differently, so if you want to collect that thing as well you’ll need to seek further advice before you have a go at that.
When we asked John Harrison for permission to use his image, he suggested also reading the article Does size matter? from The Ringing World, available at cccbr.org.uk/wp-content/uploads/2016/02/200205.pdf.
Mike Rigby, ART Teacher and Tower Captain at Lighthorne, Warks
Your place or mine?
Learners are introduced to the concept of their “place” in the row very early on since it’s so fundamental, but most beginners first come across the words “make places” as an exercise at LtR Level 2. When you learn to hunt you realise that you’re making places both at the front and at the back. When you start to learn methods, you learn about making places such as seconds in Plain Bob, thirds in Grandsire, and fourths when you “make the bob” in Plain Bob. I’m going to give you some tips for each of these situations in turn.
Making places is an exercise in bell control. You exchange place with the bell next to you, either going up or down a place for two blows before returning to your starting place for two blows, and then repeating it.This can be either hand and back, or back and hand – you need to be able to do both, comfortably and accurately. At LtR Level 1 you’ll have been introduced to how to change speed: catch the sally early (higher) to pull in at handstroke or move up the tail to shorten the rope to pull in at backstroke, or “floating” the handstroke nearer to the balance or letting out rope to ring later at backstroke. Making places requires you to do this repeatedly, with a blow at rounds speed in between alternate faster and slower blows. The fact that it’s repeated will help you to learn how to anticipate what’s coming, and you can use this to learn to ring with less effort.
Bell handling
First of all, get your bell handling right. Don’t ring “short armed”, but fully extend your arms at the top of every stroke. Instead of your muscles taking the strain, the elasticity in your tendons will help to recover and re-use energy from the bell at the top of the stroke, and if you can anticipate the next stroke, you can use your muscles more efficiently and still ring accurately. So, if you need to pull in, don’t pull the previous stroke quite so hard (so you’re not working against yourself); and if you need to ring later, pull the previous stroke a tiny bit harder (or longer, for a backstroke) so that the bell stays up more easily.
Listening
Next, hearing your own bell strike is important. It’s the only way you’ll know whether you’re in exactly the right place. Learn to pick out which bell is yours in the row, even as you change place. Many people like to say their place to themselves as they’re ringing: “3rd, 3rd, 4th, 4th, 3rd, 3rd, 4th, 4th”, for example. Try to keep the blows sounding at an even rhythm in each row; your changes should introduce no gaps or clashes.
Now let’s look at Plain Hunt. You ring two blows when you’re leading and two blows at the back, a bit like making places, but you only ring once in each place everywhere in between. At first you will probably concentrate on hunting evenly up and down, ringing slower or faster as needed. The places, especially the second blows (which are at Rounds speed), often don’t receive much attention, but if you’ve learnt to count your place as you go, and you can hear when your bell strikes, you should be able to notice these blows too. Get the handstroke lead gap right and make sure there is no gap at backstroke, just as you would do when leading in Called Changes. At the back it’s very common not to get the bell high enough: listen for any “clipping” with the bell below you and aim to get even spacing on both blows here, too.
Making places in methods
Finally, a look at making places in methods. If you’re hunting – to either 2nd, 3rd or 4th place and back – the bells you pass on the way out will be the ones you’ll pass again on the way back to lead. Once you get to your last place you don’t need to look for any others: they’re behind you in the row and cannot get past you while you’re making places, however many there are (such as long thirds at a Grandsire single). Many learners look for another bell that they don’t need, and then stumble when they don’t see it. Don’t make that mistake, but do keep listening; the change of rhythm should not introduce gaps or clashes.
Mike Rigby, ART Teacher and Tower Captain at Lighthorne, Warks
Breaking the code
Number 20 in 50 Ringing Things is to write out a method using place notation. Debbie Phipps, a ringer at Lychett Matravers, Dorset, told us that she had to get help with this one, but discovered that it was not quite as mysterious as she first thought. So, with her input and help, we decided to share more information about place notation.
Place notation is a compact way to represent a method without writing out all the lines or describing it in diagram form. You can use it to learn a method, but more often it is used to communicate a method to others by text or for a computer program.
The essence of change ringing is that the bells continually change place; they rarely stay in the same place.So noting where places are made, and assuming that all other bells change place, results in a compact notation. The ‘rules’ of change ringing let assumptions be made that allow even more compactness to be used than we’re going to explain here, but this is enough to give you the idea.
Let’s start by looking at where places are made in Plain Hunt, both Doubles (PH5) and Minor (PH6). Here are the first three rows of each, with an indication of the changes made between rows:

Suppose we write these two changes of PH5 as ‘5.1’, where the numbers represent the places made and the dot just separates the changes.For PH6 we could write ‘X.16’, where the ‘X’ means ‘all change’ or ‘no places’ and we see that 1st and 6th place are made in the same change (there is no dot between).This is the basis of place notation. The main thing we need to add to this is the convention that we write down a complete ‘lead’ of any method: from when the treble leaves the lead, to when it leads again at backstroke.
Let’s work through a sample method. We’ve chosen Little Bob Minor as it’s short: the lead is only eight blows. Here’s the blue line for each of the place bells and the grid with the places made written beside it:
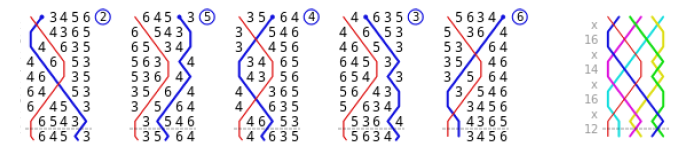
It should now be fairly clear that X.16.X.14.X.16.X.12 is the place notation for this.
There is no single convention for place notation; other symbols are sometimes used, and use can be made of symmetry in a method. Robert Wallis’s BLUELINE site at rsw.me.uk/blueline/methods/notation will give you more (it’s also the source of the diagrams reproduced above), but now – try one for yourself!
Mike Rigby, ART Teacher and Tower Captain at Lighthorne, Warks
Handbell hunting
Are there any handbells in your tower? Don’t be afraid to use them to learn all about hunting and the importance of knowing your place. It doesn’t matter if you have never picked up a handbell before!
Good bell handling
Holding the strap with your thumb uppermost, practise the upstroke (equivalent to a handstroke in the tower) and a downstroke (equivalent to the backstroke). It takes a little bit of time to get used to the wrist and hand movement required, but it’s easy to practise!
Plain Hunt
To plain hunt on 4, ask the most experienced ringers to take the 2, 3 and 4, while you have the treble. If there are no experienced ringers, well, this need not hinder you and you will probably have a lot of fun getting started! Try some rounds on 4 first. Then take things slowly; try half a course of Plain Hunt on 4. From the treble you will sound first, then second, third and finally fourth, on successive strokes. Ring really slowly so that you have time to count your place.If possible, count out loud. Stop when you get to 4th place. Have a cup of tea and think about how you are going to hunt back down to the front. You will have to start in in reverse rounds and remember, hunting down is a bit harder than hunting up! Why is this? The answer is because there is one fewer bell striking between each of your blows.
1 2 3 4
2 1 4 3
Look at the path of the 4 in these two rows. Only two bells strike before it has to ring again.
Just like before, the counting out loud helps. Then you can put the two exercises together which gives you Plain Hunt on 4 for a whole course. You can extend this by doing the same again but on six bells. With a bit of practice, you will have mastered something which takes a lot longer to achieve on tower bells and you will also have gained an understanding of how to count your place and to know which place your bell is in a change. Well done!
Learning the Ropes Handbells
If you are interested in pursuing handbell ringing, you can now follow the Learning the Ropes programme for handbells as well as tower bells. Learning the Ropes Handbells is a progressive learning scheme for change ringing on handbells, based on the principles of music grades or karate belts. Just like the LtR we are all familiar with, it has five stages, known as levels. Each level develops key skills. When you have completed LtRH Level 5, your handbell ringing will be at a standard where you will be able to progress quickly forwards in the exciting and challenging world of handbell ringing.
Helen McGregor, ART Teacher at Tulloch Ringing Centre