Handbell Toolbox
| Site: | ART Online |
| Course: | Handbell Resources |
| Book: | Handbell Toolbox |
| Printed by: | Guest user |
| Date: | Wednesday, 4 December 2024, 8:54 AM |
1. Learning to ring handbells
In this book we present the wonderful world of change ringing on handbells. Handbell ringing can be addicitive and of course can be practised anywhere there is a band and some handbells. Handbell peals have been rung on long distance airplanes, in trains, on the Great Wall of China and many other esoteric places in the world.
Read on to find out how it is done and learn from some expert handbell ringers who have given their time and experience to assist ART in providing this resources.
1.1. Overview
Handbells for non-ringers
These resources make no assumptions about what you know and explain things that existing ringers have already learnt. It is quite possible to not ring tower bells, ever, and become a very accomplished handbell ringer, ringing well beyond what is covered in this set of resources.
Handbells for tower bell ringers
Particularly in the early chapters you might want to skim or even skip some of the explanations which are targetted at non-ringers.
However, ringing methods on handbells is different to ringing them on tower bells. You don't ring two blue lines, instead you learn how to ring by position, knowing where the first bell of your pair is going to strike and then ringing the second relative to it. So, however experienced a tower bell ringer you might be, you need to learn the relative positions found in Plain Hunt (of which there are three when ringing 6 bells, four when ringing 8 bells etc.)
You then progress to ringing methods, using a combination of places, grid, lines, and structure (based on where the treble is or what the first bell of their pair is doing). These different approaches need to be learnt and practised.
Handbells for teachers
The final chapter of this book is for handbell teachers. The various pages should be used in conjunction with the corresponding pages in the earlier chapters for ringers.
The Learning the Ropes Handbell Scheme
The Learning the Ropes Handbell scheme is a progressive scheme that allows you to develop your handbell scheme in small, easily-achievable steps. Your job is to learn and then practise these steps so that ringing them becomes automatic before moving on to the next step.
An important part of the scheme is to learn how to call on handbells. The handbells scheme emphasises calling and conducting more than the equivalent tower bell scheme. There are two reasons for this. First, with half the number of people ringing in a handbell touch, it is mathematically necessary to train more conductors. Secondly, handbell bands often develop and grow in isolation and with the need to ring quarter peals to embed methods, handbell conductors must also be developed in isolation.
Getting started
These resources will take you step-by-step through ringing handbells which you can use as a learner, a teacher or as a band. A good start would be to listen to this webinar.
1.2. Handbell jargon
Ringing handbells, like ringing tower bells has a set of associated jargon, some of it shared with tower bell ringing but some unique to handbells. The ringing glossary is also available as a five-page download.
Ringing Glossary
Handstroke
The first stroke of a ‘whole pull’. The bell moves from pointing forward to pointing up. It is important that the bell is turned enough so that the clapper rests on the side closest to you to prevent double hitting on the backstroke.
Backstroke
The second stroke of a ‘whole pull’. The bell moves from pointing up to pointing forwards. After the backstroke, rest your hands on your knees but don’t make contact with the bell itself or you will stop the hum of the bell.
Changes
Rows of music where each bell sounds exactly once in each change.
Hunting
The movement of one bell back and forth. The bell stays in first and last place for two blows e.g. 1st, 2nd, 3rd, 4th, 5th, 6th, 6th, 5th, 4th, 3rd, 2nd, 1st, 1st, 2nd, etc.
Lead
Ringing first in the change, most often for two blows. A single blow at lead is usually called a ‘point lead’.
Open handstroke lead
When a single beat rest is left between the last backstroke of the last stroke and the first handstroke of the next change.
Lie
Being last in the change, most often for two blows.
Backchange
Another name for back-rounds or reverse rounds; the change where the bells ring in order from heaviest to lightest e.g. on six bells 6 5 4 3 2 1.
That’s All
The command that signals the end of the ringing when the change comes back to rounds. Some handbell bands will say ‘that’s all’ and stop ringing after rounds has been struck but other bands keep ringing rounds until the conductor says ‘stand’ or ‘set’ which is the command to stop ringing completely.
In/Out (or Down/Up)
As the bells change positions in or down would describe a bell moving towards the front of the change and out or up a bell moving towards the back. In numbers (1st, 2nd, 3rd, etc.) in or down is a decrease in the number of your position and out or up would be an increase in number.
Front/Back
The bell at the front of the change is the bell that is leading and the bell at the back is the bell which is lying.
Treble/Tenor
The treble is the highest pitched bell being used. The treble is rung first in rounds. The tenor is the lowest pitched bell being used and is rung last in rounds. The note of the tenor tells you what musical key the bells are in; the bells in front of the tenor make a major scale in the tenor’s key.
Quick /Slow
A bell moving from a higher position to a lower position (in) will have to ring more quickly to move in front of other bells and a bell moving from a lower to higher position (out) will ring slowly to allow other bells to pass it.
Up, down and in
Some handbell groups ring rounds over and over until the conductor says ‘Go’ and then the name of the method you are going to ring, e.g. ‘Go Plain Hunt on six’. The conductor should give this command when the treble rings a handstroke and it takes effect on the next handstroke. However, other handbell groups don’t bother with lots of rounds and ring rounds on the handstroke, rounds on the backstroke and then start the next handstroke; this is called ‘up, down and in’.
Coursing position
A pattern made by two bells where there is a gap of one between the two bells. The two bells meet and cross over in first and second place, also at the back (e.g. fifth and sixth place when ringing on six bells).
Opposites Position
A pattern made by two bells where they make a mirror image. When one bell is leading the other bell is in last place.The bells meet and cross over in the middle (thirds and 4th place in minor). There is never an opposites position on an odd number of bells.
2/3 Position
A pattern made by two bells where there is either a gap of two or three between the two bells. The bells meet and cross in 2nd and 3rd place and one place off the back (e.g. 4th and 5th in minor)
Minimus/Minor/Major/Royal/Maximus
The names given to ringing on an even number of bells (4, 6, 8, 10, 12).
Singles/Doubles/Triples/Caters/Cinques
The names given to ringing on an odd number of bells (3, 5, 7, 9, 11). The names refer to the maximum number of pairs of bells which can swap at a time. In singles there are 3 bells, one bell must stay still and one pair can swap, hence singles; in doubles one bell must stay in the same position and up to 2 pairs can swap, hence doubles.
Plain Course
A piece of ringing of one method or principle which starts and finishes in rounds and where there are no calls.
Method/ Principle
A pattern where the bells weave around each other.In a method there is one or more hunt bell; the hunt bell(s) ring a different, simpler pattern to the other bells. In a principle all of the bells ring the same pattern.
Extent
Where every possible change is rung. On six bells, there are 720 possible changes and the extent takes around 15-25 minutes to ring on handbells.
A Lead
In a method a lead is the number of changes from when the hunt bell (usually the treble) leaves the front until it return there.
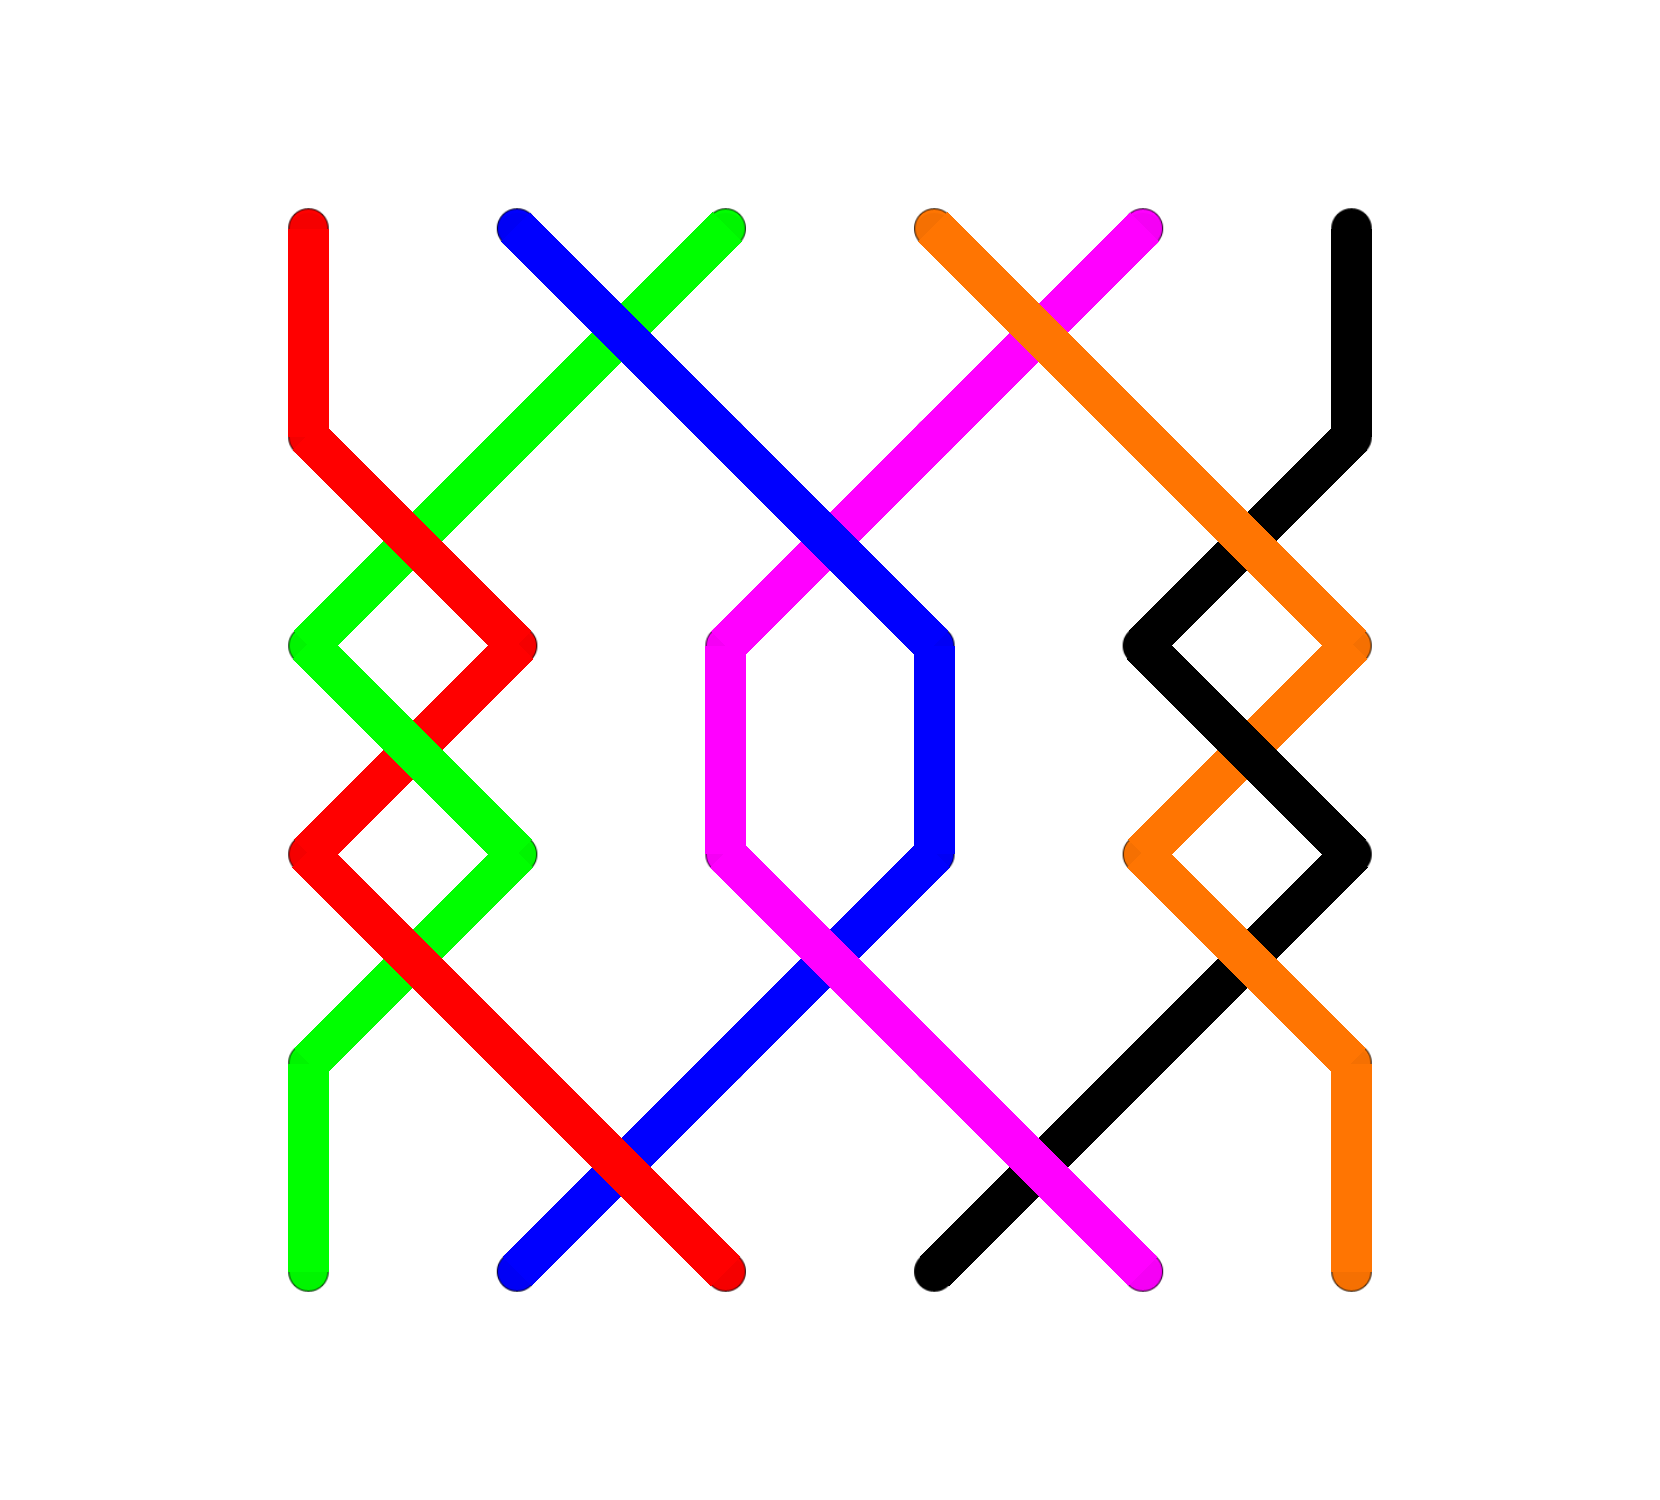
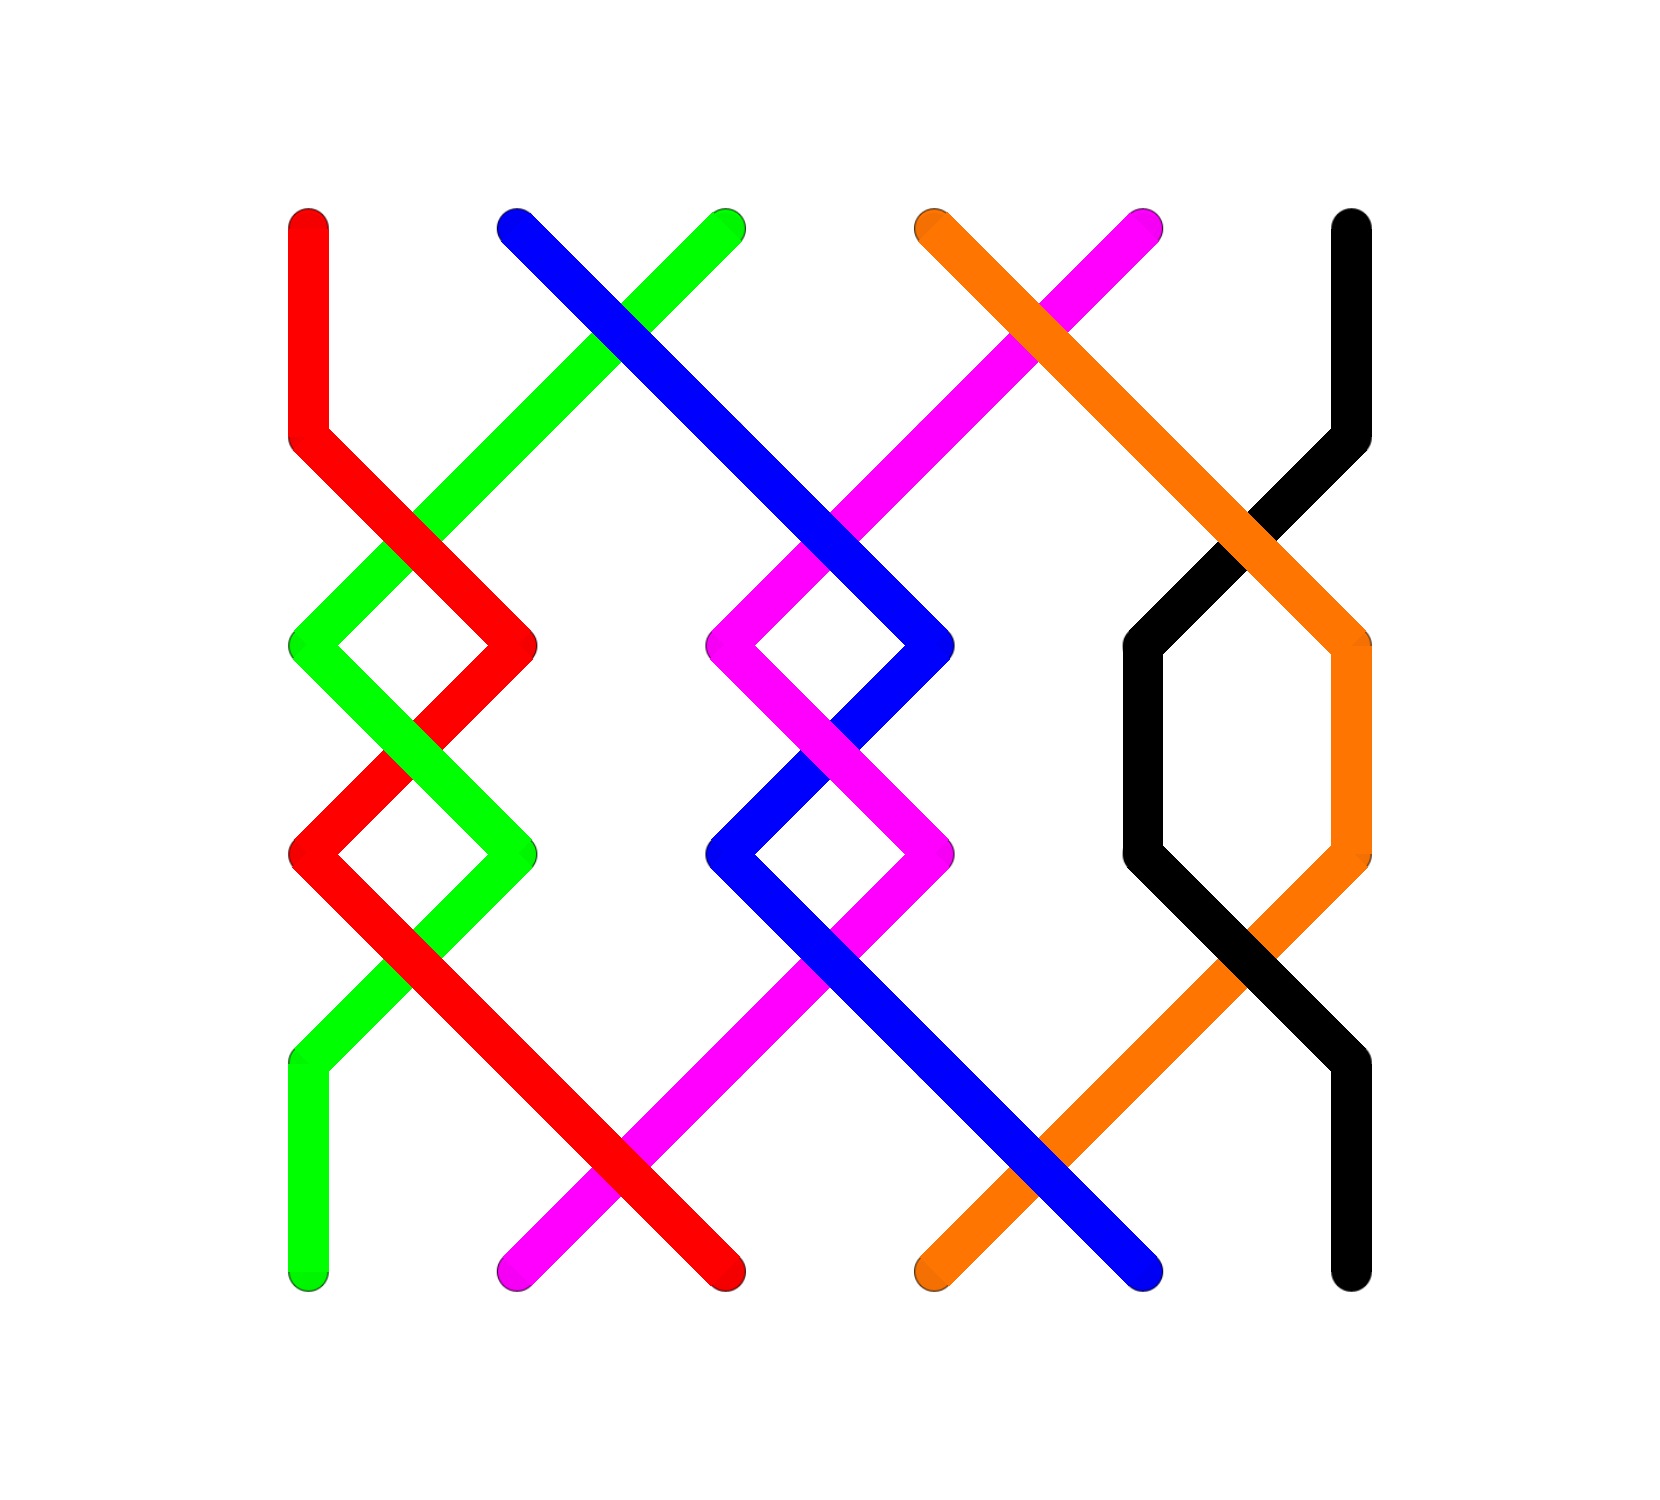
Blue line
When the changes of a method are written out and the place of one bell is traced out to show the shape of the method. A popular book of diagrams traced the places with a blue line and the name has stuck. It means the shape of the path of a bell within a method.
Order of work
A sequence of instruction which define the blue line of a method.For example, the order of work for Plain Bob Minor would be 2nds, 3/4 down, 5/6 down, 5/6 up, 3/4 up.
Lead End
The backstroke of the two blows in lead of the hunt bell (usually the treble). The place you strike your bell at that backstroke tells you which place bell you are for the next lead. This definition of lead end is the one in standard usage, however the correct term for the treble's backstroke lead is lead head, but virtually no-one seems to use use this terminology when actually ringing.
Half lead
The backstroke of the two blows in last place of the hunt bell (usually the treble). The lead is symmetrical about this point.
Dodge
A dodge is a one blow change of direction, the following blow being in the original place before the dodge was performed. Dodges can be in multiples, alternating ringing between these two places.
Place
When a bell stays in the same place for a number of blows, usually 2 blows. A 'right' place is a handstroke and backstroke in the same place; a 'wrong' place is a backstroke and a handstroke in the same place. When learning a method it is helpful to learn whether the places are right or wrong.
Quarter peal
A touch consisting of 1260 or more changes (or at least 1250 changes on eight or more bells).
Peal
A touch consisting of 5040 or more changes (or at least 5000 changes on eight or more bells).
Treble bob hunting
When bells hunt back and forth dodging in 1/2, 3/4, 5/6 etc. The bell alternates between dodging and hunting for each whole pull (for each pair of handstrokes and backstrokes).
Grid
The grid shows the blue line for all of the bells for one lead. The grid is useful to see the underlying structure of the method.
Place notation
A way of writing out the method by stating where places are made between each change. If no bells make a place between two changes, then it is notated with an 'x' indicating that all adjacent pairs of bells cross (e.g. 1-2, 3-4 and 5-6 in Minor). The place notation is unique to each method and is used to define each method. Some ringers learn the place notation to ring the method.
Bob/Single
A command which instructs the ringers to change round in a slightly different way to extend the length of the ringing. Bobs and singles are most often made when the hunt bell is leading. Bobs usually affect the order of three bells and singles two.
Wrong, Home, Make the Bob, In & Out
The names given to certain positions achieved after a bob or single. The names are used to record the composition of a touch. The names are given by the piece of work done by the tenor. In Plain Bob Minor a wrong is the 5/6 up dodge, it is unaffected by a bob or single; a home is the 5/6 down dodge it is unaffected by a bob or single; making the bob (also called fourths) is when two blows are made in 4ths place instead of dodging 3/4 up due to a bob or single being called; In is when the bell hunts down to the lead instead of dodging 3/4 down due to a bob being called; Out is when the bell hunts up away from the lead instead of making 2nds due to a bob or single being called.
Touch
A piece of ringing in which bobs and/or singles are called.
Place bells
The place you ring in at the lead end defines your place bell. The place bell is the lead which that bell would start ringing from rounds. If you learn a method in place bells, or at least know where the lead ends are in a method the conductor has more chance of putting you back into place if you go wrong during ringing. Place bells are also important when splicing different methods together. Knowing the place bell order is exceptionally useful to keep yourself on the blue line whilst ringing.
Coursing order
The order you pass the other bells as you move through the method is the coursing order. The working bells lead and lie in this order. The coursing order rotates but does not change until a bob or single is called. You can learn the way in which the coursing order changes by bobs and singles called in different places, so you can keep track of the coursing order throughout a piece of ringing. If somebody makes a mistake, the coursing order tells you what they should be doing to correct them.
Transposition
Is how you can work out how the coursing order changes due to bobs and singles being called.
Middle
Another name for a position to call a bob or single. Middle only exists for seven or more bells and is the lead end where the tenor becomes 6ths place bell in Major.
Before
Another name for the place where you would call a bob to achieve an 'out'.
1.3. Practising on your own
Tower bell ringers can learn methods and test themselves quite easily by reciting the work of a method or by drawing out the blue line on paper. If they can do this quickly and without error, and their ropesight is good, they can be confident that this will translate into a reliable performance in the tower.
However, for handbell ringers it is much harder to confirm whether you know a method well enough to ring it on handbells, because knowing a single line or a grid pattern doesn’t mean that you can ring two bells based upon this knowledge. To demonstrate that you know a method by drawing it on paper, you would have to be able to draw two lines simultaneously. This is impracticable.
Using thumbs or pens
This slightly old-fashioned method (download this pdf for an explanation) has the advantage that you can practise anywhere, but be mindful of the funny looks you might receive from others. Such practice also has a distinct up and down stroke which ringing using keyboard strokes does not. In many ways ringing using your thumbs or pens is harder than using a ringing simulator as you have no auditory cues (gaps or clashes) telling you if you've made a mistake. The converse is that if you can ring something successfully on thumbs or pens then you've probably got it!
Using a ringing simulator – Abel, Virtual Belfry or Beltower
An alternative is to practise methods with a simulator, using two keys on the keyboard to ring two bells while the simulator rings the rest.
Many ringers seem to manage to ring a simulator using the keyboard quite successfully, but it is generally acknowledged that this is much harder than practising with real ringers. There are a number of reasons for this:
- There is no distinction between handstroke and backstroke when pressing keys. The keyup, keydown option helps with this, but it is no substitute for swinging one's arms up and down.
- Using the keyboard you cannot “internalise” a rhythm based upon the movement of your arms and the timing of the swing.
- The handbell equivalent of “ropesight” is difficult as the screen bells flip instantly between strokes. With real ringers you see the bell you are going to follow start to move and this helps you anticipate the swing of your own bell to ring after it. Abel now has an option for "moving handbells" which move the bells smoothly, more closely simulating the real world situation.
You can find out more about the different ringing software providers and how to purchase/download their software in the simulator resources.
Handbell Controllers
Dummy handbells with electronic switches for clappers can overcome the first two points and includes a design to help you build your own. This website gives more information about handbell controllers.
Handbell Manager
Handbell Manager is free software (under the GNU General Public Licence) that enables USB motion controllers to be used as dummy handbells with simulator software. There is no computer keyboard or mouse interaction required – the controllers are swung to ring two bells and buttons on the controllers are used to start the others ringing, initiate the method and call bobs and singles. Handbell Manager is available from GitHub.
Setting up Abel to ring handbells
Handbell Manager Demo
1.4. Practising online
Ringers are increasingly turning to online, virtual practices to develop their ringing skills and keep in touch. This includes handbell ringers. The ability to ring handbells with anyone, anywhere in the world is especially useful as there are significantly fewer handbell ringers than tower bell ringers.
Why not try one of the virtual platforms to practise your handbell ringing with others?
Ringing Room
Ringing Room is the most popular online ringing site. Handbell ringing is supported using both key strokes and motion controllers. If you want to use Ringing Room to practise handbells, you can either ask fellow ringers to join a practice that you host, or you can visit the Ringing Room Take-hold Lounge to join an advertised practice or ask if others would like to join you to practise. Download these useful tips on using Ringing Room. Click on this link to join Ringing Room.
Handbell Stadium
Handbell Stadium provides a 3D visualisation of a handbell circle and a real life perspective of the other bells in the circle, while you ring your pair using dummy handbell motion controllers in a realistic up and down motion. You can practise with it on your own while the computer rings the other bells, or you can practise/perform over the internet with other ringers. You will need to use motion controllers with Handbell Stadium.
You can join one of the open practices from 8.30-9.30 pm on a Friday night. Discord is used for communication and people need this link to join – https://discord.gg/SKfVTy6 – and motion controllers and Handbell Stadium are required. Click on this link to join Handbell Stadium.
Ding
Ding is a system for simulated bell ringing over the Internet. Ding also has an automated ringer, which will ring as many bells as you want, to any method you want. This allows a small number of people to practise ringing on a large number of bells, or even one person to practise with all the other bells being rung automatically. Ding doesn't have a handbells option, although if you assign yourself to two bells you can ring them as handbells (albeit with ropes showing in the visual.) If you join the Ding Facebook Group you could join one of the practices located there. Click on this link to install Ding.
2. Strong foundation skills
In this chapter we cover the fundamentals of handbell ringing. Whilst some of this might seem a bit detailed it is essential, just as with tower bell ringing, that a newcomer to change ringing on handbells adopts a style that will enable them to develop their skills. The correct ringing position is essential so that the ringer can remain comfortable and relaxed during ringing sessions.
The three positions of Plain Hunt Minor form the basis of handbell ringing for so many methods that it has a number of sub-chapters all to itself.
2.1. The correct ringing position
When not ringing
- Lie the bells down on their side, not mouth down, to protect the spring.
- Don’t clash the bells together – they go out of tune.
- Inter-lock handles with a 90° turn.
Ringing position
- Rivets up or down – consistency to preserve handles.
- Posture, feet flat, back straight.
- Resting knuckles on knees after the down stroke.
- Don't rest the bell on your leg as this kills the hum of the bell.
Ringing rounds
- Make sure on the up stroke that the clapper finishes at rest on the lower lip of the bell (the side of the bell closest to you) – this avoids double clappering on the next down stroke.
- There must be no movement in the leather handle, a firm grip on the handle and then no flex in the leather either on up stroke or the down.
- Flick of the wrist – not a town crier.
- Open handstrokes at the lead.
- Count the sounds of the bells and anticipate your place.
Demonstration of the correct ringing position
2.2. Ringing with others
This page is aimed mainly at those who have not rung tower bells. If you are a confident tower bell ringer you may wish to jump to the next page of this book.
Ringing rounds
Handbells are rung in pairs:
- The lightest pair of bells (1 and 2) are paired. These are known as the trebles.
- The 3 and 4 are paired.
- The heaviest two bells are paired (5 and 6). These are known as the tenors.
You will start off by ringing rounds – in which all the bells ring in sequence from lightest to heaviest – 1 2 3 4 5 6 – with a one-beat gap left at the hand (or up) stroke, known as the open handstroke lead.
Practise ringing rounds on all three pairs until you can ring at a good speed and rhythm with an open handstroke lead. You will learn how to anticipate when to ring – if you wait until the bell before you has sounded you will be too late (or slow).
Ringing changes
Once you can ring rhythmic rounds you need to learn how to ring your bells in a different order and feel comfortable ringing both the left and the right hand first. One person, usually the most experienced or most confident will tell you when to make these changes, but why not have a go yourself – talking whilst you can ring is something you have to practise.
Start with each pair swapping on command to get used to ringing with the left hand in front of the right – 2 1 4 3 6 5. When you've got the hang of that, escalate this exercise so that handstrokes are rung one way and backstrokes the other.
Swap internal pairs (i.e. 2-3 and 4-5) to practise ringing with one bell between your pair – 1 3 2 5 4 6. Combine this with the initial swap to have the bells separated the other way round.
There are lots of other short exercises, including ringing tunes, that will help you learn how to move your bell and still ring rhythmically.
Counting your place
Start by counting the whole row as a baseline. Don't stop when you get to your own bell but continue to count the bells in the row until the end of the change. You many need to start by counting aloud but can then drop actually saying the numbers as you get more proficient. Some people start by not looking and simply counting, but try to start looking at the other bells as soon as can.
Remember that ‘seven’ has two syllables and therefore ringing on eight bells can be a real step up.
2.3. What is Plain Hunt
This page is aimed mainly at those who have not rung tower bells. If you are a confident tower bell ringer you may wish to jump to the next page of this book.
What is Plain Hunt?
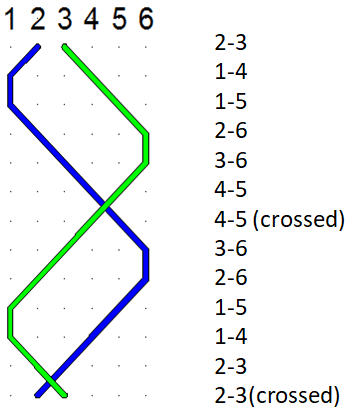
You have already rung rounds and exercises in which you move your bells within the row with someone calling when the changes are made. Plain Hunt is the first time that you will change the position of your bells at every row, using a set of rules to determine the change that is made, rather than being told by the conductor. Let's look at how Plain Hunt works, sometimes known as its structure or place notation.
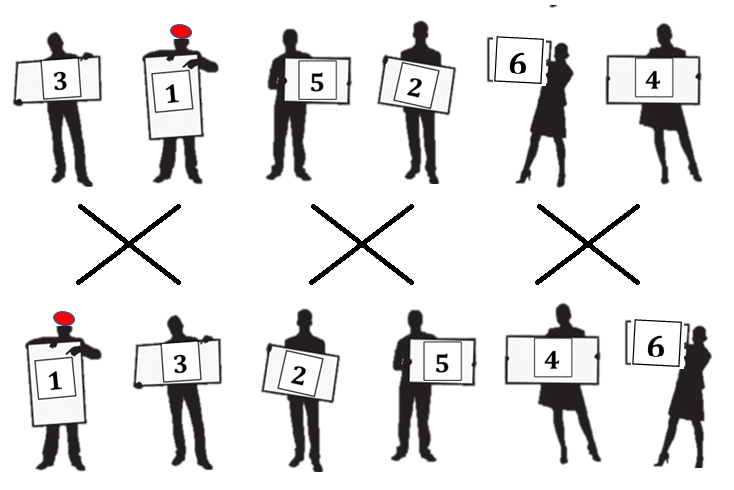
Starting from rounds, pairs of bells (1-2, 3-4 and 5-6) cross:
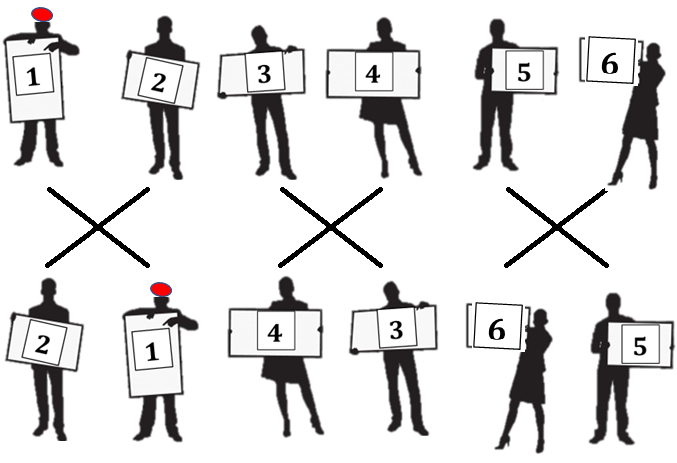
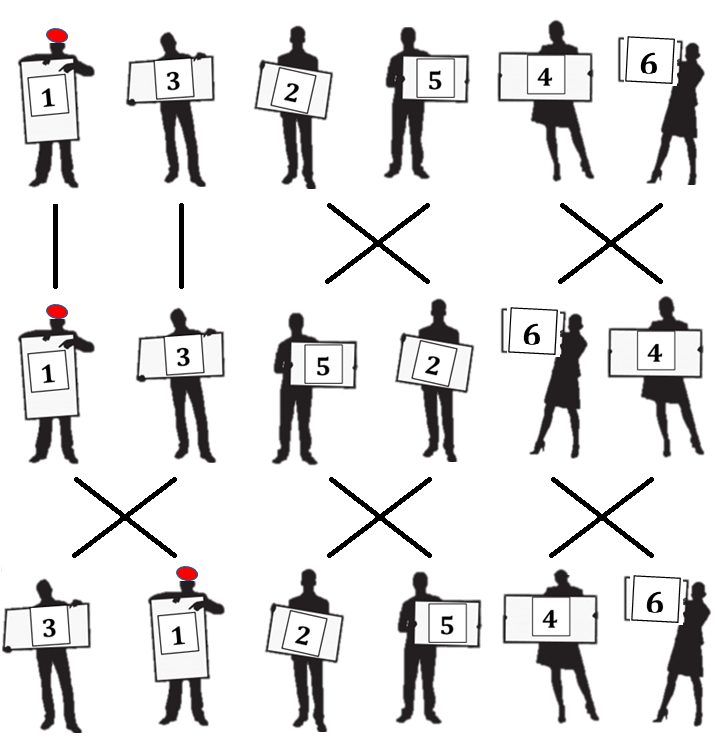
If all the bells crossed again they would arrive back where they started, at rounds. Instead, in Plain Hunt the new bells in first and last position (the 2 and 5) stay where they are and the two inside pairs of bells cross with their new partners:
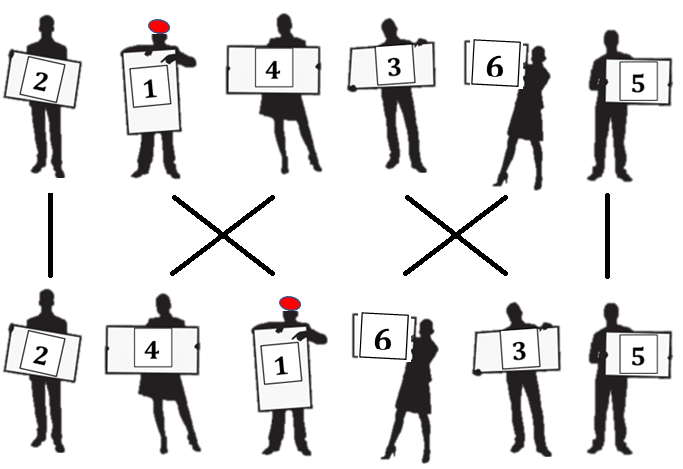
Plain Hunt consists of repeats of these two changes. This is known as a (x16) block, but don't worry too much about that at the moment. Let's look what happens when the three pairs of bells cross again:
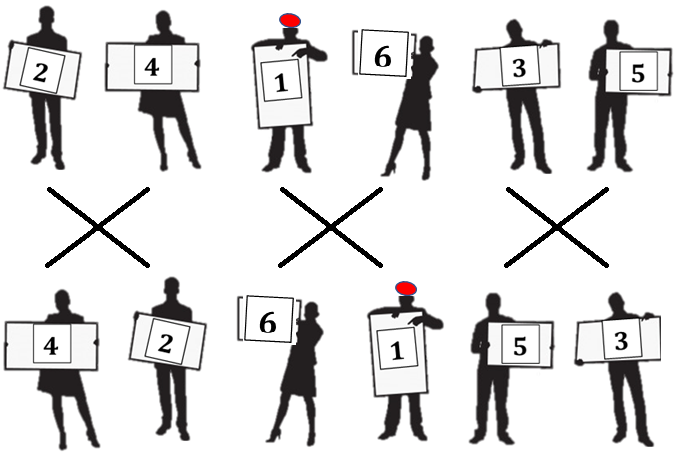
If you look at the place that the treble (1) bell (with the red hat) rings in each row, you'll start to see a pattern, this is the plain hunt pattern. All the bells ring this pattern starting at a different place in rounds at the beginning.
Repeating the operation of alternating all three pairs crossing and then only the two internal pairs crossing will eventually generate rounds again and what ringers call a course of Plain Hunt will have been rung.
Looking not at the people/bells in the above images but the crossing patterns inbetween the rows, the above changes could be written as:
X X X
I X X I
X X X
I X X I etc...
Write out Plain Hunt
Write out Plain Hunt for yourself now with all the bell numbers written in. Alternate between all the bells crossing (bells in positions 1-2, 3-4 and 5-6) then the middle bells crossing (bells in positions 2-3 and 4-5). Here's the start:
1 2 3 4 5 6
2 1 4 3 6 5
2 4 1 6 3 5
4 2 6 1 5 3
4 6 2 5 1 3 etc...
Keep going till you are back at rounds.
Plain Hunt explained
Have a look at the Plain Hunt chapter of the method toolboxes to find out more.
2.4. The three minor positions
Now – how can we ring Plain Hunt on handbells? Happily plain hunting two handbells is easier than it sounds. You will learn the three minor positions, which form the basis of all handbell ringing on 6 bells.
Plain Hunt on handbells explained
The first part of this video (up to 2:35) shows the two things you must think about when ringing Plain Hunt on handbells:
- Knowing which bell in your pair rings first in the row.
- Knowing how many bells to strike between this first bell and your second bell.
Plain Hunt on six bells
On six bells there are three patterns for your left and right hands to master. These are called the coursing position, the opposites position and the 2-3 position. The above video introduced you to the coursing position, rung in this instance by the trebles (1-2).
There are two ways of learning the three positions:
- By learning the two places that your bells ring in each row.
- By learning the first place that you ring in a row and the gap you leave before ringing your second bell.
Have a go at both and see which one works better for you.
Be aware that if both bells are hunting in the same direction then the gap between them remains constant. The gap changes by one if one bell is hunting and the other is making a place. The gap between them shrinks by two if they are hunting towards each other, and increases by two every time they hunt in opposite directions.
You can download diagrams of the three minor positions here.
Coursing position

This is the pattern rung by 1-2 and by 5-6. It is the easiest position to learn and ring. Remember:
- Know which hand is closer to the front in every change (blue or red).
- Know what place that hand is striking in.
- Leave a gap and sound the other hand – signature characteristic of a coursing pair – or learn the number pairs by rote.
- Meet and cross in 1/2 and 5/6.
- You start and end by crossing your bells.
You will recognise that the pattern of a gap of a single bell only alters when one of your pair is called upon to lead or lie. When both bells are hunting the gap of one is maintained.
In the first half of the course you must concentrate on the 2, after the reverse rounds at the halfway point you must then concentrate on the treble. Always concentrate on the first of your bells to strike, count its place, leave a gap and sound the other bell.
Watch the trebles (1-2) ring Plain Hunt in this video. Then recite along with the ringing:
- Either the places they ring in – cross, 1/3, 2/4, 3/5, 4/6/ meet, cross, 4/6, 3/5, 2/4, 1/3, meet
- Or the gaps between them – cross, 1 and 1 between, 2 and 1 between, 3 and 1 between, 4 and 1 between, meet, cross, 4 and 1 between, 3 and 1 between, 2 and 1 between, 1 and 1 between, meet.
The tenors (5-6) also ring the coursing position but start in a different place.
Opposites position
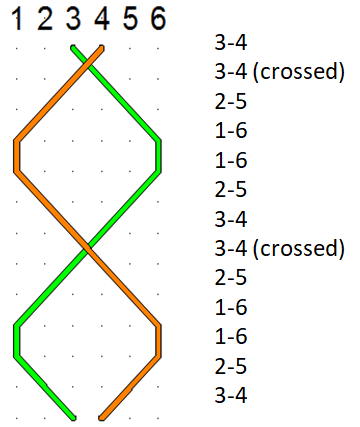
This is the pattern rung by 3-4. It is the second easiest position to learn and ring. The pattern is akin to an object and its reflection with a mirror running down the centre. When one bell sounds in 3rd place the other is in 4th (either side of the mirror). When one bell sounds in 2nd place (one away from the front) the other sounds in 5th (one away from the back), when one bell sounds first the other is last.
In the opposites position the bells meet and cross in 3/4.
You need to keep track of which of your pair is closest to the front, what place it is in and then ring the other bell in the appropriate place. If you have counted the first of your bells to be in 2nd place then the other bell must ring in 5th, if however your first bell is in 3rd then the other bell must be in 4th place.
Do not try to keep track of the position of both bells and to hunt them both – rather keep track of the place of the first of your pair to strike and then simply ring the other bell as a reflection of the first.
Remember which bell is closest to the front of your pair (this is the one you are counting) and which is the reflection. Loudly count 3rd (quietly think 4th for the other hand). Loudly count 2nd (quietly think 5th for the other hand). Loudly count 1st (quietly think last for the other hand) etc.
Watch the 3-4 ring Plain Hunt in this video. Then recite along with the ringing:
- Either the places the bells ring in – cross, 2/5, 1/6, 1/6, 2/5 meet, cross, 2/5, 1/6, 1/6, 2/5, meet.
- Or the gaps between them – cross, 2 between you, 3 between you, 3 between you, 2 between you, meet, cross, 2 between you, 3 between you, 3 between you, 2 between you, meet.
The 2/3 position
And finally, you are ready to look at the look at the last of the three positions, the 2/3 position. It does not relate to any of the traditional pairs, 1-2, 3-4 or 5-6 that ringers ring. It is the position rung if a ringer rang the 2-3 or 4-5.
In the 2/3 position, the bells meet and cross in 2/3 and 4/5.
This is the position in which the bells both hunt in the same direction (in which case the gap between them remains constant) AND hunt towards or away from each other (in which case the gap between them shrinks or increases by 2).
Watch the 3-4 ring Plain Hunt in this video. Note however that the ringing does not start or finish with rounds – 1 2 3 4 5 6 – but with the row – 2 3 4 5 6 1 – which means that the person ringing 3-4 starts by striking in 2nd and 3rd place, so they are ringing the 2-3 position. Sounds complicated but you'll get it when you watch the video.
Recite along with the ringing:
- Either the places the bells ring in – cross, 1/4, 1/5, 2/6, 3/6 meet, cross, 3/6 2/6, 1/5, 1/4, meet.
- Or the gaps between them – cross, 2 between you, 3 between you, 3 between you, 2 between you, meet, cross, 2 between you, 3 between you, 3 between you, 2 between you, meet.
Practising the positions
It is important to practise these positions until they become automatic. This requires you to do your homework. Reciting numbers or mantras or twiddling your thumbs whenever you have a spare moment may feel a bit strange, but it works. Online ringing simulators also help as they will introduce you to the rhythm of the different positions. You can find out more about how to practise on your own here.
2.5. Rhythm and pace
If you listen to the YouTube recordings of handbell ringing below you'll hear how rhythmical the ringing is (on higher numbers it can almost be hypnotic) and how quickly handbells are rung. It takes time and practice to be this good but it is easier to strike well on handbells than on tower bells.
Lockdown handbells – Easter morning 2020
Handbell Performance at the ASCY Anniversary Dinner 2019
Stedman Triples on handbells at Parramatta
Tips
- The rhythm of handbells is the same as tower bells including the need for a full handstroke gap at the lead.
- Ring your bells in the right place, even if someone else doesn't. There is no natural rhythm to handbells and big gaps in a change need to be avoided otherwise ringers can forget their place and the ringing just stops.
- When you're practising on your own, you can slow down the speed of the ringing and gradually increase it when your have learnt something.
- Usually the tenors set and keep the pace.
Ringing by rhythm and place
If you're new to ringing or rely on ringing tower bells by ropesight you will need to learn about ringing by rhythm and place. This YouTube video explains these concepts and has various exercises for you to try during or afterwards. You can practise using a ringing simulator.
3. Ringing your first method
This chapter covers the ringing of a method for the first time − Plain Bob Minor. The skills developed in the previous chapter will be put to good use in this section which culminates with the ringing of a quarter peal. If you struggle with any of the techniques or concepts at this stage, return to the previous chapter and keep practising until the three minor positions become second nature.
3.1. What is Plain Bob Minor
This page is aimed mainly at those who have not rung tower bells. If you are a confident tower bell ringer you may wish to jump to the next page of this book.
What is Plain Bob Minor?
You have already learnt and rung Plain Hunt on six bells and learnt the three handbell positions – coursing, opposites and the 2/3 position. The first method that you go on to ring will be Plain Bob Minor. Let's now look at how Plain Bob Minor works, sometimes known as its structure (which can be represented by place notation).
The good news is that Plain Bob Minor is mainly Plain Hunt. It is only when the treble leads that something different happens – a place (seconds place) is made over the treble for two blows causing the bells above this, in 3/4 and 5/6 to dodge. This happens for five leads in total and then the bells come round. You can find out more about what a dodge is in the method toolbox.
Let's assume you can plain hunt competently and let's pick up plain hunt just before the treble leads. What happens? All the bells (positions 1-2, 3-4 and 5-6) cross, just as they would in plain hunt and the treble (the person with the red head) leads:
Now, if we were ringing Plain Hunt this row would be followed by places being made in 1 and 6 (lead and lie) causing the middle bells to cross and the next row would be rounds −1 2 3 4 5 6. Instead in Plain Bob places are made in 1 and 2 and the bells in 3/4 and 5/6 cross which results in a dodge.
Note that a bell (in this case the 3) leads, makes seconds over the treble and leads again. In the plain course each bell makes seconds over the treble once.
The above changes could be written as:
X X X
I I X X
X X X
Write out Plain Bob Minor
Write out Plain Bob Minor for yourself now with all the bell numbers written in. Alternate between all the bells crossing (bells in positions 1-2, 3-4 and 5-6) then the middle bells crossing (bells in positions 2-3 and 4-5), just as with Plain Hunt. Each time the treble leads, make places in 1-2, rather than 1-6. Here's the start:
1 2 3 4 5 6
2 1 4 3 6 5
2 4 1 6 3 5
4 2 6 1 5 3
4 6 2 5 1 3 etc...
Keep going till you are back at rounds.
Plain Bob Minor cribsheet
Download and print out the Plain Bob Minor handbells cribsheet.
3.2. Plain Bob Minor on handbells
You can download and print out the Plain Bob Minor handbells cribsheet to see the path of each pair and how they change positions at each lead end. Alternatively, you can write it out using coloured pens and develop the cribsheet yourself.
Plain Bob Minor on handbells explained
Whilst you're ringing you need to know two things:
- Which of the three positions you are ringing in.
- When the treble is leading.
You plain hunt until you reach the lead end (when the treble leads). At this change seconds place, rather than sixth place, is made, causing the bells in 3-4 and 5-6 to dodge. You make a shape and pick up a new position – coursing, opposites or the 2/3 position – and continue ringing this position until the next lead end.
Remember that the three different positions are uniquely defined. For example if you find yourself striking in 1st and 6th place of the change then you are in opposites and if you strike 3rd and 6th then you are in the 2/3 position. There is never 3rd and 6th in coursing. If you strike 2nd and 4th you are definitely coursing – there is no choice.
Dodging in Plain Bob Minor
Success in learning to ring handbells depends on ringing your bells as a pair, learning patterns, rather than separately as two blue lines. Plain Bob will introduced to some new important patterns – the three ways that your bells can dodge at the same time. You can dodge with yourself, make a parallel dodge or make a scissors dodge.

Dodging together
Two bells meet, dodge with each other and then part. You may get confused knowing when to part. In Plain Bob Minor (and all other right-place methods) you part on the backstroke. At the beginning you might want to learn the manoeuvre as "meet, cross, cross back for the dodge, cross again and part". Eventually knowing when to part will become automatic.
Parallel dodge
This is probably the easiest dodging pattern to ring as the bells ring in parallel. The dodge disrupts just one blow of the plain hunting pattern, when both bells step backwards for the dodge at backstroke.
Scissors dodge
This is the hardest dodging pattern to learn and confusion can arise knowing when the dodge is finished. Again, you may wish to learn this manoeuvre as "cross, part, meet, and then part".
Plain Bob Minor on the Trebles (1-2)
Some people like to start ringing Plain Bob Minor on the trebles because it is obvious when the treble is leading as you are ringing it yourself. During a plain course however, it will ring all three positions and will change position at every lead end. You need to know your positions and everyone else is relying on you keeping the treble right.
Plain Bob Minor on the Tenors (5-6)
The majority of new handbell ringers start by ringing the tenors. In the plain course the tenors stay coursing except for one lead in which they ring the 2-3 position.
Plain Bob Minor on 3-4
Method Structure
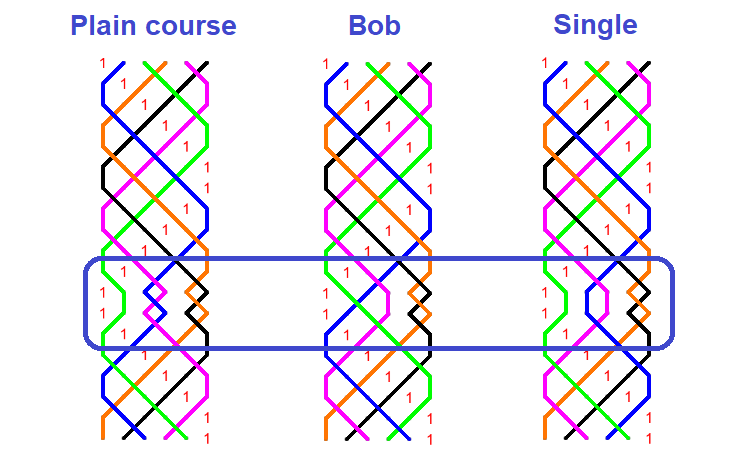
Once you have mastered Plain Hunt you are able to ring the block (x16), but what does this piece of place notation mean?
- The x (cross) means that all bells on their up stroke swap positions in pairs 1-2, 3-4 and 5-6.
- The 16 indicates that places are made in 1 and 6. These places are made on the down stroke so the bells that go up in 1 and 6 place come down in the same position, whilst the other bells have to move so they swap in positions 2-3 and 4-5.
When plain hunting you continue plain hunting until the treble leads again and at the backstroke the bells sound rounds.
In order to generate more changes (different music) whenever the treble leads instead of swapping the middle 2 pairs (2/3 & 4/5) we can swap the pairs in 3/4 and 5/6, and both bells in first and seconds place will stay in the same place for the backstroke that they were at the handstroke. This creates new features, a place is made internally in seconds place over the treble and the bells in 3/4 and 5/6 dodge. We have introduced a new block (x12). This lead and lead end can be repeated four times producing Plain Bob Minor.
3.3. Ringing touches
The effect of the bob
Everybody rings plain hunt until the treble leads. If no bob is called then a (x12) block is rung and you continue ringing Plain Bob. If a bob is called the (x12) at the lead end is replaced by a (x14). The treble and the bell in fourth place remain in position (make places in 1 and 4 at handstroke and backstroke) whilst the bells in 2/3 cross (plain hunt) and those in 5/6 dodge (as in Plain Bob).
The effect of the single
Again, everybody rings plain hunt until the treble leads. If no bob is called then a (x12) block is rung and you continue ringing Plain Bob. If a single is called the (x12) at the lead end is replaced by a (x1234). The front four bells remain in position and make places in 1, 2, 3, 4 at handstroke and backstroke, whilst the bells in 5/6 dodge (as in Plain Bob).
At the lead end, make the shape and pick up or continue with one of the three minor plain hunt patterns.
Picking up your new position
You never change the position you're ringing unless there is a block change and even then it's not necessarily true that you change positions even then. When the new block is introduced, such as the lead end (x12) block in Plain Bob or the (x14) block when a bob is called you only change position if your bells do different things:
- If both of your bells dodge – you stay in the same position.
- If both of your bells make a place – you stay in the same position.
- If both of your bells hunt – you stay in the same position.
- If one of your bells dodges, makes a place or hunts whilst the other does something else – you change position.
How do you know what this new position is? Well you note where you bells strike in the change and relate those two places to one of the positions and ring this new position going forward. There is no ambiguity – each position has unique pairs of places. So if you strike in third and fifth place, you can only be in coursing position, and if you strike in seconds and fifths place, you must be in opposites position.
Why ring touches?
A plain course of Plain Bob Minor is five leads or 60 changes long. Bobs and singles are introduced at the lead end to vary and increase the changes rung – adding variety and length.
Thinking of blocks of changes, the (x12) at the Plain Bob lead end is replaced by a (x14) for a bob and a (x1234) for a single.
The bob or single is called when the treble strikes in seconds place whilst hunting down to the lead.
3.4. Your first quarter peal
Think of a quarter peal as a long touch. If you can ring for such an extended period, it shows that you've really "got" the method.
Practising
- Add the composition to a ringing simulator package and keep practising. If you go wrong, start again at the previous lead end.
- Share and discuss the composition to aid your (and the band's) understanding.
- Practise with increasing length of touches e.g. 120, 360, 540, 720.
Top tips
If you're learning to ring handbells and have not yet rung a quarter peal on tower bells then here's some tips:
- Make sure you rest your arms on your legs at the end of each backstroke.
- Concentrate on an object – this could be a picture above the computer – and if you find your concentration going just focus back on that object.
- If you go wrong, or someone else goes wrong, just keep going!
- If you find you have swapped your bells, just swap them back – we all do this!
- A quarter peal will take at least 30 minutes, probably longer – up to 45/50 minutes depending on the pace of the ringing.
- Make sure there will be no distractions – dogs and cats are notorious and silence mobile and land lines.
- At some point the bells will or may come back into rounds and unless the conductor says 'that's all' continue to ring the method again. If in doubt, carry on ringing the method.
- Try not to watch the clock as it may be distracting and misleading on how much progress you have made.
Here's some thoughts on keeping right written by a ringer like you.
Ringing World
Well done! Don't forget to submit your quarter peal to BellBoard and send it up to the Ringing World for publication.
4. Exploring plain methods
In this chapter we will address the issue of how best to learn and ring new methods on handbells.
If you are already a tower bell ringer you will be used to the techniques based on learning the 'blue line' and following it through the other bells, pausing sometimes to make places, or just treble bobbing up and down, like in Kent with occasional stints of leading and making seconds until the treble re-appears. Sometimes you will have to slide through the 3-4 dodging position instead of doing a dodge. These changes to plain hunt that you are used to are governed by the number and positions of 'places' made by the bells.
When ringing handbells however, there is another technique that is used. Some ringers also use it on towerbells too, although not many who are not handbell ringers of some experience.
This new technique is called 'place notation'. It would serve you well in both tower and handbell ringing if you take time to understand what this technique can offer. You are strongly encouraged to study this rather technical section well and do ask your instructors if you are having difficulties. Everyone had to learn this stuff sometime in their lives.
4.1. Exploring plain methods
The first method that virtually everyone rings on handbells is Plain Bob Minor, but once you are confident ringing short touches the next step is less obvious. It’s very easy at this stage to progress to ringing well-known, named methods, however this can encourage ringing by just using two blue lines, which should be avoided at this stage. Most handbell ringers use a combination of places, grid, lines, and structure (based on where the treble is or what the first bell of their pair is doing) and these different approached need to be learnt and practised.
If you're new to method ringing, this can be an advantage at this stage – you just do as you're told and you have no preconceived notions about what's hard and what isn't. If you're a tower bell method ringer, you will already have ideas about which methods are difficult and often assume that those you've not heard of, must be hard. In fact, what's hard on tower bells can be easy on handbells (and vice versa). Ringing by rules rather than a blue line associated with a method name can magically work and you'll be surprised to find out what "hard" method you've rung.
Place notation
You can read some more about place notation and "breaking the code" from a new ringer's perspective in Learning Tips.
Adding extra pieces of place notation
You already know more than you think. So far you've learnt and rung the:
- x16 block (in Plain Hunt)
- x12 block (in Plain Bob Minor)
- x14 block (bob in Plain Bob Minor)
Adding extra blocks may sound scary, but it's not if you add one block at a time, learning the effect of different blocks in small, easily achievable steps.
Remember, you never change which of the three positions you're ringing unless there is a block change and even then it's not necessarily true that you change positions even then. You've already started to ring by structure when you ring Plain Bob Minor. You know that ring one of the three positions and only even think about changing position when the a new block is introduced, such as the lead end (x12) block. Even then, you only change position if your bells do different things during this block:
- If both of your bells dodge – you stay in the same position.
- If both of your bells make a place – you stay in the same position.
- If both of your bells hunt – you stay in the same position.
- If one of your bells dodges, makes a place or hunts whilst the other does something else – you change position.
How do you know what this new position is? Well, you note where you bells strike in the change and relate those two places to one of the positions and ring this new position going forward. There is no ambiguity – each position has unique pairs of places. So if you strike in third and fifth place, you can only be in coursing position, and if you strike in seconds and fifths place you must be in opposites position.
Doing more with these four blocks
Let's put together the three blocks – x16, x12 and x14 – in different ways to give four more methods. Try to think of these as different arrangements of these three blocks, rather than new methods.
There’s nothing wrong with someone calling the half-lead or the place notation (e.g. x14) whilst you're getting used to the new block order and/or explaining that the place notation leads to one bell (in the case of Little Bob, the treble) making fourths and coming back down to the lead.
Plain Bob Minor
Requires the blocks to be rung in this order – x16 x16 x16 x16 x16 x12 – which we can translate into a rule, plain hunt (x16) until the treble leads when a seconds place (x12) is made, which causes all the bells above to dodge.
Crayford Little Bob
An easy next step is this set of blocks – x16 x14 x16 x16 – which is a lead of Crayford Little Bob
Little Bob
Crayford Little Bob naturally leads on to the second place version – x16 x14 x16 x12 – Little Bob.
Single Oxford
Another way of arranging the blocks is to place the fourths (x14) at either side of the seconds place lead end – x14 x16 x16 x16 x14 x12 – explained as Plain Bob Minor with a fourth place made when the treble moves between 2-3, causing an extra dodge in 5-6. This is Single Oxford
Single Court
If you substitute the x12 block at the lead end with a x16 block you get Single Court.
Adding more blocks
So far, you've expanded your repertoire considerably by mixing and matching the blocks you learnt for Plain Bob Minor. The next step is to look at another block. Take fifths for example. Think what (x56) at the half lead does to the bells.
Reverse Bob Minor
When fifths place is made the bells in 1-2 and 3-4 swap places (dodge) resulting in a parallel up or down manoeuvre and the scissors manoeuvre as in Plain Bob lead ends but involving the first four bells rather than the back four bells. This method is Reverse Bob Minor and is upside down Plain Bob. If you struggle to spot when to do the manoeuvres, then ask someone to call the half lead for you. It won’t be long before you'll be able to spot the half lead on your own, a skill that is so important in handbells.
Double Bob
With a seconds place lead end (x12) and a 5ths place half lead (x56) you get Double Bob – x16 x16 x56 x16 x16 x12.
London New Bob
That only leaves the (x36) block to master. Those in thirds or sixth place stay put, whilst the two bells on the front dodge. The bells in 4/5 swap places, which is what they would have done at a x16 (plain hunt).
If the x36 is added at the half lead then you get a three-lead method, in which 1, 2 and 3 all plain hunt – write this out and you'll see a method you've probably not rung in the tower! While putting in a seconds place lead end (x12) gives London New Bob.
St Clements
Finally – x16 x36 x36 x 36 x16 – with a seconds place lead end (x12) is St Clements.
Double Oxford
The ultimate method to ring having mastered all the places is Double Oxford in which a place is made every whole pull.
What have you learned?
All this mucking around with blocks is the perfect way to develop good handbell skills without the need to ring two blue lines. Ten plain methods have been mastered without Kent Treble Bob Minor even being mentioned.
4.2. Original Minor
Original is a really useful learning method, particularly for learning how blocks of place notation work and can link together.
What is Original?
Original Minor is essentially Plain Hunt with bobs and singles. It is classified as a principle because the treble is no longer a special bell – it is affected by calls in the same manner as all of the other bells (Stedman and Erin are also principles).
How does it work?
All the bells plain hunt until a bob is called. The treble is affected just like any other bell. In minor the bob is called at backstroke:
- The bob is made in fourths place as in Plain Bob.
- The bells in 1/2/3 are unaffected.
- The bells in 5/6 dodge with each other
Note that the calls can be made at consecutive backstrokes so that you are still ringing one bob while the next is being called. You have to develop a high level of concentration to keep listening to the calls and continue counting your place.
Writing out touches of Original

The touch on the left is 24 Original Minor which keeps the trebles unaffected. It is represented on the right by the calling notation (B,P,P,P,P,B)*2.
Substituting place notation (x16) for the plain hunt and (x14) for the bobs gives a place notation of x14x16x16x16x16x14 which can then be used to generate the touch using method viewing software, such as https://rsw.me.uk/blueline/methods/.
5. Treble bob methods
Now is the time to move on from Plain Bob Minor, and in this chapter you will start exploring methods in which the treble no longer plain hunts – the so-called Treble Bob Methods.
5.1. Introduction to treble bob
In treble bob methods the treble no longer plain hunts. Instead it dodges in 1/2 up, 3/4 up, 5/6 up, lie behind in 6ths place, 5/6 down, 3/4 down, 1/2 down, lead. This doubles the number of changes in each lead. The following exercises and methods allow you to practise treble bob hunting.
Treble Bob Hunt
Treble Bob Hunt has all the bells dodging in 1/2 up, 3/4 up, 5/6 up, lie behind in 6ths place, 5/6 down, 3/4 down, 1/2 down, lead. It is false (every change is repeated) but a great training tool. It is also short. A one page cribsheet of Treble Bob Hunt can be downloaded and printed off as a learning aid.
Bastow Little Bob
The treble continuously makes seconds and leads. All the other bells treble bob in 3/4 and 5/6 but when they get to the front they just lead – no dodging in either 1/2 up or down. Note the dodges in 3/4 and 5/6 happen when the treble makes its second blows in seconds place. Maintain whatever pattern you are in through the parallel/scissors dodges when both hands are treble bobbing but note you will change your pattern when one bell leads (under the treble) and the other bell dodges.
Forward Minor
Forward is a principle in which all the bells ring the same work including the treble. The work consists of treble bobbing in 1/2 and 5/6 with Kent places up and down in 3/4. The places are made back/hand with the two blows in fourths are over the same bell. It has plain hunt coursing order so the ropesight will be familiar. It provides a stepping stone to build up towards Kent Treble Bob Minor.
5.2. Kent Treble Bob Minor
Oxford or Kent?
Kent Treble Bob Minor might well be the first Treble Bob Minor method you ring on handbells. Build up to it by ringing the stepping stone exercises/methods of Treble Bob Hunt, Bastow Little Court and Forward Minor. There are advantages and disadvantages of ringing Kent:
Disadvantages:
- The 3/4 Kent places are "wrong" and can often be inaccurately or wrongly struck.
- The 3/4 places whilst difficult to learn aren't used in other methods.
Advantages:
- Kent is often rung in the tower and people are more familiar with it than Oxford.
- Easier to ring and keep right especially for an inexperienced conductor or band that is learning to ring together.
If you're a novice band, you could try ringing Kent with dodging in 3-4 instead of places in order to cement the other rules first. It is false, but that shouldn't be an issue.
How to ring Kent
- The treble rings treble bob throughout.
- If you meet the treble on the front you must dodge with it and thereafter make seconds, lead and make seconds until the treble returns to dodge with you in 1/2. This is called ‘the slow work’.
- Whenever the slow bell makes seconds the other bells dodge in 3/4 and 5/6 (this will feel like Bastow except that it is the ‘slow’ bell making seconds not the treble).
- If the treble is under you when you arrive in 3/4 make Kent places rather than dodge.
- If you "fluff" the places, remember that whichever of the three positions you were ringing when you started the places, you will be leaving the places in the same position.
- Write the places out and learn the patterns for these places.
When you are learning Kent it is perfectly alright for the strongest ringer or the treble ringer to call out "treble dodging in 1-2 now", "lead end" or "hunt above" (the slow bell) or "dodge above" (the slow bell). Adding structural comments like this can stabilise the ringing and help people learn how to ring by watching or listening for the treble. A two page Kent Treble Bob Minor cribsheet can be downloaded for study and reference.
Ringing bobs
The plain hunt block (x16) at the Kent lead end is replaced by a (x14) block when a bob is called. This is the same place notation block as for a bobbed lead of Plain Bob Minor and it has the same effect:
- One bell runs out – the bell just coming out of the slow. In fact it is unaffected by the bob. Remember to make Kent 3/4 place on the way out.
- One bell runs in – the bell just going in to the slow. It, too, is unaffected by the bob.
- Two bells dodge in 5/6. This dodge replaces the plain hunt at the lead end and results in a triple dodge at the back – counted as 'one when the treble is dodging in 1-2 down, one for the bob, and a final one for when the treble is dodging 1-2 after the lead end.
- One bell makes the bob. This is the bell that made 3/4 Kent places up when the treble dodged in 1/2 before the lead end. Before the bob, this bell first makes Kent up, makes two blows in fourths at the lead end followed by Kent places down. This entails ringing thirds, long fourths, thirds and in. This is the most difficult manoeuvre to make – study it before you ring it!
5.3. Oxford Treble Bob Minor
Oxford or Kent?
Oxford is a better stepping stone method (to Surprise methods) than Kent. You can build up to it by ringing the stepping stone exercises/methods of Treble Bob Hunt, Bastow Little Court and Forward Minor. It can, however, go wrong very quickly if any of the ringers miss the 1-2 treble dodge.
How to ring Oxford
- The treble rings treble bob throughout.
- If you meet the treble on the front you must dodge with it and thereafter make seconds, lead and make seconds until the treble returns to dodge with you in 1/2. This is called ‘the slow work’.
- Whenever the slow bell makes seconds the other bells dodge in 3/4 and 5/6 (this will feel like Bastow except that it is the ‘slow’ bell making seconds not the treble).
- If the treble is under you when you arrive in 3/4 make Oxford places rather than dodge.
- If you "fluff" or miss the places you can very quickly find yourself in completely the wrong position and place.
- Write the places out and learn the patterns for these places.
When you are learning Oxford it is perfectly alright for the strongest ringer or the treble ringer to call out "treble dodging in 1-2 now", "lead end" or "hunt above" (the slow bell) or "dodge above" (the slow bell). Adding structural comments like this can stabilise the ringing and help people learn how to ring by watching or listening for the treble. A two page Oxford Treble Bob Minor cribsheet can be downloaded for study and reference.
Ringing bobs
As for Kent, the plain hunt block (x16) at the Oxford lead end is replaced by a (x14) block when a bob is called. This is the same place notation block as for a bobbed lead of Plain Bob Minor and it has the same effect:
- One bell runs out – the bell just coming out of the slow. In fact it is unaffected by the bob. Remember to make Oxford fourths and in after the bob.
- One bell runs in – the bell just going in to the slow. It, too, is unaffected by the bob.
- Two bells dodge in 5/6. This dodge replaces the plain hunt at the lead end and results in a triple dodge at the back – counted as 'one when the treble is dodging in 1-2 down, one for the bob, and a final one for when the treble is dodging 1-2 after the lead end.
- One bell makes the bob. This is the bell that made thirds places when the treble dodged in 1/2 before the lead end. Before the bob, this bell first makes thirds from the back, makes two blows in fourths at the lead end followed by Oxford thirds and out to the back. This entails ringing thirds, fourths, thirds and out. This is the most difficult manoeuvre to make – study it before you ring it!
6. Extending your method ringing
Now is the time to extend your method ringing repetoire into surprise minor and ringing on higher numbers of bells.
6.1. Ringing using place notation
Before we look at how to build up to ringing surprise methods, it will be useful to take a look at place notation − something we've talked about in previous pages, but not fully explored.
What is place notation?
Place notation is a short-hand way of describing a method without drawing a diagram. It is quite possible to ring handbells (particularly on 6 bells) using place notation and is a very useful way of communicating structure whilst ringing. For example, when ringing Oxford Treble Bob Minor, the conductor might well say "Treble is dodging in 1-2", which everyone interprets as "And 3 and 4 places is made here". Even the instruction "lead end now" in Plain Bob Minor tells the band to make seconds over the treble or dodge in 3-4 and 5-6. You might not think of this as ringing by place notation, but that's exactly what you are doing.
Place notation uses four different types of notation:
- An “x” means all adjacent bells swap position
- One or more numbers mean that a place is made in the positions indicated by the number(s)
- A “.” separates places if they come immediately after each other
- A “,” before the last numbers denotes that these places are at the lead head
Using these four types of notation, all the methods that have ever been rung on any number of bells can be defined with a single row of characters.
Plain Bob Minor – place notation is x16x16x16,12
St Clements Minor – place notation is x16x36x36,12
Cambridge Surprise Minor – place notation is x36x14x12x36x14x56,12
This series of characters defines the places that are made at each change. As methods are symmetrical, place notation is usually only written down for the first half lead i.e. until the treble rings at the back of the change.
Place notation on 6 bells
Right place methods on 6 bells have a limited number of building blocks based on place notation:
- (x16) is the plain hunt building block.
- (x12) is the block found at the Plain Bob lead end – seconds is made over the a bell, whilst the other bells dodge in 3/4 and 5/6.
- (x14) is the block found when a bob is called at the Plain Bob lead end – the bell making the bob makes fourths, whilst the other bells in 2/3 plain hunt and the bells in 5/6 dodge. It is also found at the half-lead in Little Bob Minor.
- (x56) is the block found at the half-lead in Reverse Bob or Cambridge Surprise Minor – one bell makes fifths under the treble, which the bells in 1/2 and 3/4 dodge.
- (x36) is the block found in St Clements or New London Bob – it causes a dodge in 1/2, two bells to cross or hunt in 4/5, whilst the bells in thirds and sixths place make a place.
By starting with Plain Hunt and gradually introducing new building blocks it is possible to learn to ring right placed methods using place notation.
Summary
Seconds place (x12)
Causes dodges in 3-4 and 5-6.

Thirds place (x36)
Causes a dodge in 1-2.

Thirds place (x34)
Causes dodges in 1-2 and 5-6.
Fourths place (x14)
Causes a dodge in 5-6.

Fifths place (x56)
Causes dodges in 1-2 and 3-4.
Exercises
A lined piece of paper along with a pencil is all that you need to construct a method using place notation. Select a Treble Bob or Surprise Minor method as it will have more rows to get the hang of the idea in comparison with a plain method. If you want, you could use the Cambridge Surprise Minor place notation from above.
Complex methods
London Surprise Minor
36x36.14x12x36.14x14.36,12
Cambrai Alliance Major
x38x14x18x12x18x3456x78,12
You can check your lines on this site.
6.2. Introduction to Surprise Minor
Outlined below is a suggested pathway taking you from Oxford Treble Bob Minor to Ipswich Surprise Minor, by adding extra blocks of place notation. It is not the only learning pathway. Jeff Ladd has produced a similar pathway From Treble Bob Hunt to Primrose Surprise Minor in 24 steps which you might also wish to use.
Oxford Treble Bob Minor
x34 x16 x12 x16 x12 x16,16
Introduces the third place when the treble dodges in 1-2. This place is common to all right place Surprise methods.
The defining feature of Oxford Treble Bob Minor is the slow bell which leads and makes seconds, starting and ending the lead by dodging with the treble. The seconds is made over each of the other working bells in turn. Every time the slow bell makes seconds (x12) the bells above dodge whilst they hunt (x16) when it is leading. To prevent falseness when the treble dodges in 1-2, right places are made in 3-4.
Be prepared to call the treble dodge in 1-2 as a reminder that the 3-4 places are being made. If the bell ringing the slow is secure, they can also call hunt when they are leading and dodge when they are making seconds.
There is no seconds place version of Oxford. Sandal Treble Bob Minor is a half lead variation of Oxford Treble Bob Minor. A (x56) block replaces the (x12) at the half lead which disrupts the slow work and causes a triple dodge in 3-4 around the half-lead.
Woodbine Delight Minor
x34 x14 x12 x16 x12 x16, 16
Introduces a fourth place when the treble hunts from 2-3, causing a triple dodge in 5-6 and short places in 3-4.
Counting the triple dodge can be challenging. The triple dodge happens when the treble is dodging in 1-2 (first dodge), hunts between 2-3 (second dodge) and when the treble dodges in 5-6 (third dodge). You may wish to ring by watching the treble or ring using some form of mantra. If you are triple dodging with yourself in 5-6 remembering that you part at backstroke can be useful.
Have a good look at the 3-4 places which also happen between the treble's 1-2 and 3-4 dodges. They start/end by dodging with the treble in 3-4 and end/start with a thirds place and hunt at around the lead end. 3-4 places are a common feature of Surprise Minor methods and you will be building on these later on.
It helps when starting to learn Woodbine if someone can call the (x14) when the treble is hunting between 2-3.
Note that Woodbine is an irregular method – it does not have plain bob lead ends. This results in 3-4 and 5-6 ringing the same pattern in the plain course. You can only ring the other position if you call a touch or ring non-standard pairs.
Norwich Surprise Minor
x34 x14 x12 x36 x34 x16, 16
Introduces additional thirds places when the treble hunts from 4-5 and dodges in 5-6.
Norwich builds on Woodbine (in fact it is Woodbine above the treble). You ring Woodbine until the treble passes between 4-5. The (x16) block is replaced by a (x36) block resulting in a dodge below. When the treble dodges in 5-6 the (x12) is replaced with a (x34) block. The slow work is different and you get long places in 3-4.
Although the half-lead is still a plain hunt (x16) block it often needs calling.
Annable's London Surprise Minor
x34 x14 x12 x36 x14 x36, 16
Introduces the Cambridge front work and a non-plain hunt block (x36) at the half lead. The long places in 3-4 are also found in Bourne Surprise Minor.
Bourne Surprise Minor
x36 x14 x12 x36 x34 x36, 12
For the first time third place bell does not make fourths and in to the front, as the (x34) block is replaced by a (x36) block. This cause sixth place bell to hunt straight down to the front - a feature of all the next surprise minor methods.
The sixth place version of Bourne is Hull Surprise Minor.
Cambridge Surprise Minor
x36 x14 x12 x36 x14 x56, 12
The sixth place version of Cambridge is Primrose Surprise Minor
Ipswich Surprise Minor
x36 x14 x12 x36 x14 x16, 12
A variation of Cambridge Surprise Minor in which the (x56) block at the half-lead is replaced by a plain hunt block (x16). The half-lead dodge in 1-2 at the beginning/end of the Cambridge front work and in 3-4 at the beginning/end of the Cambridge 3-4 places are replaced by a hunt. Before you ring the method work out what piece of working you'll be ringing after the half lead as you hunt between 2-3 and 4-5.
If you can't spot the treble at the half-lead then ask someone to call them for you initially.
The sixth place version of Ipswich Surprise Minor is Norfolk Surprise Minor.
Crib sheets
You can make your own crib sheets by copying and pasting the place notation for a method into this website.
6.3. Ringing on higher numbers
Benefits of ringing on higher numbers
- Patterns last longer.
- Reinforces patterns on lower numbers
- More time to settle into pattern before having to look for the treble.
- Tenors are unaffected by bobs.
- Improves rhythm on lower numbers.
- New patterns – unless you ring non-standard pairs (e.g. 1-2 3-5 4-6 7-9 8-10).
Ringing on eight bells
Even if you normally only ring on six bells, the occasional foray into ringing on eight or more bells is not only a welcome change, but also helps develop rhythm and a greater understanding of the three positions in minor and adds a new position:
- The coursing position – hunting with one bell between you.
- The 2/3 position – hunting with 3 bells between you.
- The 3/4 position – hunting with 5 bells between you.
- The opposites (or 4/5 position) – hunting with 7 bells between you.
On eight bells, the 2/3 position (with a gap of 3) becomes much clearer, on 10 bells the 3/4 position (with a gap of 5) becomes clearer etc.
When starting to ring on higher numbers you don't have to stick to the standard pairs. It is much easier to establish a rhythm if everyone rings coursing pairs initially (e.g. 1-2 3-5 4-6 7-9 8-10). The rounds will feel a bit weird and lumpy at first but you'll soon get the hang of it.
You can print out the four positions on this cribsheet and keep them as a handy reference.
Practising the positions
It is important to practise these positions until they become automatic. This requires you to do your homework.
You might look like the nutter in the park, reciting numbers or mantras or twiddling your thumbs whilst sitting on a bench, but it works! Online ringing simulators also help as they will introduce you to the rhythm of the different positions.
7. Calling and conducting
In this chapter you will be introduced to:
- Calling − putting the bobs in the right place
- Conducting − keeping people right
You will be shown how to call Plain Bob Minor (a seconds place method) and Kent/Oxford Treble Bob Minor (sixth place methods).
7.1. Calling positions
Calling touches on handbells is exactly the same as on tower bells. Calls are made at the lead end, and each lead end has a name. Usually this name relates to the place bell of the tenor:
- Wrong (w) – when the tenor is dodging 5/6 up.
- Home (h) – when the tenor is dodging 5/6 down.
- (run) in,
- (run) out
- Make (the bob).
The bob or single is called when the treble rings in 2nd place at backstroke when it is hunting down to the front:
- Wrong – make the call when ringing in 5th place at backstroke before the 5/6 up dodge.
- Home – make the call when lying in 6th place before the 5/6 down dodge.
Some compositions are particularly handbell friendly. For example, they might keep certain pairs mainly ringing the coursing position.
7.2. Writing out a touch
There are at least three ways to write out a touch. Download this article which explains how touches are written out, including in the Ringing World diary.
Touches are often represented by writing out the lead ends rather than all the work:
- A bob is represented by a dash at the beginning of the row.
- A single is represented by an “s” at the beginning of the row.
- For a plain lead no mark is written.
Simple touches
The following 120s of Plain Bob Minor leave the tenor unaffected:

As an example the left hand compostion can also be written as:
- b.p.p.p.b.b.p.p.p.b
- wrong, home, repeated.
Practising calling
Use ringing simulator software to practise calling touches. Load your touch and learn to ring the touch confidently. Work out where the calls come and think about how you are going to call it either b.p.p.p.b.b.p.p.p.b or wrong and home.
7.3. Calling touches of Plain Bob Minor
As soon as the topic of calling is introduced you come face to face with a whole lot of new jargon. If you already call touches on tower bells then this isn't a problem, but if you've not, then you're in for some fun. Persevere! It's not as hard as you might think, once you've learnt how to speak and continue ringing and as long as you've done your homework beforehand.
Note that we're talking about calling touches here. You need to be able to know when to say "bob" and "single". Conducting, the art of keeping others right whilst you do this, is something for much later.
Calling Plain Bob Minor
The first thing you need to practise is saying "bob" in the right place without going wrong yourself. Treat this as an exercise rather than a performance. Ring a pair that you're comfortable with and then say "bob" at the right place in the lead (when the treble rings in 2nd place at backstroke when it is hunting down to the front). If you miss it, don't worry, carry on ringing Plain Bob Minor and try and put it in the right place next lead end. It doesn't matter if the touch doesn't come round or if it keeps on firing out. You're just getting used to talking and ringing at the same time.
When ringing the tenors
Some prefer to call touches when ringing the tenors, mainly because on tower bells compositions are usually written as though you are ringing the tenor.
If you're learning to call touches from 5-6 then start with two singles Home or three bobs Home to keep 5-6 together. Then you can move onto the 120 below which forms the basic block of a quarter peal.
The classic touch of Plain Bob Minor is 120 changes long and has bobs called when the tenor (6) is at Wrong (dodging 5-6 up) and Home (dodging 5-6 down). The bobs are called when the treble is in seconds place just before it leads. At every call the 5 is closer to the front than the 6 so the same touch is easier to call by having the 5 make the bob, run out, run out, Home (for the 5 this is 5-6 up). Write out the touch and you will be able to recognise some signposts:
- The first bob is called at the first lead end and puts the tenors into the 2/3 position.
- When the 6 makes seconds a few leads later then the tenors are put into the opposites position and the next lead end they dodge with themselves in 3/4. If you fluff this dodge, make sure it is the tenor (6) which comes down to the lead.
- The next lead is when the 5 would make seconds so call a bob to have it run out.
- Another bob is called at the next lead (i.e. two consecutive bobs).
- There are no more calls until you are about to dodge with yourself on the back in 5/6. Call this bob and two blows later ’that’s all’.
When ringing the trebles
Handbell ringers who haven't called touches on tower bells often prefer to start calling when ringing the trebles, as they find seeing where the treble is from any other pair, is difficult. When it is in your right hand, it is a lot easier!
If you're learning to call touches from this pair, start with by calling the 2 to when it makes seconds place of the treble (at the end of the plain course). Then move on to call the 2 Home and Wrong.
Practising calling
Use ringing simulator software to practise calling touches. Load your touch and learn to ring the touch confidently. Work out where the calls come and think about how you are going to call it either bpppbbpppbb or wrong and home.
7.4. Calling Original
Original Minor is Plain Hunt with bobs and singles. It is classified as a principle (Stedman and Erin are also principles) because the treble is no longer a special bell – it is affected by calls in the same manner as all of the other bells. Original Minor is a really useful learning method. It does mean that someone needs to be able to say the word 'bob' in the correct place and everyone needs to react to it quickly. If your band is inexperienced a bit of calling practice using one of the ringing simulator packages wouldn’t go amiss.
Calling Original
Don’t be frightened off by having to call Original.
Start by calling a bob to make the treble (or any other bell) run in and run out i.e. keep it plain hunting. This will give you 60 changes. Make the calls at the chosen bell’s backstroke in fourths place on the way down to the front and at the backstroke of the lead. Many ringers new to handbells will find a 60 of Original called in this way quite easy to ring and a lot easier than a plain course of Single Court, not realising that the two are the same!
There are many other short touches of Original that teach how to move from one position to the other and add variety to the practice. Download this cribsheet of Original Minor touches.
Writing out touches of Original

The above touch is 24 Original Minor which keeps the trebles unaffected. It is represented by the calling notation (B,P,P,P,P,B)*2.
Substituting place notation (x16) for the plain hunt and (x14) for the bobs gives a place notation of x14x16x16x16x16x14 which can then be used to generate the touch using method viewing software, such as https://rsw.me.uk/blueline/methods/.
Touches of Original Minor
Bob = 14, Single = 1456
60 Original Minor
Call a bob each time any of the six bells will be in 2-3 (up or down) as the bob takes effect (i.e. it will Plain Hunt)
With treble in 2-3, that will be (B,P,P,P,B,P)*5
With the 5th in 2-3, that will be (P,P,B,P,B,P)*5
24 Original Minor
Keeps 5-6 unaffected
(P,P,B,B,P,P)*2
24 Original Minor
Keeps 1-2 unaffected
(B,P,P,P,P,B)*2
24 Original Minor
Keeps 3-4 unaffected (includes singles)
(P,S,P,P,P,P)*2
80 Original Minor
Treble does 5-6 up dodge, lie, 5-6 down dodge, at the back each time
(P,P,B,P,B,P,P,P,)*5
16 Original Minor
Treble and 2nd Plain Hunt to 4ths and back
(P,B,B,P)*2
21 Original Minor (Backstroke start)
123456 (up)
123456 (down)
123456 (up)
132546 (down)
Then call P,P,B,B,P,B,B,P,B,B
7.5. Calling touches of Kent and Oxford
Both Kent and Oxford are sixth place methods, the lead end comprising a (x16) or plain hunt block. This contrasts with Plain Bob which has a (x12) block at the lead end. To call a bell unaffected, you don't call Wrong or Home, but In and Out (of the slow work).
Three homes
Calling at a wrong or home results in the calling bell being affected.
If you call a bob at the end of each of the first three leads then the tenors ring the same lead (the first lead) three times whilst the other bells practise making the bob, running in and running out. The touch is only three leads long.
In, Out, repeated
Calling any bell (but it is traditionally the tenor) to run in and then run out, two times, will give you a two course touch of 240 changes.
An extent
Calling "In, Out, In" three times, is analogous to the "Wrong, Home Wrong" three times called for a seconds place method.
7.6. Calling a quarter peal
Plain Bob Minor
A quarter peal of Plain Bob Minor requires the conductor to call a surprisingly large number of bobs and singles. This can seem daunting until you understand that the quarter peal is composed of a number of small blocks built up in a logical manner. Knowing how the quarter peal is constructed makes it a lot easier to both put the calls in the right place and keep right – collectively known as conducting.
Which pair to ring?
Ideally it would be good to have the choice – to ring the pair you feel most comfortable with and to also ring with an experienced band of ringers who won't go wrong.
If you've conducted on tower bells, you might feel most comfortable ringing the tenors as you are probably used to calling off the tenor. If you haven't called touches on tower bells you might like to ring the trebles as the lead end is easier to spot when the treble is in your right hand. However, you might find yourself in the situation in which you are the most experienced ringer in the band and have to conduct from the hardest bells to ring, 3/4.
Whichever pair you ring, it pays to do your homework beforehand. Work out how you're going to know when to call the bobs and singles and have a back-up to check who's doing what at some or all of the calls.
Building the quarter peal
This might all look a bit complicated with bobs, singles and coursing orders flying around. Have a piece of paper handy and follow the deconstruction of the quarter peal given below. Start with the plain course and study each building block in turn. When it gets too much stop and have a rest!
When it comes to ringing the quarter peal, you can either practise each block starting with the 120. Or you can "go for" the quarter peal and see how far you get. The point isn't to "score" the quarter peal but to practise longer pieces of ringing. Doesn't mean you can't celebrate appropriately when you do finally "score" though.
A plain course
A lead of Plain Bob Minor is 12 changes long and a plain course consists of 5 leads i.e. 60 changes.
A simple 120
A bob rotates three bells in the coursing order. Calling a bob every time the tenor dodges in 5/6 (up & down) brings the bells back to their original order after four bobs.
| 5 3 2 4 6 | The plain course coursing order | |
| W | 3 2 5 4 6 | The first bob (W) rotates the first three bells in the coursing order (5, 3, 2) |
| H | 3 5 4 2 6 | The second bob (H) rotates the middle three bells (2, 5, 4) |
| W | 5 4 3 2 6 | The third bob, another W, rotates the first three bells (3, 5, 4) |
| H | 5 3 2 4 6 | The fourth bob is at H so it rotates the middle three bells again to return to the original coursing order |
This is two full courses and is 120 changes long.
When ringing the tenors for this touch, the 5 is always closer to the front when the calls are made so it is easier to think of this touch from the point of view of the 5 which MAKES the bob, runs OUT, runs OUT and dodges 5/6 up.
The 360
By omitting the second call at 5/6 up (the final home) the touch lasts for six courses, i.e. 360 changes.
| 5 3 2 4 6 | The plain course coursing order | |
| W | 3 2 5 4 6 | The first bob (W) rotates the first three bells in the coursing order (5, 3, 2) |
| H | 3 5 4 2 6 | The second bob (H) rotates the middle three bells (2, 5, 4) |
| W | 5 4 3 2 6 | The third bob, another W, rotates the first three bells (3, 5, 4). End of first block. |
| W | 4 3 5 2 6 | |
| H | 4 5 3 2 6 | |
| W | 5 3 4 2 6 | End of second block. |
| W | 3 4 5 2 6 | |
| H | 3 5 2 4 6 | |
| W | 5 3 2 4 6 | End of third block. Returns to original coursing order. |
Call the 5 to (MAKE it, Run OUT, Run OUT) three times.
An extent
To get the 12 courses for the full extent (720 changes), call a single at the final home where it would otherwise come round. Call the 5 to:
- MAKE it, Run OUT, Run OUT
- MAKE it, Run OUT, Run OUT
- MAKE it, Run OUT, Run OUT, single at 5/6 up
Repeated.
To put it another way: call a single at the final Home position and repeat the 360 changes now with the 3 & 4 reversed = 720 changes i.e. nine courses short of a quarter peal.
The extra 540 changes - option 1
The extra courses for a quarter peal requires an additional touch of 540 changes. The easiest way to do this is to call WHWHsHs three times. The single at Home (Hs) swaps the second and fourth bells in the coursing order.
| 5 3 2 4 6 | The plain course coursing order | |
| W | 3 2 5 4 6 | The first bob (W) rotates the first three bells in the coursing order (5, 3, 2) |
| H | 3 5 4 2 6 | The second bob (H) rotates the middle three bells (2, 5, 4) |
| W | 5 4 3 2 6 | The third bob, another W, rotates the first three bells (3, 5, 4) |
| Hs | 5 2 3 4 6 | A single at H swaps the 1st and 3rd of the middle three bells (2, 4) |
| Hs | 5 4 3 2 6 | A second single at H (one course later) swaps them back again to the previous coursing order |
| Repeat the above twice to return to the original coursing order |
Calling this whole calling sequence (WHWHsHs) again leads to a coursing order of (5,2,4,3,6) and then once more (WHWHsHs) we have (5,3,2,4,6) – the plain course coursing order after nine courses i.e. 540 changes.
The extra 540 changes - option 2
The alternative approach to the 540 is to call (WHW) x3 with a single at H (exactly as for the 720!) then call 3 x W with a final sH. The advantage of this is that the first half is identical to the first 360 rung and in the second half there are fewer calls and all in the same position. The disadvantage (which is not insignificant) is that 5-6 are not coursing in the final part of the quarter (which they are in the option 1). This can be mitigated by calling the 540 before the 720.
Total 1260 changes, a quarter peal
If you're an inexperienced conductor and the 540 looks a bit difficult, you can always ring two 720 extents and ring a quarter peal of 1440 changes.
Ringing World
Don't forget to submit your quarter peal to BellBoard and ask for it to be included in the Ringing World for publication.
7.7. Understanding coursing order
Coursing order
Have you heard the expression “follow your course bell” and not had a clue what this bit of bell ringing wisdom meant or what to do with it? Like a lot of things in ringing, the concept of coursing order is quite simple to understand but it is routinely very poorly explained, if it is explained at all.
In Plain Hunt and Plain Bob, the coursing order is the order in which you follow the bells, although it is in fact a much deeper property of the way methods are constructed, and so the concept of coursing order can be applied to other methods too.
The easiest way to see the coursing order is by looking at the order that specific bells (e.g. the treble, the 2nd and the 6th) pass the other bells in Plain Hunt. You will notice a circular pattern:
- The treble passes bells in the order – 2 4 6 5 3
- The second passes bells in the order – 1 4 6 5 3
- The sixth passes bells in the order – 5 3 1 2 4
The 5th always courses the 6th, the 3rd courses the 5th and the treble courses the 3rd etc. This is the coursing order and on six bells it is 5 3 1 2 4 6. Extending to higher numbers the coursing order is always the odd bells descending followed by the even bells ascending, so on ten bells the plain course coursing order is 9 7 5 3 1 2 4 6 8 0.
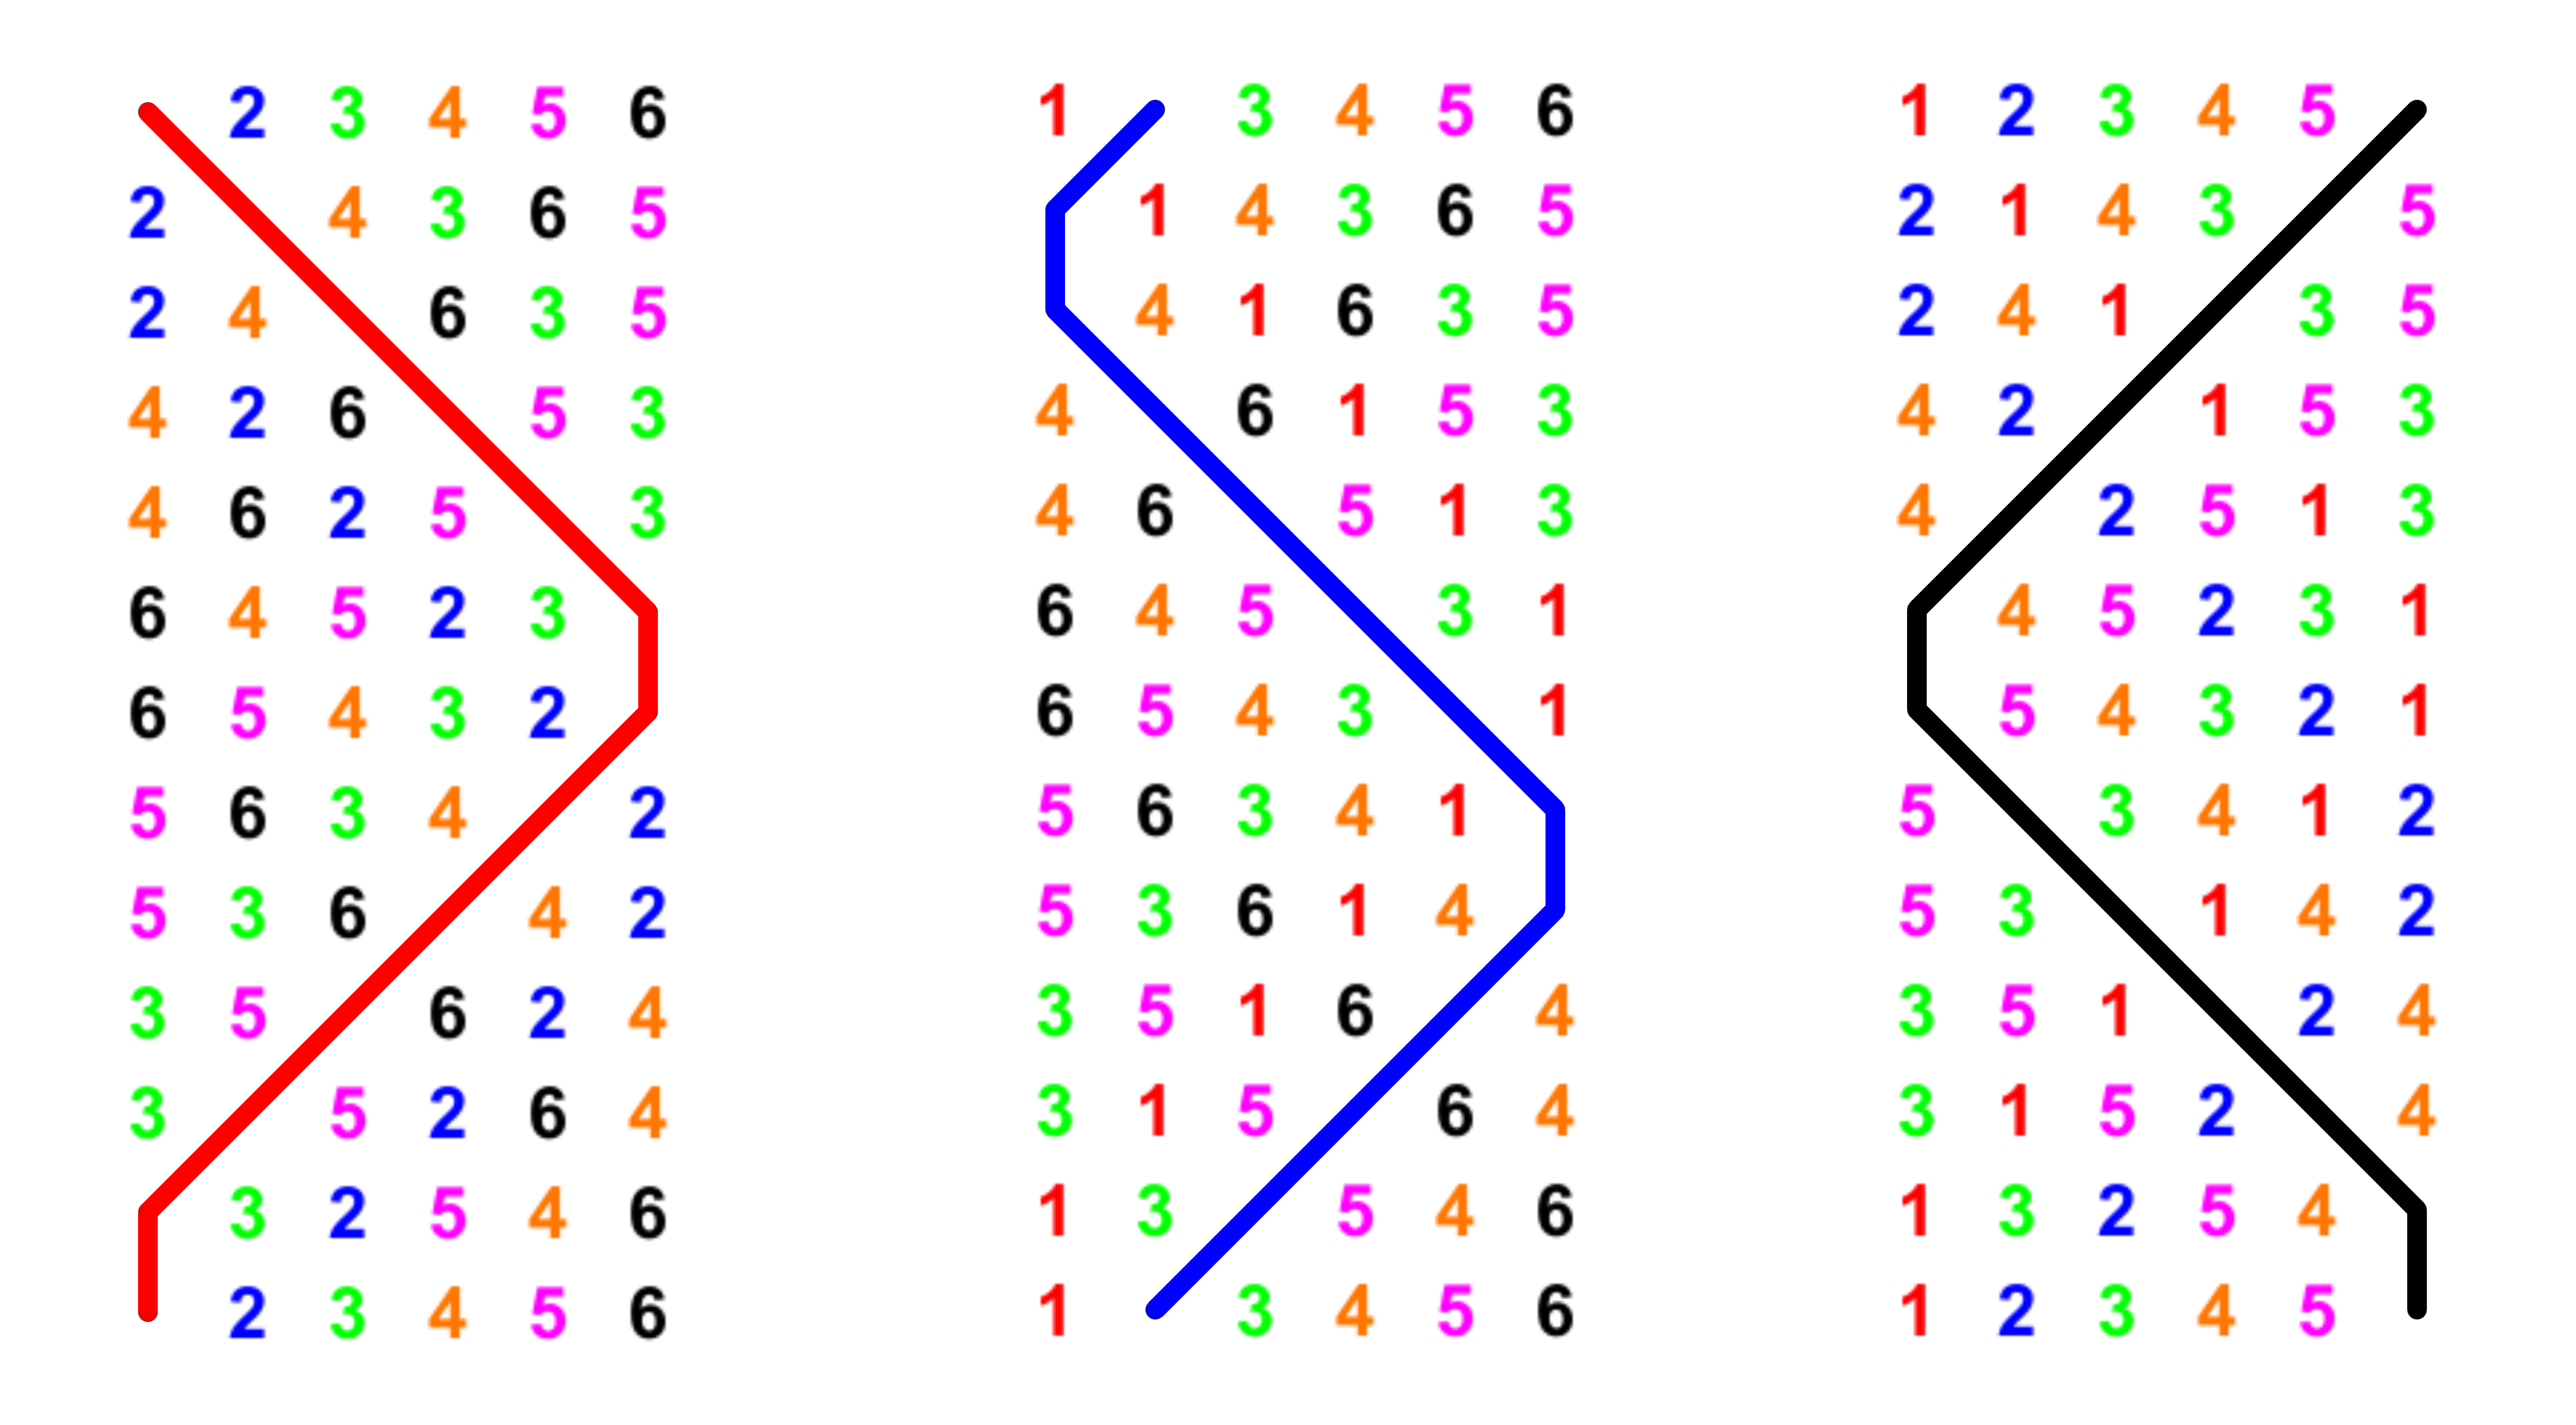
In Plain Hunt and Plain Bob, the coursing order is the order in which many things happen:
- You ring over the other bells in the coursing order.
- The bells come to the front in the coursing order.
- The bells go to the back in the coursing order.
Coursing order is a convenient way of describing how the bells follow each other around in a method, which remains constant between calls. It is easiest to see in plain hunt where it is the order in which the bells come to the front and to the back, (i.e. 531246 in Minor). The order is cyclic, so it repeats and could be written down starting at any point.
In a method the coursing order is defined with the treble omitted (so the above becomes 53246). In Plain Bob this order is constant through all leads of the plain course. Because the coursing order is cyclic – it is conventional to consider the tenor to be at the end (or beginning) and to omit it when written down (so 53246 is written 5324).
Exercises
Get out your coloured pens and paper and write out Plain Hunt on 12 or 20 bells and work out the coursing order. You should be able to see how the coursing order extends to all numbers of bells.
Course and after bells
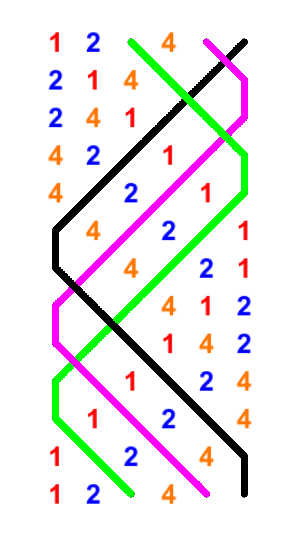
Your course bell is the bell you follow down to the lead – so you might hear someone say “take your course bell off the lead.” Your after bell is the bell that follows you down to lead – hence the instruction “your after bell takes you off the back”.
The coursing order on 6 bells is 653124 i.e. the 5th courses the 6th, the 3rd courses the 5th and the treble courses the 3rd.
- If you're ringing the 5, your course bell is the 6 and your after bell is the 3.
- If you're ringing the 3, your course bell is the 5 and your after bell is the treble.
7.8. Transposition
Keeping others right
Have you ever wondered how conductors keep people right or know if two bells have swapped over? Well... transposition is the answer. It is a method of calculating and writing out touches of methods in a shorthand-way and tells you the order that the place bells occur at each lead head of a method. It might sound complicated but it is easy to do and very useful.
Every time a call (bob or single) is made, the coursing order of the bells changes. Transposition allows you to work out the new coursing order and hence keep people right if they go wrong or tell if two bells have swapped over.
Ask an experienced conductor in your tower or local area to sit down and show you how transposition works; it shouldn’t take more than five minutes so you can do it between touches at a practice. Alternatively there are some good online resources that you can use to teach yourself at home.
8. Teaching handbells
ART principles apply to the teaching of handbells just as for teaching tower bell ringing.
Explain key words
Lead, hunt, rounds, minor, major etc.
Feedback
It's easy to stop at a crunchy bit and review what happened straight-away.
Vary your teaching style
What works with one learner won't work with another, so always look for different ways of explaining and practising concepts.
Whole-part-whole
If someone is not getting something, break it down into smaller parts.
Differentiate lessons and add variety
You'll find lots of ideas on these pages.
Set appropriate targets
Plan for the next lesson. Let your band know what their homework is and ensure the next practice goes along as planned – that way everyone feels a sense of progress.
8.1. Overview
Making the most of your practice sessions
- Practise Plain Hunt a lot and on every adjacent pair.
- Stop in the middle of leads to talk about what just happened and start again just before the tricky bit.
- Ring on higher numbers when you can. You can pick pairs so everyone rings the coursing position.
- Use stepping stone methods when needed – one step at a time is very important.
- Try odd-bell methods now and again (or even-bell methods if teaching odd-bell methods).
- Turn concentration up and down like a dial.
- Keep up the pace.
- Don’t forget to have fun!
Place notation
Take time to dabble with place notation. It is much more relevant to early stage handbell ringing then tower bell ringing. Double Court Bob Minor is boxes around the treble hunting 2/3 and then 4/5 and the same coming back.
Quarter peals
When you're ready, aim to ring a quarter peal each time you meet but don't add pressure onto your group. If you encounter a problem then don’t go back to the start, pick it up from the lead end before the one in which you had a problem and resume from there. It's about the practice afforded by extended ringing rather than scoring the quarter peal.
Quarter peals – two teachers with one learner
- Tenors to Plain Bob Minor.
- Trebles to Plain Bob Minor.
- Calling a quarter peal of Plain Bob Minor from the tenors.
- Inside pair to Plain Bob Minor/Major.
Quarter peals – one teacher with two learners
- Aim for Minor but if it’s too far away:
- Minimus – to build stamina.
- Minimus with 5-6 continuously dodging (good for improving rhythm for the ringer of 5-6).
- 1440 Plain Bob Minor. Call the single at the end of the 360s.
Higher numbers
Don’t delay ringing on higher numbers, because:
- Patterns last longer.
- Reinforces patterns on lower numbers.
- More time to settle into a pattern before having to look for the treble.
- Tenors are unaffected by bobs.
- Improves rhythm on lower numbers.
New patterns – unless your ring odd pairs (1-2, 3-5, 4-6, 7-9, 8-10).
Grandsire Doubles
Why not ring Grandsire Doubles for a bit of light relief? It's easier that you think:
- Trebles course throughout.
- Tenors can be rung by the blue line (as the 6 is the cover bell).
- The 3-4 course for 2 out of the 3 leads.
Watch this video of the 3-4 prior to your practice (rung by the person in the black zipped top), and place your learners on 1-2 and 5-6. Enjoy the great sense of achievement when Grandsire comes round.
Warn everyone to take care when lying at the back – it is made at backstroke and handstroke which may feel a bit weird if you mainly ring even-bell methods.
Or you could try the curious variation called Yule Kegmeg (or Blind Dogs in Norfolk). Starting row 1,2,5,4,6,3,3,3 then 1,2,5,4,6,3. i.e. eight beats at handstroke and beats at back. Then ring Grandsire Doubles with this beat.
8.2. The first lesson
Everyone must have good rhythm and handling but then differentiation is important.
How you start and how you progress depends on the needs of the individual ringer and the capabilities of the supporting band. There is no standard handbell ringing pathway.
Some will make huge strides very quickly and some intermediate steps can be bypassed. Some lack confidence at the beginning and need to be guided slowly via. small easily-achievable steps. Some have lots of knowledge of method structure; others don't.
Here are some suggestions for how you might introduce handbell ringing to different people.
Child learner
Games, call changes, walk-through
Adult with no tower experience
Rhythm exercises, rounds and tunes
Tower bell call change ringer
Plain Hunt with one bell
Tower bell method ringer
Plain Hunt Minor learning the three basic patterns
Conducts peals of surprise
Tenors to Plain Bob Minor
Starting with minimus
When introducing ringing two bells, a good starting point for young children or those lacking in confidence is to ring on four rather than six bells.
Plain Hunt Minimus on 1-2
Plain Hunt Minimus on 3-4
Plain Bob Minimus on 1-2
Plain Bob Minimus on 3-4
8.3. Foundation skills
Whether you are teaching a non-ringer or a proficient tower bell peal ringer they need to develop: good handling, an appropriate action and good rhythm.
Good handling
Consists of good handbell positioning:
- Rivets can be either up or down – but consistency is required to preserve handles.
- Lie the bell down on their side, not mouth down, to protect the spring.
- Don’t clash the bells together – they go out of tune.
- Inter-lock handles with a 90o turn.
- Posture – feet flat, back straight and rest knuckles on knees after the down stroke.
And appropriate action:
- Don’t double clapper – the hand or (up)stroke to be flipped right over so that the mouth of the bell is facing your chest (clapper on downward lip of bell).
- Flick of the wrist – not a town crier. Compact style aids precision.
- Open handstrokes at the lead.
- Count the sounds of the bells and anticipate your place
Good rhythm
Exploring rhythm using rounds and variations.
- Write out rounds and then ring rounds rhythmically.
- Swap two bells, write it out and then ring it rhythmically.
- If your student is not an experienced tower bell ringer discuss the place each of the swapped bells is ringing in.
- Listen to some good handbell ringing.
- Hear the rhythm of even handstroke sounds then backstroke sounds then a (handstroke) gap. Repeat.
- Tap out 3-4 on the table following your 1-2 and before another teacher's 5-6.
- Encourage the practising of rhythm at home through clapping or using a ringing simulator package set to ring either rounds or with the tenor covering.
Call changes and jump changes are remarkably difficult to ring on handbells and although this might be the logical next step on tower bells, it's not on handbells.
Exploring rhythm using tunes
Jingle Bells
4, 4, 4, - 4, 4, 4, - 4, 2, 6-, 5, 4,
3, 3, 3, 3, 3, 4, 4, 4, 5, 5, 4, 5, 2,
4, 4, 4, - 4, 4, 4, - 4, 2, 6-, 5, 4,
3, 3, 3, 3, 3, 4, 4, 2, 2, 3, 5, 6.
Happy Birthday
8, 8, 7, 8, 5, 6, 8, 8, 7, 8, 4, 5,
8, 8, 1, 3, 5, 5, 6, 7,
(3, 6), (3, 6), 3, 5, 4, 5.
The First Noel
6, 7, 8, *, *, 7, 6, 5, 4, *, *, *, 3, 2, 1, *, 2, *, 3, *, 4, *, *, *,
3, 2, 1, *, 2, *, 3, *, 4, *, 3,*, 2, *, 1,*, 4, *, 5, *, 6, *, *, *, *,
Other ideas to reinforce rhythm
The methods toolboxes include further ideas for teaching the rhythm of rounds and leading. Encourage quicker ringing as it really is easier and more rhythmical. Demonstrate this by ringing slow rounds which become gradually faster then back slower again. It is harder to be rhythmical if ringing slowly.
8.4. Plain Bob Minor
Example lesson
Start with a pep talk through the order of patterns:
- For 1-2 – coursing, 2/3, opposites, 2/3, coursing.
- For 5-6 – coursing, coursing, 2/3, coursing, coursing.
- For 3-4 – opposites, 2/3, 2/3, 2/3, opposites.
Announce when the treble is leading to begin with (might have to even if the learner is ringing the trebles).
Start with one lead at a time. If it fires out, start at the previous lead end.
Don’t always start at rounds, practise the tricky bits by starting at the middle lead end or at a roll-up or at back-rounds.
If you get really stuck, watch the videos.
8.5. Plain Hunt
Teaching theory
Hunting is the starting point for all method ringing – make sure everyone understands what it is and how we achieve it – this will be time well spent if you are teaching handbells to non-ringers. It might also be worthwhile going over the theory with tower bell ringers, who can often rely on the blue line to ring it on tower bells, without understanding the underlying structure.
Walking Plain Hunt
Line up your ringers and get them to walk the pattern. Every time they arrive in a new place they should ring one stroke of their bell – or announce their place. Ringers / walkers moving up to the back of the row should walk behind the ringers moving down to the front. This establishes the routine of moving to a new place once a single stroke is rung.
Why not tie a ribbon around someone’s wrist so onlookers can watch one bell’s progression?
Lapping
- Sit three people down at a table with two bells each in front of them on the table.
- The most experienced ringer (or you as teacher) should ring the middle pair.
- Pick up and ring in order right to left. Everyone crosses their hands and replaces their bells in front of them.
- Pick up and ring in order right to left. The end two ringers keep their outside bell in their same hand but place their inside bell on the table closer to the inside of the line of bells – at the same time the centre ringer splits their bells placing each one out towards an outer edge.
- Pick up and ring in order right to left. Everyone crosses their hands and replaces bells in front of them.
- Pick up and ring in order right to left. The end two ringers keep their outside bell in their same hand but place their inside. bell on the table closer to the inside of the line of bells – at the same time the centre ringer splits their bells placing each one out towards an outer edge.
- Repeat until rounds return.
Teaching the three minor positions
The coursing position
- Encourage your students to draw the pattern out in two colours (be consistent – always use red for left hand and blue for right).
- 90% focus on the lead hand, other follows with a gap of one bell or learn the pairs of numbers.
- Lead hand stays the same until the next meet and cross.
- Learn in two halves. Start with all bells up for reverse rounds.
- Ring several times without stopping.
- Ring on higher numbers.
- Trebles to a bob course of Plain Bob Minor.
- Ring Plain Hunt on bells 3-5 or 4-6 or 5-7 or 7-9 or 8-10 – this can be a challenge but it gives everyone the same chance and underlines the nature of coursing.
The opposites position
- Encourage your students to draw the pattern out in two colours – consistent use of colour.
- 90% of the ringer’s focus should be on the lead hand, the other hand follows as a mirror or reflection of the lead hand or learn the pairs of numbers.
- Lead hand stays the same until the next meet and cross.
- Extend by ringing several times without stopping and ring opposites on higher numbers.
The 2/3 position
- Encourage your students to draw the pattern out in two colours – consistent use of colour.
- 90% focus on the lead hand other follows as a gap of three but on only six bells that ‘signature’ is not overly apparent so know your crossing points or learn the pairs of places in each row by rote.
- Be aware that the lead hand stays the same until the next meet and cross, then 2 between, 3 between, 3 between, 2 between, meet, cross.
- Extend by ringing several times without stopping.
Mental agility
These positions form the foundations of all subsequent method ringing and must become automatic. Lots and lots of practice of the three positions is required. To add some variation you can rotate bells (i.e. pass one to the right) and plain hunt from here – twice through, three times through.
Using videos
Watch the plain hunting videos on the ART YouTube channel and count together with your student. Ask them what are they thinking. Ask them to count out loud while they watch.
Helping non-method ringing students
You can download a suggested lesson plan to bring non-method ringing students up to speed with their method ringing colleagues.
8.6. Teaching using place notation
Most experienced handbell ringers use a combination of places, grid, lines, and structure (based on where the treble is or what the first bell of their pair is doing) to ring handbell methods and these different approaches need to be learnt and practised. A small number of teachers teach and ring solely by place notation and can keep bands right who ring this way. Here are some ideas to introduce place notation ringing to your band. If nothing else, they will help your band ring and keep right later on. For example knowing that a fifths place is made under the treble at the half-lead and the structure this produces makes the advice "half-lead now" an easy way to recover a piece of ringing.
Teaching ideas
Seconds place (x12)
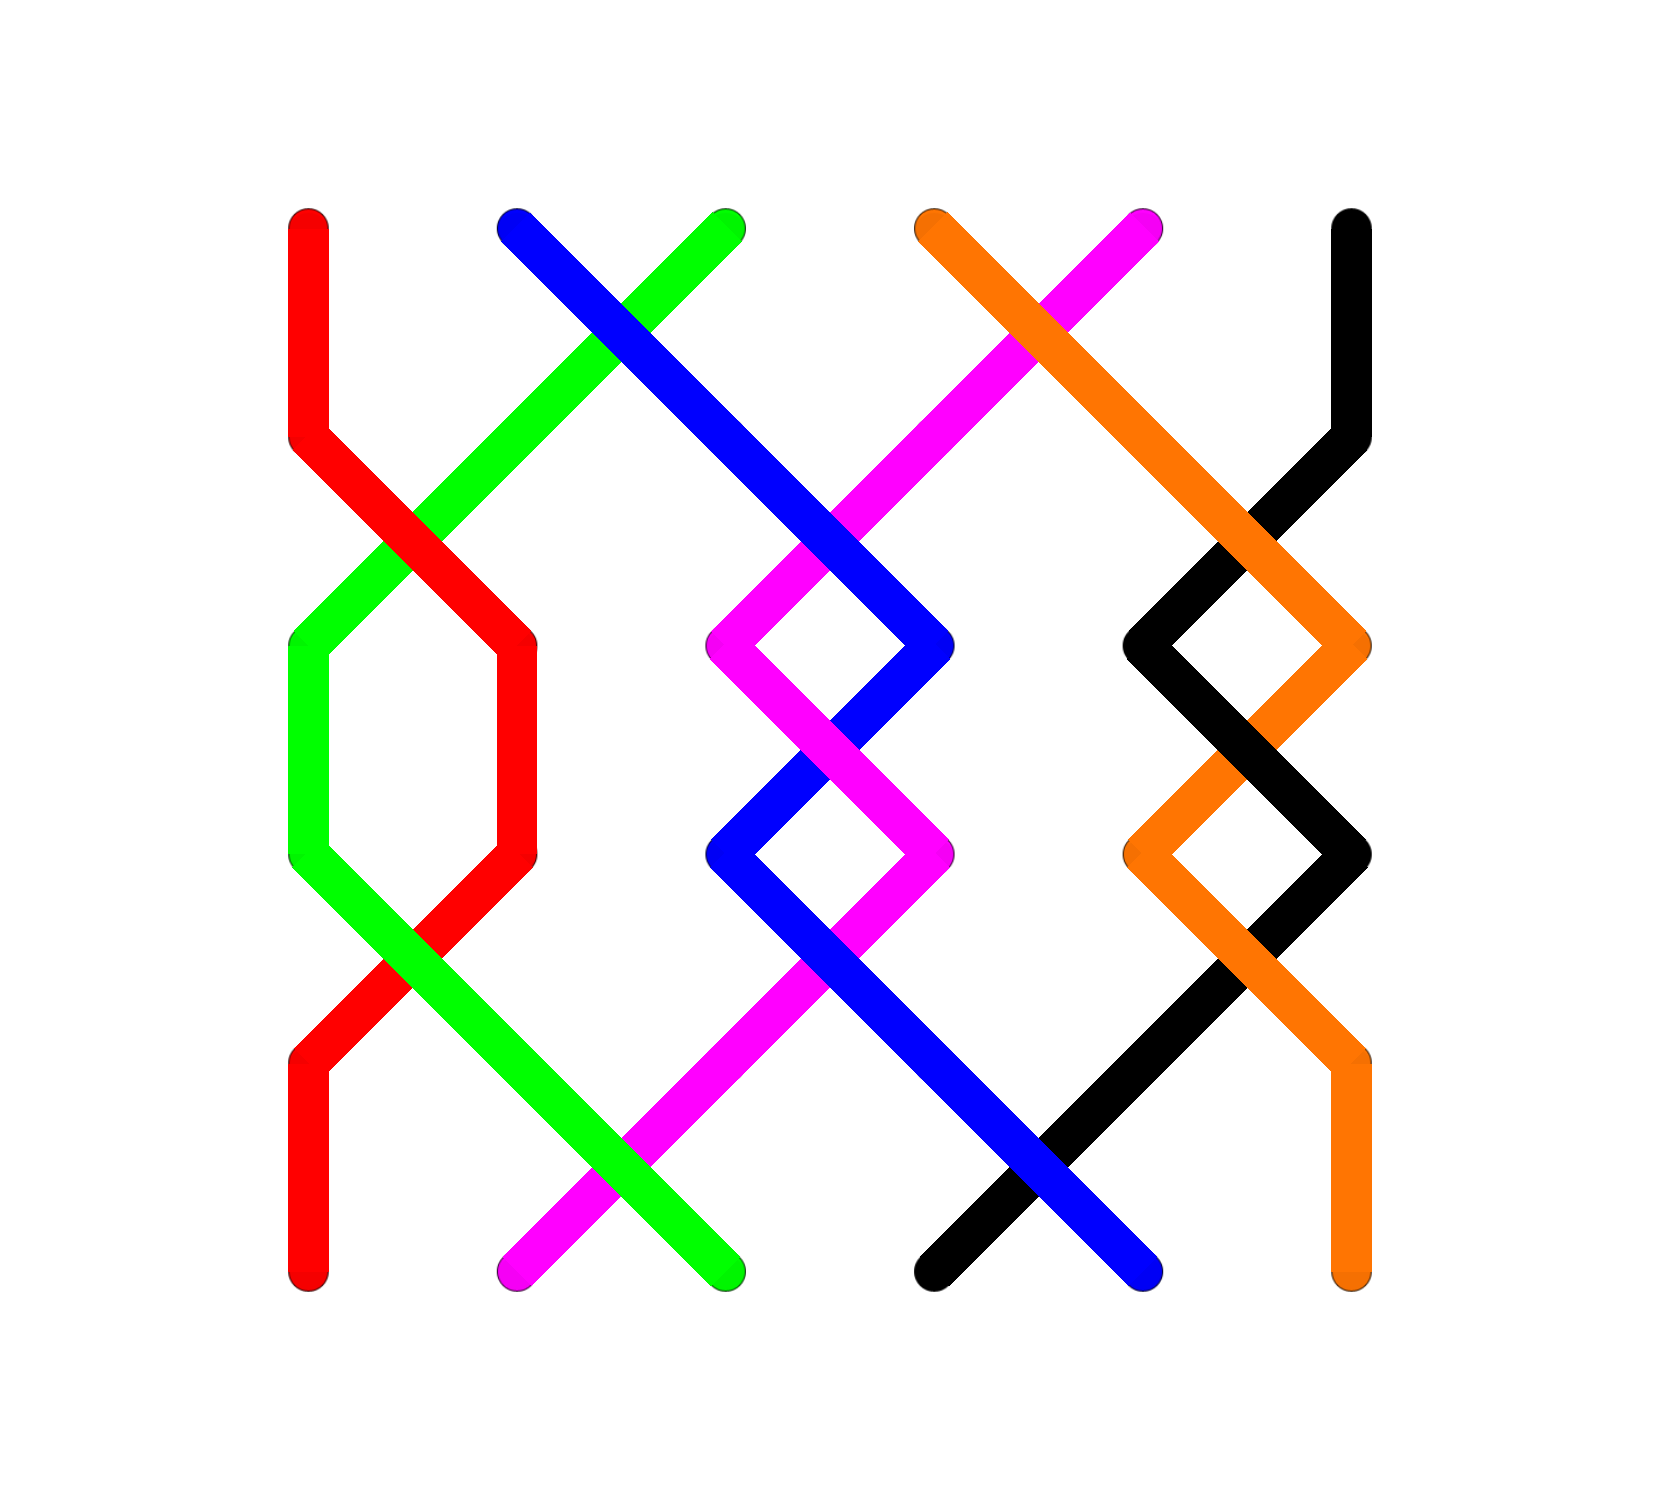
- Call seconds at random whilst ringing Original
- Ring Plain Bob with different bells as the treble
Fourths place (x14)

- Call fourths at random whilst ringing Original
- Ring Single Court (but don't name it) either call the places or use the rule "fourths when treble hunts through 2/3"
Thirds place (x36)

- Call thirds at random whilst ringing Original
- Ring College Bob (St Clements without the 2nds)
Fifths place (x56)

- Call fifths at random whilst ringing Original
- Ring fifths when the treble lies (Reverse Bob)
Combined places
- Double Bob (2nds and 5ths)
- Double Court (3rds and 4ths)
- Single Oxford (4ths and 2nds)
- Double Oxford (3rds, 4ths, 5ths and 2nds)
Treble bob methods
- Oxford is a good start, change the 2nds when the treble is in 5-6 to 4ths (that's Burton Treble Bob)
- Cambridge is 3rds 4ths 2nds 3rds 4ths, 5ths at the half lead and 2nds at the lead head
- This can then be varied by having or not having 5ths at the half lead and 2nds at the lead head (giving three more methods)
Wrong place methods
All these are right place methods (i.e. places are made at backstroke only). Wrong place methods (e.g. London) are more difficult to ring by place notation.