Simulator Toolbox
| Site: | ART Online |
| Course: | Simulator Resources |
| Book: | Simulator Toolbox |
| Printed by: | Guest user |
| Date: | Sunday, 24 November 2024, 3:18 AM |
Table of contents
- 1. Basic information
- 2. Installing a simulator
- 3. Teaching with a simulator
- 3.1. Bell Handling - LtR Level 1
- 3.2. Foundation Skills - LtR Level 2
- 3.3. Introduction to Change Ringing - LtR Level 3
- 3.4. Novice Change Ringer - LtR Level 4
- 3.5. Change Ringer - LtR Level 5
- 3.6. Rhythm, listening and striking
- 3.7. Accuracy statistics
- 3.8. Simulator striking competitions
- 3.9. Developing ropesight
- 3.10. Ringing on higher numbers
- 3.11. How-to guides
- 4. Practising at home
- 5. Extending your simulator capability
1. Basic information
In its simplest form a ringing simulator consists of two things:
- A physical component (hardware) for the student to ring, consisting of one or more sensors to convert the motion into an electrical signal.
- An electronic component (software) that detects the hardware signals and turns the student's action into sound.
The student can either ring a bell that has been silenced or a dumbbell specially constructed for training purposes. In either case, sensors are attached to the wheel in order to convert the movement and position of the bell into an electronic signal. The software converts these electronic signals into sound, giving feedback to the student either alone or by mixing the sound of the bell rung by the student with other simulated bells. The student can then learn to control and ring the bell at first and then to adjust the sound of their bell to fit in with the "perfect" timing of the computer.
Students can also practise at home by pressing a key on the keyboard to make a sound.
When someone is new to ringing there are a number of skills that they need to master in order to successfully progress to call changes and method ringing. The latest simulator software is a useful tool to help develop skills such as: listening; an understanding of place in a row; an ability to control a bell sufficiently well to be able to ring it to any of the three speeds of ringing on any stroke; leading and ropesight.
What a little simulation can do
Simulators can save time and manpower whilst benefiting students at the early stages of their ringing careers. They allow the student to practise listening and bell control without the necessity of the whole band being present. In summary, simulators allow:
- Unlimited practice which won't disturb the neighbours.
- Unlimited practice at rounds and beyond without needing the help of other ringers.
- Non-judgemental feedback on striking.
- Practise ringing on higher numbers and methods unsupported by the local tower/band.
All in all, a very powerful training tool for both new and experienced ringers.
With simulators, people seem more relaxed about trying things that could go wrong – because they know they are keeping their mistakes to themselves in the tower. With open bells, some ringers are uneasy about trying something ambitious as they are worried about making a racket or a fool of themselves – a simulator liberates them from that.
How much does a ringing simulator cost?
For the basic installation, not too much. To get started on one bell:
- Cost of bell silencing with a rope = zero
- Single sensor and DIY installation = £150
- Laptop or PC (donated) = zero
- Simulator software = £20
A reconditioned Windows PC with screen, keyboard and mouse can be bought for as little as £90 and a reconditioned 14” Windows 7 laptop from £120. If you're not confident then installation can be part of the sensor package.
Remember you can start small and build up your capability over time.
Learning to ring using a simulator
A student learning to cover
Learning on dumbbells at the Worcester Teaching Centre
1.1. Simulator map
If you want to see a simulator in action prior to getting one yourself, use the simulator map to find and contact an existing working simulator.
1.2. Pop-up simulation
Wireless sensors that are simple and straight forward to set-up, give the possibility of easily portable, "pop-up” silent ringing in any tower.
When teaching a new ringer from scratch it can take varying amounts of rope time, but, often long periods of repetitive ringing whether you are teaching traditionally or practising for Learning the Ropes Levels 1 and 2. This can be very annoying to your neighbours so “silent practice” has the significant benefit of allowing you to ring for longer periods or at unsociable hours, or on multiple bells teaching a number of ringers at the same time. It also offers a lot of useful information for feedback and allows the learner to ring with other bells without the need for actual ringers!
Silent practice can be used at the various ringing centres and towers fitted with simulators BUT the original idea behind Belfree and Simbell was to make silent practice available in any tower, on a temporary basis. Steve Farmer (Simbel) and I (Belfree) have found since the launch of our products that nearly all interest has been for full installations of six or eight bell setups for various towers. Part of our original concept for these new types of wireless sensors was that they should be simple and straight forward to set-up, thus giving the possibility of easily portable, ”pop-up” silent ringing in any tower.
All that is required is a clapper “full muffle” or “tie” (i.e. motorcycle tyre segment, other such muffle or rope), a single sensor mounted on the training bell, and a dongle receiver which plugs into a reasonable specification Windows PC running one of the simulator software packages (Abel, Beltower or Virtual Belfry) or for for teaching bell handling just software that goes “bong” at the right time! This applies to both Belfree and Simbell sensor setups.
In the near future it will be possible to attach the dongle to a suitable Android Smart Phone or Tablet running the newly released Methodology app but in the meantime it is possible to buy a reasonable spec second hand Windows 8 or 10 PC online for £200 to £400.
Belfree uses a simple mount which is fastened to the wheel and the sensor clipped in. Simbell uses reflective tape which is attached to the wheel and the photo sensor fastened to the frame with Velcro or zip ties as per the instructions on the respective websites. Both offer a “try before you buy” option for the sensors. See the respective websites for further information.
All you should have to do then is to plug in the dongle and open and set up your chosen simulator package and away you go. In either case it’s then easy to leave either the mount or the reflective tape on the wheel making it easy and quick to set up prior to a practice session and pass on to another tower in-between if required.
For LtR Level 2 practice you can use the simulator with the learner ringing any bell to simulate covering or ringing rounds with a set of perfect ringers; no need for your band to ring endless rounds in the early stages of learning. The striking statistics can be very useful for giving immediate feedback and also provides a valuable measure of progress and in some cases, especially for younger learners, a competitive element to keep them interested.
“It’s not rocket science” and can make a huge difference to the amount of rope time you can make available. Simulation is NOT just for ringing centres and I would strongly recommend anyone interested to attend one of the ART Simulator Awareness Workshops where you can learn how to set things up and teach bell ringing using this technology.
Tony Croft, Hathern, Leicestershire
2. Installing a simulator
Installation of a simulator can be straightfoward but usually involves rummaging around amongst the bells. To accurately sense the position of the bell, essential for the software to ding the bell at the right time, the sensors must be placed carefully and fixed firmly to the bell frame.
Be prepared to spend a bit of time fine tuning such things before being able to use the simulator and hear the bells hopefully at the time you expect!
ART merely informs and advises where it can – it does not have any software or hardware bias or make any recommendations.
2.1. Design considerations
Before you purchase anything, think about how you are going to use your simulator:
- A form of sound control
- One-on-one practice
- Multiple workstations
Do talk to your neighbouring towers and your local ringing society to see what use they might like to make of the system and whether you can collaborate on funding or installation.
Sound control
If you just need an alternative form of sound control, you can do this relatively cheaply, but you will be missing out on many of the benefits of a simulator. If your bells are difficult to access so that you can silence them, why not consider one or more dumbbells in the clockroom?
One-on-one teaching
If you are going to use your simulator for one-on-one practice, you will need a screen (either a TV screen or projector and screen) but it does not need to be a large one. To make the most of this set-up a triple action foot-switch is recommended.
Multiple workstations
You can have more than one workstation so that several ringers can practise different things at the same time. You wil need several computers and several sets of headphones. Some sensor systems are unable to cope with multiple workstations so future plans may influence your choice of system.
If you plan to have multiple workstations do give some thought to where the computers will be placed and to cable management. Budget for additional power sockets to be professionally installed.
And finally...
Don't try to do things on a shoe-string. Be bold. Many ringing societies will contribute to improvements in teaching facilities from their bell restoration or training funds and you should certainly allow for this in any bell restoration project. There are many local charities who will contribute to imaginative projects, especially when they involve people gaining access to heritage and work with young people.
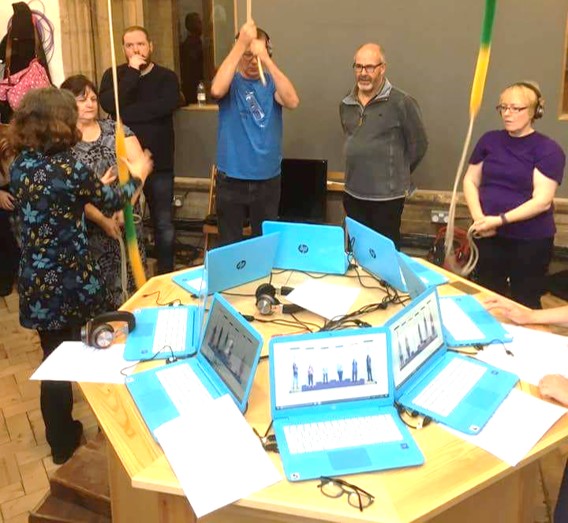
Ringing simulator with multiple workstations at Mancroft Ringing Discovery Centre
2.2. Silencing Bells
Equipment used to silence a bell should only be fitted or removed when the bells are in the 'down' position (never when the bells are up). They should be fitted securely to ensure that they do not slip around during the ringing. Always work in the bell chamber with someone else. If lone working cannot be avoided, take a mobile phone with you and let someone else know that you are working on the bells and how long this work should take. For the most up to date advice, refer to the CCCBR website
Bicycle inner tubes
Bicycle inner tubes act as a large rubber band and can be used to hold the clapper centrally or to one side. They are relatively cheap and quick to fit and remove, the top end being looped over one of the nuts on the headstock. If the tube is too long, you can shorten it by tying a simple knot in the middle of the tube. |
Motor-cycle tyres
An alternative method is to cut an old motor-cycle tyre into sections. Old tyres are easy to get hold of as garages need to dispose of them and they produce a heavily muffled sound on both strokes. Being fixed to the clapper means that they do not affect the set of the bell. |
Hinged wooden clamps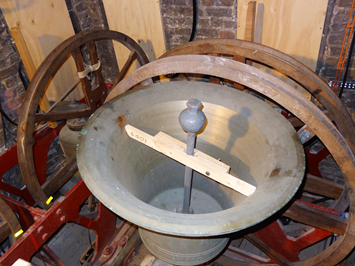
Hinged wooden clamps, secured to the bell with a wing nut locking mechanism, can clamp the clapper in the centre of the bell and are easy to make. These can sometimes work loose if not tightened properly and need to be tailored to fit the diameter of each bell. One disadvantage of clamping the clapper centrally is that it makes the bell lighter set on both strokes, as the weight of the clapper is not working so effectively at holding the bell on the stay. |
Rope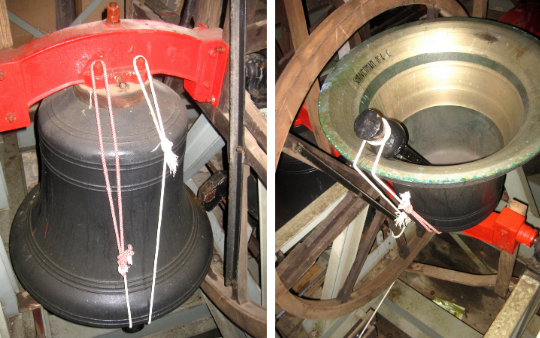
Position yourself comfortably on one side of the bell. Pass one end of the rope around the top of the bell under the headstock making a loop. Tie a packer’s knot where shown. And pull reasonably tight. Twist the loop round so that the long end of the rope hangs down on the far side of the bell. Reach under the bell and pull the loose end of rope fairly taut against the middle of the far side of the lip of the bell. Then tie a clove-hitch around the narrow part of the flight as shown. With practice you can make the knot and then slip it over the flight. Adjust if necessary so that the clapper is about in the middle of the bell and pull tight. Bring the loose end of the rope to your side of the bell and pass the end through the loop that you made at the beginning. Pull the rope towards you very tightly. Secure it with two half hitches. Tuck in any loose rope securely. |

2.3. Simulator software
Key features of the software applications
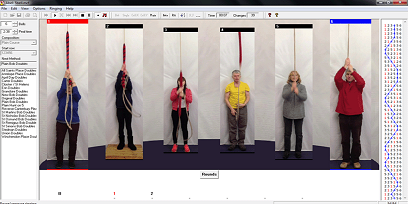
All of the packages have huge amounts of functionality and this is evolving all of the time. There are currently three main software applications offering full simulation on PCs. All have developed a "moving ropes" screen with videos of real ringers to give a virtual reality effect.
Besides the graphic displays, which can be viewed as you ring or afterwards to see how well you have done, the latest releases of all three software packages include the facility to record your ringing and to play it back afterwards.
The packages all include accuracy statistics allowing you to measure how your performance improves over time. There are usually two statistics: one measures the overall error at each stroke; this can be useful in a tower situation to tell whether you are consistently quick on one stroke or another. As errors can be positive or negative and cancel each other out, a second statistic, "average error" or "standard deviation", is usually provided, which measures how variable the striking is overall.
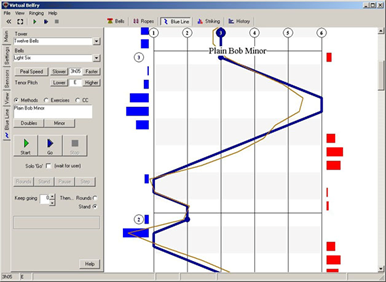
Once you have mastered ringing a bell at a steady speed in rounds, you can then move on to practising call changes. At home or on your smartphone, you can use the software to help understand the theory. In the tower, with an instructor, you can practise physically ringing the bell quicker or slower at handstroke. Kaleidoscope exercises allow you to practise changing place at backstroke as well, and to increase the frequency of the changes of speed, till you have mastered the three speeds of ringing at both strokes. These exercises are pre-programmed into some of the packages, as are most of the exercises for Learning the Ropes Levels 2 to 5.
All of the packages have video clips of moving ringers so that when practising on a bell with a sensor you can watch the other ropes and practise your ropesight. They also include features to help you spot which bell you should be following, such as flashes or winks.
Abel
|
Beltower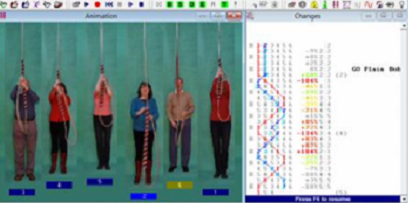
Developed by Derek Ballard, the Beltower licence has been extended to allow any version of Beltower previously supplied by the author to be installed in any bell tower or mini-ring for training purposes. BelTutor (the cut down version for training) is effectively freeware and may be copied and passed around freely. |
Virtual Belfry Developed by Doug Nichols, each copy of Virtual Belfry is licensed to a particular computer, although if you own several computers, additional license keys are provided free of charge. Developed by Doug Nichols, each copy of Virtual Belfry is licensed to a particular computer, although if you own several computers, additional license keys are provided free of charge. |
 Abel is probably the commonest application in use and was first released by Chris Hughes in 1993. Since then ringers have bought more than 10,000 copies. If you have an older version of Abel it can be upgraded for free by downloading an update from the Abel website.
2.4. Sensors
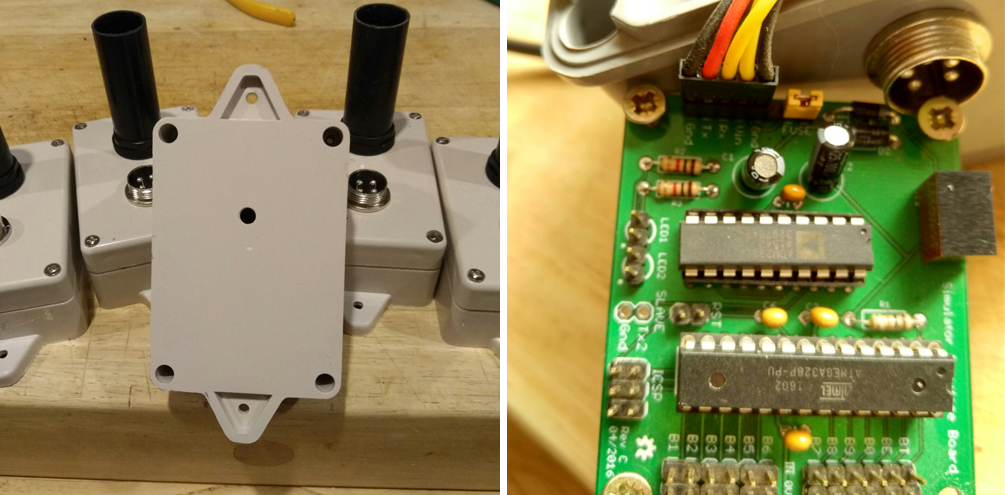
There are a number of different sensor systems on the market and there is also the option to make your own. Each sensor system has advantages and disadvantages. The number of sensors and how you intend to use the system all need to be considered carefully before choosing a system:
- Unless you are confident about electronics, you would be best advised to purchase a tried and tested off-the-shelf system.
- Hard-wired or wireless? Hard-wired systems are the most common, although cable management is an issue. The newer wireless sensors avoid the problems of cables running around the bell frame and are easily transported. The same set of sensors can be used in more than one tower.
- If you are using the installation for teaching, you may only need sensors on one or two bells. However, the systems also double up as an alternative to installing sound control and you may want all of the bells connected.
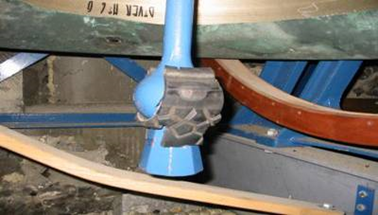
Optical sensors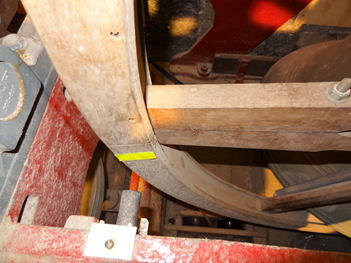
For over 20 years David Bagley has been making optical sensor systems. The sensors themselves can be fitted to the frame either with screws or by wrapping plastic insulation tape around them and the frame. Similarly, plastic insulation tape can be used to clip the cables out of the way. How do they work? Light generated by a LED strikes a reflective strip on the wheel and the sensor sends a signal to the computer. The reflective strip is placed opposite the sensor when the bell is down. A delay needs to be incorporated before making the sound of a bell which is set using the computer. The delay varies from bell to bell in a ring by weight. Typically for a ring with a 12cwt tenor the delay varies from about 350ms to 450ms. The accuracy of the human ear is limited to around ± 30ms and bells can also be odd-struck. Therefore, it can be difficult to set up the sensor precisely. However, adjusting the delay so that the sounds coincide with those of the real bell is not difficult and will be near enough for most practical purposes. The Bagley system comes with 9-pin serial connections to the computer. These days many laptops and small computers do not have 9-pin serial ports and it is usually necessary to purchase an additional USB-Serial converter. |
Magnetic sensors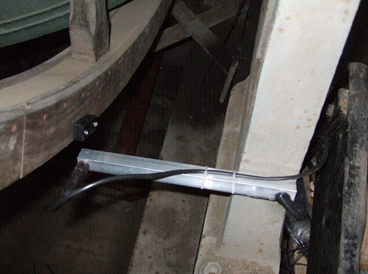
John Thorpe makes a solid state magnetic system and the basic layout of the system is similar to the optical system. The interface with the computer is via a USB so there is no need for a converter. The sensors are made in a completely sealed unit and this, along with the use of waterproof connectors, ensures that they are dust and moisture-proof and therefore offer reliable operation in the less-than-ideal environment of many bell chambers. |
Radio Frequency (RF) Sensors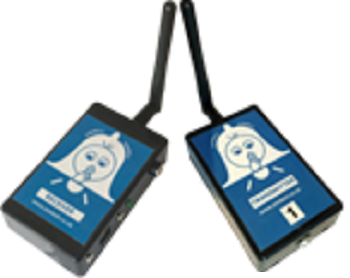
Simbell is based on standard Radio Frequency (RF) technology and offers similar advantages to wireless sensors. This system has a good range and almost zero latency (a few micro-seconds). It is quite possible to power 6 or 8 transmitters for several hours on a single rechargeable battery pack. Originally designed to simulate sound only for silent practice in towers without sound control, the sensors are compatible with Abel, Beltower and Virtual Belfry. There are some helpful videos on the Simbell YouTube channel. |
Making your own sensors
Sensors and the interface are two entirely different things. Most people understand the sensors well enough; the challenge is getting the signal into the computer. But it can, in fact, be very easy.
The minimum circuit for a single bell requires a USB-serial converter, a reed switch and a magnet. It is also easy to make your own multi-bell interface using some fairly basic programming. A suitable converter can be bought for about £10 and it allows you to connect up to 4 bells. The help pages in each application explain more, although the electronics and the programming, while quite basic for some, may be too daunting for others.
Multi-bell installations
A multi-bell installation allows you to use the system as an alternative form of sound control and to practise on any bell. The sensors are quite sensitive and, if you are practising with the other bells down, any slight motion can set them off. There are options within the software to switch the other bells off, or you can simply ring any offending bells up.
2.5. How-to guides
Simbell YouTube
Three handy videos showing how to set up Simbell with each of the three major software packages.
Setting up Simbell with Abel
Setting up Simbell with Beltower
Setting up Simbell with Virtual Belfry
2.6. What the user's say...
Simulator at Scaldwell
I know there are a lot of computer simulators quietly sitting in a dusty corner never being used. The technology is not simple for a mere mortal with just adequate computer and even less engineering skills. But I thought it was the only way forward. I am, after all the only member of my merry band with the skills to ring methods and I was determined to drag the rest of the band into the delights of change ringing with the help of 21st century technology! It is also extremely useful when teaching learners, I have found.
The desktop computer we had in our tower died over the winter; it didn’t like the cold and damp. So we raised the money for a laptop (from weddings and a local educational charity amongst others) so we can take the laptop home and keep it warm and dry.
We loaded the software, we had (Beltower) and bought a programme I had seen demonstrated at the ART Conference (Virtual Belfry) and thought it was going to be easy to get everything going again!
Having only set up the system once and that was at least 18 months ago, of course you forget all the little steps you have to take. That time around, my two brother-in-laws came to help; one putting in the hardware the other figuring out how to set up the software. I just made the tea! But they live a long way away and this time round only one could make it, so although Chris came up for a few days, we failed to get the system running. A name check to Chris Bassett from Staplehurst for his and sister Sue’s help.
To cut this long story short, over the last week or two I have been emailing David Bagley and Tony Croft to make sure the systems were working correctly. David helped me work though systematically to see if the sensors on his Bagley Box system were working correctly and sending signals, making sure nothing had happened to the hardware during and since the computer decided to die. I would like to say thank you to David for being so helpful and taking me through the process step by step. Screenshots and comments were sent, with suggestions coming back as to the next step.
The other person who has been extremely helpful and supportive is Tony Croft with help from his friend Steve Framer. Tony has knowledge of Virtual Belfry and has helped me through the problems I have encountered there. Steve has recently developed a YouTube video which explains setting up Simbell with Virtual Belfry and I found another video on how to set up Simbell with Beltower. [Editor's note – setting up Simbell with Abel is also a subject of one of Steve's YouTube videos]. I recommend both to you if you have got this far in reading my story, the basic idea is the same regardless of the hardware and software you use. Tony and Steve are currently working on a video explaining how the hardware is connected and talks to the computer programme. This proved to be the vital bit that always seems to be missing from any list of instructions. I had no idea what a COM port was, apparently it’s another name for the USB socket where you plug the thing in! You have to make sure (in Device Manager) that the computer is using the same number as you decide to use with the computer programme!
Enough technical details. Stick with it, ask questions and be persistent, there is some fantastic software and hardware out there to make teaching bell ringing easier. More is being developed by the boffins all the time, make sure you get the latest upgrades and keep practising! Let’s just hope in the future it doesn’t take quite so long getting it set up! But it is all worth it in the end.
Scaldwell band have the aim of ringing Plain Hunt by Christmas. We are not sure which Christmas, but Christmas is our aim. If you are in the area do please come and give us a hand!
Simulator at Crick
I had been attending simulator sessions at a nearby Church since starting to ring again in 2013. These were run by (the late) Peter Wenham at Braunston. When I started to teach others myself in 2015 I could see the possibilities but hadn’t access to the £500-600 plus computer and software that a simulator set-up would have cost to purchase at the time so it went on the back burner.
Last August I was looking around on the internet and up popped a new site I hadn’t spotted before, The Liverpool Ringing Simulator Project. I was immediately impressed. The project was based on the principles of open-source meaning that all the technical details (program for microcontroller and even PCB layouts and circuit diagrams) were, freely available for anyone to use. The thing that made this stand out from similar things I’ve seen in the past though, was the attention to detail and the exemplary documentation of the project. This gave me the confidence to contemplate making a version for Crick.
I contacted the project leader Andrew Instone-Cowie and was pleasantly surprised to receive a very supportive email and an offer of help should I hit any problems. I had a couple of weeks which were fairly free and to get me started while my PCBs were being manufactured in America he sent me some spares he had lying around. I hit a few snags but always had support from Andrew and had something working within a few weeks.
I still needed to build sensors sort out cabling and get things in boxes, as I had a bare circuit board at this stage
Muffles for the bells also needed to be made. Eventually near to Christmas I assembled everything in the tower connected the computer and a few bells sort of worked. After some grumbling I pulled the wiring out took all the sensors off of the frame and took them home for proper bench testing all assembled correctly. I had made 2 soldering errors on two of the sensors. All was tested and at the second attempt almost all worked, but not quite. The sensors were a bit too sensitive, so I bit the bullet taking all six out and remounting them so they would be further from the wheels. Now it all works! Fabulous.
A bit of a journey. Not trivial but not impossible either. I think the total cost was under £200 (old laptop, software, old amplifier and speakers not included) but I have sufficient spares to make most of another 1-2 simulators and some of this cost was tooling.
Our first fully simulated practice will be this coming Saturday morning.
Nick Hiams, Crick, Northamptonshire
2.7. If you need help
Contact Details
Each supplier (hardware and software) will be able to help.
- Abel – Chris Hughes
- Beltower/Beltutor – Derek Ballard
- Virtual Belfry – Doug Nichols
- Optical Sensors – David Bagley
- Magnetic sensors – John Thorpe
- Belfree – Tony Croft
- Simbell – Steve Farmer
- The Liverpool Simulator Project
YouTube
The Simbell YouTube channel has some very useful videos.
The Simulator Users and Suppliers Facebook group allows you to tap into other users and suppliers who can help resolve your problems.
3. Teaching with a simulator
People often think of simulators as a silencing tool, allowing a student to ring for as long as they need, without disturbing the neighbours. Then, adding a screen allows the student to ring with other "perfect" ringers without having more than you and them in the tower.
However, there's much more to a simulator than that and other teachers' exercises and ideas are described in the following sub-chapters.
If you've got an exercise that isn't included in these resources, please let us know and we'll include it for others to try.
3.1. Bell Handling - LtR Level 1
Benefits of using a simulator
Frequent one-on-one sessions are the best way of teaching a new recruit how to handle a bell competently and safely. To avoid disturbing the neighbours this is often done using a tied bell. However, the addition of a simulator even at this stage of the learning process has the following benefits:
- The ringer learns right from the first lesson when the bell strikes in relation to their movements and the movement of the rope – a critically important lesson. If the new ringer does not get used to this from the outset, it can be difficult and time consuming to teach later.
- You can add variety and fun by changing which bell is the tenor or even the sounds of the bells. Duck quacks are currently in vogue, however you can ring the front six of an eight, but have them sounding like the back six on a major scale, which may be easier for younger (or older) ringers.
- You can try exercises or practise unusual combinations without worrying what it might sound like outside.
- Prepare your ringer for ringing with others by getting them to ring on the simulator. The one learner needs to be in otherwise immaculate ringing to hear their own mistakes: which can be difficult to achieve with bands who are learning together.
Once they have practised these exercises using the simulator, new ringers will be ready for the daunting task of ringing open rounds with a band, and they are unlikely to go too far wrong. It can be very demotivating at this stage to ring with others for the first time with insufficient practice and preparation beforehand and to find they cannot do it.
An example – changing the speed of the bell
Monique was watching the moving ringers at this stage and you may have noticed that she was grabbing at her sally a bit so it was too fast and the backstroke was correspondingly slow. We showed her the striking analysis which proved this. After this clip was taken we asked her to turn away from the screen and just listen. Almost magically she adjusted the timing of her pulls to get her H/S and B/S spot on. We were all so pleased. She loved ringing with the simulator. When we next followed up with ringing on three real bells she proceeded to ring dodging in 2-3, under at B/S, really well.
Adding spice to bell handling lessons
Three blind mice
Start with rounds on just three bells, as this is easier for the new ringer to pick out their bell. Increase the number of bells as they hear their bell and become more confident.
Following
Practise ringing rounds at a steady speed before trying to ring the bells open. Get your ringer to follow you but allow the computer to put in the sound of the remaining bells.
Bell Control
Ringing slowly and even setting every handstroke and backstroke in preparation for ringing rounds on open bells and waiting for other ringers. Allow your student to ring different bells to each exercise in order to develop bell control.
Quicker and slower strokes
Change the speed of ringing on the simulator (e.g. 2h 30m and 3h 30m peal speed) to practise ringing at different speeds (equivalent to moving down or up a place) including taking out and letting in rope.
I’m sorry I haven’t a clue
Let them ring one bell to an even rhythm then turn the sound off for several blows and see if they have maintained the beat. Alternatively you can turn the screen off if they are watching it in order to see how they manage without.
Shadowing
Two bells are rung at the same time. The learner’s bell is silent and the learner tries to ring in time with an experienced ringer on the other bell. This helps the learner get used to the feel and movement of ringing. Not an exercise to be performed on open bells!
Raising and lowering
It is also possible to practise raising and lowering, as the latest versions of the software can drop from double clappering to single clappering as the bell lowers, in a somewhat realistic way, if a ‘bottom dead centre’ sensor system is used. However, it is not possible to mimic chiming.
3.2. Foundation Skills - LtR Level 2
When a new ringer is able to ring safely on their own, one-on-one sessions often cease and they begin ringing with others at a practice in which the amount of rope-time is limited. Progress often slows and ringers can become disheartened and even decide to give up. What a waste! Additional regular and frequent simulator sessions at this stage of the learning process have the following benefits:
- One or many learners can practise when and for as long as at least one teacher is available, without disturbing the neighbours.
- You can try exercises or practise unusual combinations without worrying what it might sound like outside.
- There is no need to get a band of helpers to ring the rest of the bells – even the most enthusiastic won't be keen on hours of rounds and call changes week after week.
- The new ringer can practise and study at home in order to accelerate their learning.
- Give your ringer the chance to ring with "perfect" ringers so that they can learn to hear and correct their mistakes.
Again, once they have practised these exercises using the simulator, ringers will be better prepared for the daunting task of ringing them with a band and they are less likely to go too far wrong.
Introducing the open handstroke lead
All applications have a feature where you can press a key or tap the screen to make one of the bells sound and the computer rings the other bells. This allows the open handstroke lead to be practised at home, on a tablet or smartphone.
Of course you have to be able to pick out your bell to hear how accurate your striking is, but most of the software packages have the ability to show the results graphically afterwards. They can even show the results graphically as the bell is rung in each row, and there are also features to practise listening to uneven ringing in order to learn to detect the errors. Back in the tower, the handstroke lead is a difficult concept to grasp and it can take a lot of practice. A simulator is an ideal way of practising as the other members of the band will be in the right place all the time and will not get bored.
Starting to teach ropesight
You can use the moving ringers facility on the simulator software (on a computer or better a large screen) to show any of the Learning the Ropes Level 2 exercises. These may be easier to see this way, especially when in slow motion. You can start at 6-hour peal speed and increase this as success develops, until ringing at a normal but slowish speed. These can be organised as either group or individual sessions with you leading or teaching. You can ask questions such as "Who is following the 2?" or "Which bell is ringing in 6th place?" Alternatively you can give advice such as "Just look at the sallies – whose comes down last?"
Call Changes
Practising some simple call changes allows the learner to practise changing speed at handstroke.
All the applications have the facility to ring call changes, although you may need to set some options such as whether the call changes are called up, down or by place. The help file explains how to do this.
To start with, the call changes will need to be called occasionally to allow time for the learner to understand how and when to pull and to settle down afterwards, but as the change between one row and the next becomes cleaner, the frequency of the call changes can be increased.
In method ringing, changes are also made at backstroke, so it is necessary to practise this as well. All applications have an option to practise changing at backstroke. This gives the learner the chance to get the feel of how much and when to pull.
The software applications can be used on their own without input from a sensor, to help the student understand the theory of call changes and work out which bell to follow next. They can also experiment with the effect of different calls. This is useful practice prior to them calling their own call changes.
Kaleidoscope places and dodges
Kaleidoscope is a useful step between call changes and methods. Long and short places can be practised at handstroke and backstroke as in call changes and dodging introduces changing speed continually at handstroke and backstroke. When practising dodging it is important to practise both the ‘up’ dodge and the ‘down’ dodge as the amount the pupil needs to pull and when are completely different.
TIP. Remember to untick the stop at rounds and stand at rounds options when you're practising kaleidoscope exercises.
Adjusting the speed of the bell
In addition to Kaleidoscope places and dodges, if your pupil is experiencing difficulties, you can also adjust the speed of the rounds to give the pupil the feel of ringing at each of the three different speeds and how much they need to take in or let out rope. For example, normal rounds speed would be around three-hour peal speed, but changing the peal speed to 2 hours 30 minutes simulates the speed of hunting down. Similarly, changing the peal speed to 3 hours 30 minutes simulates the speed of hunting up.
3.3. Introduction to Change Ringing - LtR Level 3
 Benefits of using a simulator
Ringers progressing through Learning the Ropes Level 3 benefit from simulator sessions, helping them consolidate bell handling (moving their bell accurately at every stroke), ropesight and listening skills:
- Whilst learners can still practise supervised at separate simulator sesssions, they should be safe enough to practise on their own on a spare bell or dumbbell at the normal practice.
- Exercises or unusual combinations can be rung without worrying what it might sound like outside.
- The new ringer can analyse their ringing, looking for patterns in order to improve their performance.
- Ropesight and listening skills can be further developed with "perfect" ringers.
Ringing on a simulator at this stage can be just as beneficial to the learner, accelerating learning and adding fun to practices, as it is for Levels 1 and 2.
Learning to cover
Perhaps the easiest bell to hear in any ring or on the simulator is the tenor. As it stays in the same place in odd bell methods, ringers can practise developing listening skills by ringing the tenor to a Doubles method such as Grandsire or Plain Bob without needing to worry about changing speed.
When students are not ringing, encourage them to have a go on the treble with a set of headphones and practise their striking. Set them a challenge, such as covering to a 120 of Doubles and improve their scores, beating their own previous best, recording them on a nearby whiteboard. You can train others as software managers to free yourself to help with the main ringing. One teacher likes to assign this role to a youngster, which taps into their ease with technology, whilst keeping them off their phones! The ages of those who liked a go, ranged from 1 to over 80. And people loved recording their best scores, and comparing them to their first-attempt scores, which were kept as a baseline.
You can set up any bell to sound as the tenor so ringers can learn to cover (improving their ropesight, rhythm and listening skills) off a bell they can easily handle – something they couldn't do without the simulator.
This is extraordinary! Neil ringing behind to Grandsire Cinques on the MRDC simulator. Anne ringing behind for the first time ever on 12. Obviously Neil had rung on 12 behind in the past quite a few time. Anne is a Ringing Remembers recruit.
If you have an 8-bell tower set up with a simulator, with six ringing Plain Bob Doubles, you can use both your silent bells to mirror the tenor. Alternatively you can have one student mirroring the tenor and the other the treble or an inside bell.
Learning to plain hunt
All simulator applications allow you to practise ringing Plain Hunt and Minimus methods on four bells with two bells covering. This may be a useful exercise before attempting Plain Hunt on five bells.
Having mastered the foundation skills, there are a number of simple exercises that can be practised in order to develop the skills needed to plain hunt the treble to methods. Bistow Little Bob Doubles allows the student to practise ringing the treble to Plain Hunt on two. It is similar to Kaleidoscope short places and involves the same pulls but each time the treble ringer will ring over a different bell, so it starts to introduce ropesight.
At this stage the applications offer a wide range of methods to practise which can be used to develop ropesight. The moving ringers feature helps with this, although some new ringers trained using a simulator will often have developed good listening skills and may rely more on listening than ropesight.
Learning to plain hunt by mirroring an experienced ringer, is a great use of a simulator. You can have a whole group of students model their speeds for plain hunt, on one experienced ringer ringing their bell at the correct times and talking through speeds and place. The students should aim to fire their bells with the experienced ringer, who rang on a mid-range bell to avoid extremes of visual gap. Any number of tied bells can have their sound turned off on the simulator, so many can do this exercise at the same time.
Ringing up and down in peal
Practising ringing up and down in peal can sound really awful but the bell needs to be heard by the participants. A simulator takes away the worry associated with annoying the neighbours.
Practising ringing up and down in peal can be started in a group, with just one teacher and a student on each bell. The teacher rings a middle bell in the peal down, slowly and steadily. All the other ringers try to match the teacher's speed – either firing or ringing closely after the teacher. This is particularly useful when there is only one teacher and the rest of the band are new ringers. Alternativey this exercise can be used to get more students through the earlier stages of being able to control the raise or fall without having to take turns one at a time.
Real ringers vs ringing simulator
It is important that the teaching programme includes a balance of time with real ringers as well as time on a simulator. Real ringers will not strike as accurately, and although they will nod and wink, they will also go wrong! Nevertheless there are also things that can be done with a simulator that are less convenient to do with real bells. This includes:
Shadowing
In which the student’s bell is silent and the student shadows the teacher’s movements. Two or three students can shadow a single teacher.
Ringing bells of different weights
To get used to the different techniques required.
Ringing theory
Such as coursing order, before and after bells etc. become very easy to see using the moving ringers or the numbers on the screen.
3.4. Novice Change Ringer - LtR Level 4
Benefits of using a simulator
 As ringers progress through the higher Learning the Ropes Levels, simulator sessions should still be used to consolidate foundation skills – bell handling, ropesight and listening. Remember:
- Whilst learners can still practise supervised at separate simulator sesssions, they should be safe enough to practise on their own on a spare bell or dumbbell at the normal practice.
- Exercises or unusual combinations can be rung without worrying what it might sound like outside.
- New ringers should be encourage to analyse their ringing, looking for patterns, in order to improve their performance.
- Simulator sessions add an element of fun and variety to any practice.
Analysing ringing to improve performance
Two ringers came for daytime sessions – they were both poor strikers. They hunted and covered and we analysed their ringing, playing it back so that they could hear what being late or early looked like on the speed chart, and sounded like, at the same time. We looked at patterns. One of them was always too soon at backstroke; the other always rushed the handstroke leads. Talking about what caused it, how to change, clearing up misconceptions (e.g. about speeding up to lead when you are already at hunting down speed) and practically, by ringing a single bell, balancing it at each backstroke, getting the tail end in the right place etc, all helped. They have both since been in winning or highly-placed bands, in guild striking competitions.
Ringing methods inside
Moving on to ringing a method inside a number of new challenges present themselves:
Where to start- How to learn circles of work
- Longer more complex blue lines
- Passing the treble
- Calls
Practising at home on a laptop or in the tower with a silenced bell ensures open practice is used most effectively.
- The screen diagrams help explain various elements of theory – blue line, order of work, starts, passing the treble, the grid and seeing what happens at calls. What you see on the screen and the experience you gain using the simulator software
is a great way to understand what methods are all about. - Practise ringing a plain course by pressing a key on the keyboard or on a bell or dumbbell, ringing all inside bells.
- Once the plain course has been mastered a new ringer can then practise ringing touches.
- The student can get used to saying go and stop and experiment with calls before trying it for real. They can also print out the touches that they have called to see the effect of the calls.
3.5. Change Ringer - LtR Level 5
 As ringers progress through the higher Learning the Ropes Levels simulator sessions should still be used to consolidate foundation skills – bell handling, ropesight and listening.
At this stage, your ringer will be familiar with some methods and you will want to develop their repertoire. Standard methods are at their fingertips and new methods may be added. Touches may be called or pre-set touches and exercises used to develop abilities.
Analysing ringing to improve performance
Two newish retired learners had Abel on their own PC, so I would save and email their Abel files to them so they could play them back at home and study them. They were so taken with it they ordered their own dumbbell but carried on returning for my sessions for a while as well.
Exercises or unusual combinations
Exercises or unusual combinations can be rung without worrying what it might sound like outside. Your own practice exercises can be added to the simulator software's repertoire, although all the ones ART recommends are there already, such as dodging and place making in various positions and Mexican Wave. It can be used for practising more complex pieces of work such as Cambridge places. This can do done with two bells in the tower, or they can be added into the middle places of 6-bell kaleidoscope places. Alternatively the place notation can be added to the simulator with the student ringing by themselves, ringing both the 3 and 4 to simulate ringing Cambridge places both up or down.
Met short for a practice?
If you meet short for a practice, you can set the simulator to ring the tenor. This will feel a bit strange so start with something simple, such as Plain Hunt, and work up to more complicated methods as the band gets used to the lack of visual cues. Experience shows that the tenor is the best bell to simulate.
3.6. Rhythm, listening and striking
Benefits of using a simulator
Simulator sessions are extremely well placed to help a ringer improve their striking by developing rhythm and listening skills:
- Ringing with "perfect" ringers allows every imperfection to be heard and corrected.
- Exercises can be rung without worrying what it might sound like outside.
- The new ringer can analyse their ringing, looking for patterns in order to improve their performance.
- There is no need to get a band of helpers to ring the rest of the bells – even the most enthusiastic won't be keen on hours of rounds and call changes week after week.
It could be argued that simulator practice to improve striking would be useful for even very experienced method ringers!
Hearing the bell
To start with, many new ringers find that the ringing is too fast to hear their bell. The speed of ringing is usually expressed in terms of the peal speed, which is usually set at the normal peal speed for the bells being rung.
Each of the applications allows the ringing to be slowed right down, and as a ringer's skill improves the ringing speed can be increased. All applications have a feature where a key can be pressed or the screen tapped to make one of the bells sound, with the computer ringing the other bells. This allows a ringer to practise their listening skills at home, even on a tablet or smartphone.
In the tower, simulator sessions can be rung on a small number of bells with the ringer counting, and then ringing, along to three and four bells and then gradually increasing the number of bells. Someone who is having difficulty hearing their bell can continue with this exercise for as long as is required – not having to worry about the patience of others to continue with this exercise.
Of course, the ringer needs to be able to pick out their bell to hear how accurate their striking is, but he software packages have the ability to show the results graphically afterwards. They can even show the results graphically as the bell is rung. There are also features which allow listening skills to be honed using uneven ringing. Be patient – some people have extreme difficulty picking out their bell, but very few people are totally tone deaf.
When ringing with real ringers in the tower these will often wait for the learner to ring, but computers will carry on regardless. Simulators now include a "cooperative striking" feature where the software waits till the learner has pressed a key before ringing the other bells.
Developing listening by covering
Perhaps the easiest bell to hear in any ring or on the simulator is the tenor. As it stays in the same place in odd bell methods, listening skills can be developed by ringing the tenor (or any bell programmed to sound as the tenor) to a Doubles method such as Grandsire or Plain Bob without needing to worry about changing speed or developing any ropesight.
In the simulator sessions, they both worked on covering to Doubles initially, with increasing success – the scoring facility is amazingly motivating! Striking analysis showed that their handstrokes started off being too close and they crunched in. Then we looked at the striking analysis, listening at the same time, and saw the effect. I was able to ring to demonstrate and show them on the screen that the open handstroke lead goes all the way through the row, so they had to incorporate that in covering.
Developing rhythm
When learning how to plain hunt, ringers may rely too much on (imperfect) ropesight and not develop a sense of rhythm. Shadowing an experienced ringer is a useful way of developing this sense of rhythm.
I watched a whole group of students model their speeds for plain hunt on one experienced ringer, ringing her bell at the correct times and talking through speeds and place. They were aiming to fire their bells with her, as she did this. (She was on a mid-range bell to avoid extremes of visual gap.) Any number of tied bells can have their sound turned off on the simulator, so many can do this exercise at the same time.
Simulators are well suited for practising ringing by ear and rhythm alone:
Looking at the screen for the blow by blow analysis and using the built-in tools to analyse striking, play ringing back and make the link with the visual display, to demonstrate common faults e.g. slow handstrokes or slow backstrokes or consistently ringing below or above the place.
Playing back the ringing and striking analysis tools
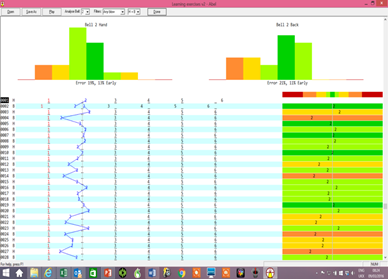
One of the most exciting tools is the graphic of the striking which is really helpful in analysing consistent problems. The latest releases even allow ringing to be recorded as it is practised and then it can be played back afterwards.
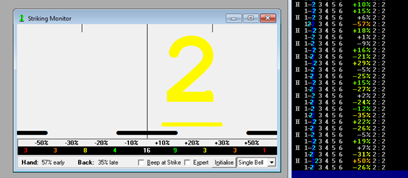
The applications give a variety of statistics for errors, some even broken down by place, so that a ringer can measure how their accuracy improves over time. There are usually two statistics: one measures the overall error at each stroke; this can be useful in a tower situation to tell whether you are consistently quick on one stroke or another. As errors can be positive or negative and cancel each other out, a second statistic, ‘average error’ or ‘standard deviation’, is usually provided, which measures how variable the striking is overall. Find out more about accuracy statistics.
Improving striking with practice
You can use the simulator packages to measure how accurate a ringer is at striking their bell. The results can be measured each time with a few minutes of rounds, long enough to obtain a representative result. Of course striking will not magically improve overnight, but like any other musical instrument, regular practice over an extended period of time will help achieve a marked improvement.
The striking tools in the latest software also provide valuable information to help improve striking. For example, a "saw tooth" pattern will often be visible in rounds, where one stroke is consistently quick and another slow.
Variability can be an issue, but as handling improves the bell can be more consistently struck in the right place, so it is important to practise bell control exercises in parallel. Often the inability to hear a bell is misdiagnosed when it is bell control that is the real issue.
3.7. Accuracy statistics
Striking analysis tools
All of the simulation software tools produce a graphic representation of a ringer's or band's striking to help identify any consistent problems. The latest releases even allow you to record something as it is practised, and play it back afterwards. The applications also give a variety of statistics for errors, some broken down by place. In order to interpret these statistics, however, some explanation is needed.
How accurate is accurate?
A typical row of ringing lasts about two seconds. Therefore, the typical gap is ⅓ second or 300 milliseconds.
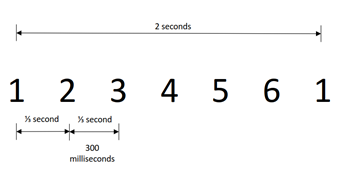
There are limitations on the human ear. Two sounds made less than 20 milliseconds apart will seem to sound at the same time. Therefore, in practice, even the best ringers will struggle to get their bell within 10% of the inter-bell gap (30 milliseconds). Therefore, an average error of 20% is not bad, especially for newer ringers.
One of the problems with errors is that some blows will be early and some late. The +ve and -ve errors tend to cancel each other out. Therefore, in the Abel example an error of 19% at handstroke is a measure of the distribution, ignoring whether the errors are late or early. The second figure, 13% early, indicates that the bell has a tendency to be slightly early.
Some applications use standard deviation rather than average error to measure the distribution of the errors. This is a statistical measure, based on the assumption that the errors will follow a ‘normal’ distribution curve.
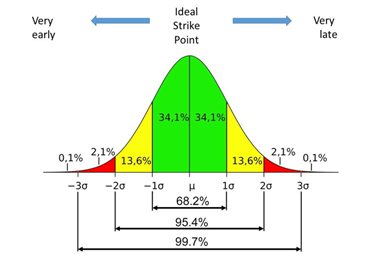
Striking windows
Abel |
Virtual Belfry |
Beltower |
 |
 |
 |
3.8. Simulator striking competitions
Chester Diocesan Guild Striking Ladder
The Chester Diocesan Guild runs a "striking ladder" similar to the table tennis or squash ladders of our youth. The referee or judge can be human or technology can be used, in the form of recording the striking on a simulator and submitting it for analysis.
CDG Striking Ladder
The Isle of Dogs striking challenge
The Isle of Dogs have a simulator, connected to all of the bells, so they can record two touches of 120 changes in Abel and the file can be marked by the 12 bell competition striking analysis software (CAS). As the judge is a computer, it is 100% consistent each time it is used, and produces a percentage score which enables easy comparison.
Isle of Dogs Striking Challenge
Orange County individual striking challenge
Doug Nichols was able to use Virtual Belfry with a group of ringers at Orange, New South Wales, to measure how their striking accuracy improved over the course of a year with the use of a simulator.
Orange New South Wales

3.9. Developing ropesight
Benefits of using a simulator
Exercises that develop ropesight by watching from outside the circle can often be more easily seen by watching the moving ringers on simulator software. Advantages include:
- Ability to ring in slow motion at the start – six-hour peal speed made faster as success develops until ringing at a normal but slowish speed.
- Perfect striking and no method mistakes!
- Opportunity to learn from watching methods which might be beyond the capability of the band to ring.
- No chance of an observer's comment upsetting a more experienced ringer!
Covering exercises
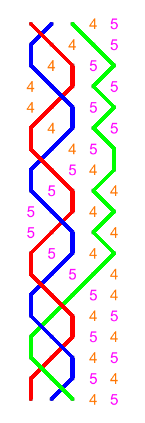 Try Cloister Doubles (right). There are just three bells to watch, but is has a six bell rhythm and speed. Explain about the dodges causing two bells to alternate for six blows. The learner gets three goes at spotting the two bells to follow alternately, before one goes and is replaced by another. You can change from a Plain Bob start to a Grandsire start to prevent students remembering numbers.
Covering Plain Bob Minimus increases the number of bells to watch to four. Initially the learner can watch the method being rung very slowly, looking for the last bell in each row. Speed up the ringing as calling out which bell is last becomes faster and more accurate, till it is being rung at a speed at which the learner will be able to control the bell. Finally add a cover bell, and demonstrate covering, getting the learner to call out the last bell of each row, as before. Then give them a go.
Covering to Doubles is best started on Stedman rather than Plain Hunt or Plain Bob because of the six blows that a pair of bells alternate in 4-5 before one goes to the front and another comes to replace it, working with the bell that stayed at the back. They only have to look at the other three bells to see which is last. As in Cloister Doubles, it is good to talk them through the six-end by saying "now" when a bell moves away from the back and then asking them to see who is ringing last "now" (stress it) to replace them. Both methods are a lot less frantic for the learner and it's easier to help them if they miss the bell at the back. You can point to the three bells on the screen they are looking at, or put your hands over the two they have just been following, leaving the three to be watched.
Following a bell
Following the treble (or any bell) through slow ringing in Plain Hunt Minimus. There is little point in just asking someone to follow, if no one is going to tell them what they are looking for, blow by blow. Ask them to watch the treble ring after one bell, then two bells then ring last (easier to see at this stage, than ring after three bells). You can slow it right down at first. If you have another ringer present, they could ring the treble, in which case, it will be greyed out, leaving the learner with just three ringers to watch on the screen.
In group sessions we watched Call Changes on four, whilst I asked questions such as "Which bell is ringing first?" "Which bell is last?" "Which bell is ring after number 2 bell?" Once this was successful, we started to watch Plain Bob Minimus rung at exceedingly slow speeds trying to see which bells rang in which place. I asked questions such as "Which bell is last at each handstroke. Just look at the sallies – don't watch the backstrokes?" "Now which bell is last at each backstroke. Don't look at the sallies – just watch the backstrokes as all hands and tailened are up in the air – whose comes down last". Sometimes I would pause after each row, and ask what order it had been ... then start and pause and ask again. To do this, I had to remember to hide the striking display and blue line or they could cheat!!!
3.10. Ringing on higher numbers
You can set your simulator to ring more bells than you have in your tower and one or more of your ringers can practise the rhythm of ringing on higher numbers. This can be challenging for most people if the back bells are “unmanned”.
This is extraordinary! Neil ringing behind to Grandsire Cinques on the MRDC simulator. Anne ringing behind for the first time ever on 12. Obviously Neil had rung on 12 behind in the past quite a few times. Anne is a Ringing Remembers recruit.
3.11. How-to guides
Download these handy guides showing how to set up your simulator for each of the learning exercises on these Learning the Ropes resources.
Getting the most out of your simulator software
Abel
ART has published a series of YouTube videos about setting up and using Abel.
- Getting started
- How accurate is my striking?
- Help, I can't hear my bell
- Call changes
- Covering by listening
- Covering by watching to develop ropesight
- Setting up for handbells – Plain Hunt
- Setting up for handbells – Plain Bob Minor
Virtual Belfry
Simbel has published a series of YouTube videos covering practical simulator sessions using Virtual Belfry.
- Dodging
- Following
- Striking part 1 – listening
- Striking part 2 – speed
- Ropesight
- Kaleidoscope
- Mexican wave
- The pull-off
- Using a footswitch
- Learning the Ropes Level 1
- Learning the Ropes Level 2
- Learning the Ropes Level 3
4. Practising at home
Benefits of using a simulator
Practising and learning at home accelerates progress – see recruitment and retention resources to find out more.
Each of the simulator packages has the facility to press a key or tap the screen to make one of the bells sound whilst the computer rings the other bells. This allows you to:
- Understand bell ringing theory
- Develop your listening skills
- Analyse your performance in the tower
- Practise the blue lines to methods
- Practise calling from Call Changes to methods
When ringing with real ringers in the tower these will often wait for you (the learner) to ring, but computers will carry on regardless. Simulators now include a "cooperative striking" feature where the software waits till you have pressed a key before ringing the other bells.
Understanding theory
The software applications can be used to help you understand the theory of new concepts such as Call Changes, work out which bell to follow next and to experiment with the effect of different calls.
As your ringing progresses, the screen diagrams help explain various elements of theory – blue line, order of work, starts, passing the treble, the grid and seeing what happens at calls. What you see on the screen and the experience you gain using the simulator software is a great way to understand what methods are all about.
Developing listening skills
To start with, many new ringers find that the ringing is too fast to hear their bell. Each of the applications allows the ringing to be slowed right down and as your skill improves the ringing speed can be increased. Listening skills can be practised at home, even on a tablet or smartphone.
In addition, the software packages have the ability to show the results of a piece of ringing graphically and there are also features to practise listening to uneven ringing in order to learn to detect the errors.
Analysing ringing to improve performance
Two newish retired learners had Abel on their own PC, so I would save and email their Abel files to them so they could play them back at home and study them. They were so taken with it they ordered their own dumbbell but carried on returning for my sessions for a while as well.
Practising methods
Practise ringing a plain course by pressing a key on the keyboard, ringing all inside bells. Once the plain course has been mastered you can then practise ringing touches. You can get used to saying go and stop and experiment with calls before trying to call touches for real. You can print out the touches you have called to see the effect of the calls.]
Using your smartphone
Remember that you can also practise at home and on the move using your smartphone. There is a separate resource dedicated to learning with a smartphone.
How-to guides
ART has produced some handy guides to using simulator software at home.
These guides show you how to set up your simulator software to practise a graduated set of exercises designed to improve your ringing.
4.1. Smartphones and tablets
Mobel
Mobel, a ringing simulator for the Apple iPhone, iPod Touch and iPad, is available from Apple's App Store. If you choose the tower bells option, Mobel displays pictures of sallies and tail ends, uses tower bell sound, and rings at tower bell speed. You can vary the speed of the ringing and ring with handstoke gap or cartwheeling. You can have Mobel wait for you if you hesitate while ringing a bell – or it can carry on in perfect rhythm. Optionally, Mobel will give you marks out of 10 for your striking.
The latest version of Mobel runs on iOS 8 onwards, although an earlier version of Mobel is available for older iOS versions.
Methodology
Is a simulator that works on Android phones and is free to download. It was launched in 2010 and there have been over 5,000 installs since. In the ‘interactive mode’ your selected bell appears at the bottom of the screen. To ring the bell, tap the dark blue rectangle. This doesn’t do anything until you start to ring – then you will see feedback on your timing, the little bars indicating how early/late you are on each stroke. Of course, you will hear if your timing is out as well.
You can run Android applications on your Windows 10 PC with emulator software such as BlueStacks which is free to download. You can also run Android Applications on a Windows smartphone by a similar process.
To purchase
- Mobel – Apple Store
- Methodology – Google Play
4.2. Handbell simulation
Learning methods
Towerbell ringers can learn methods and test themselves quite easily by reciting the work of a method or by drawing out the blue line on paper. If they can do this quickly and without error, and their ropesight is good, they can be confident that this will translate into a reliable performance in the tower. However, for handbell ringers it is much harder to confirm whether they know a method well enough to ring it on handbells, because knowing a single line or a grid pattern doesn’t mean that you can ring two bells based upon this knowledge. To demonstrate that you know a method by drawing it on paper, you would have to be able to draw two lines simultaneously. This is impracticable. The alternative, and one that some handbell ringers use, is to practise methods with a simulator, using two keys on the keyboard to ring their two bells while the simulator rings the rest.
Some ringers seem to manage to ring a simulator such as Abel using the keyboard quite successfully, but it is generally acknowledged that this is much harder than practising with real ringers. There are a number of reasons for this:
- There is no distinction between handstroke and backstroke when pressing keys. Abel’s keyup/keydown option helps with this, but it is no substitute for swinging one's arms up and down.
- Using the keyboard you cannot “internalise” a rhythm based upon the movement of your arms and the timing of the swing.
- The handbell equivalent of “ropesight” is difficult as Abel’s screen bells flip instantly between strokes. With real ringers you see the bell you are going to follow start to move and this helps you anticipate the swing of your own bell to ring after it. Abel now has an option for "moving handbells" which move the bells smoothly, more closely simulating the real world situation.
Dummy Handbells
Abel’s documentation suggests using dummy handbells with electronic switches for clappers to overcome the first two points and includes a design to help individuals build their own. Although a few people have successfully built dummy handbells for their own use, mechanical designs are prone to problems such as bounce and unwanted rattle, the design is beyond many ringers' DIY skills and no one has built any for general sale to others.
Handbell Manager
Handbell Manager is free software (under the GNU General Public Licence) that enables USB motion controllers to be used as dummy handbells with Abel or Beltower. Click on play below to see a demonstration video of three leads of Bristol using Abel, Handbell Manager and ActionXL wired motion controllers.
There is no computer keyboard or mouse interaction during the video – the controllers are swung to ring two bells and buttons on the controllers are used to start the others ringing, initiate "Go Bristol" and call the three bobs.
What do you need?
For more information about setting using simulators to learn to ring handbells, go to the Handbell Resources.
Reproduced with the kind permission of Graham John
5. Extending your simulator capability
Hardware extensions to your ringing simulator, improve the simulator experience and increase the amount and type of learning that can take place.
5.1. Dumbbells – at home or in the tower
Ringing but not on a real bell
Dumbbells allow you to practise on something other than a real bell. Most bell hangers can incorporate full size dumbbells into a design for a new bell frame or as a stand-alone installation. There are also a number of off-the-shelf systems that can be purchased for a more modest cost but which still have a realistic feel and can even be installed in your garage or loft!
This dumbbell and framework is fabricated from steel with a hot-dip galvanized finish. It is ideal for installation as an independent unit or can be hung from an existing bell frame or foundation beam. It is very robust and does not require a breakable stay. The stay and slider mechanism is simply a loop of rope which engages with a toggle and can simply be replaced if it becomes worn.
In addition to the standard design, wheel sizes and weights can be adjusted to coincide with existing bell installations if required. Graded sets can also be manufactured to simulate complete sets of bells or simulated augmentations.
Pros and cons of teaching handling on a dumbbell
By Chris de Cordova
For several years I have been teaching at Cleator Moor in Cumbria using a single tied bell with Abel simulator software, coaching individuals and small groups, in sessions open to anyone in the area who needed more rope time: usually for eliminating handling faults, for practice at managing coils, and for working on rhythm in covering and plain or treble bob hunting. I was more than convinced of the value of the equipment. Then, at Tulloch, I experienced a Matthew Higby dumbbell and was sold on it as the perfect teaching tool! I began to explore using it to help learners gain ropesight with the ringers on screen, before they were ringing methods, and found that it opened the way to ringing by place rather than by numbers. Slowing the speed down helped them see who rang first, last, then to see the order the bells rang in.
The Higby dumbbell has a large, blue, steel weight instead of a bell and is hung on a 4ft steel wheel, mounted on a steel frame; the whole assembly is about 14” wide. Altogether it weighs 2.5cwt but when rung it feels like a real bell of about 4cwt. It can be hung in a frame or from a beam, or bolted to the floor; it doesn’t have a breakable stay, just a loop of rope, which engages with a toggle to stand it. When Cleator Moor bells were removed following closure of the church, and St Bridget’s Church Moresby were chosen to receive a new light eight in exchange, it was logical that I offer to teach the new ringers there, it being only a couple of miles away from me. I decided to raise money for modern teaching aids by making mini bell ropes and designing a set of Christmas cards to sell. My first target was a Higby dumbbell, which was bought and installed at Moresby in November 2017, and in December I began with my first pupil. The rest started in January and by March I had ten learners who had learned on it, seven of whom were ready to ring with other people.
At this stage, all was positive – fast and effective learning, they all had a lovely style, and were making such fast progress they were quickly hooked. Seven were presented with their Level 1 Learning the Ropes certificates in church one Sunday morning, which created even more interest in the bells project amongst the parishioners.
Meanwhile, I was getting tired! Two-hour afternoon and evening sessions, 3-4 days a week at least, were dominating my life! But it was fun. Eventually the time came when most needed to ring with other ringers and on real bells, not least because ringing a bell up and down was an early part of the Learning the Ropes scheme and it is not easy to do it on a dumbbell, as it goes up and down so quickly.
So at the end of March I arranged a session at Arlecdon, and I asked for the help of other nearby ringing teachers to enable one-to-one work for several students at the same time. Arlecdon is a great tower for this, as it sits alone with no houses within half a mile, so a lot of jangling is no problem. Having expected little or no help, I also asked a few non-teaching friends to come along to ring rounds, and I was astonished and delighted when eleven ringers came along.
Here is where the differences between dumbbell teaching and tower bell teaching showed up!
First of all, to get them used to the feel of real bells, I asked each teacher to begin with separate pulls with their learner and to give constant feedback. When they felt their pupil was ready, they went through the usual stage of letting them ring all backstrokes but catching the sally intermittently, the learner deciding who would catch each time, until they built up to ringing it alone. The disadvantages of dumbbell teaching became obvious now! Everyone got to ring several different bells that first night, and each ended up ringing rounds on four with three teachers ringing round the learner. But the target was to teach a complete band so that they could ring. Since then, we have had two practices a week at Arlecdon, and it was a major milestone when all of them could ring rounds on four bells by themselves. As the time came close to being able to ring their own bells, I was able to take them a few times to Wigton, an 8cwt millennium ring of eight, to bridge the gap between heavy ringing – 100-year old bells on plain bearings – and the modern easily-rung bells that they would be getting. Six of them can ring rounds together, at the time of writing, mostly keeping in order, and with some rows well-struck! The length of time they can keep them together before someone gets out of place is increasing! Three are able to lead.
‘Whole pull and stand’ on six works well; we are randomly choosing a number of whole pulls (up to five) to ring before standing. The real joy is seeing what lovely neat ringers they are, because they developed their style on the dumbbell, without being afraid of the tower bell.
I am totally sold on starting ringing like this and I have now begun to do the very early lessons in ringing on the dumbbell with two more from another local church. If that proves as successful, I will offer the use of it to other teachers in the area when they get new starters.
Advantages of learning on the dumbbell
Quick learning
Because the dumbbell has a rope mechanism for setting, not a breakable stay, I was able to take risks with the learners, letting them take full control of each stroke very early on. They put both strokes together very quickly, within three lessons for most, and in their first lesson for two. When first putting both strokes together, they rang to just below the balance and used one hand on the sally, transferring it correctly to the tail. Before putting two hands on the sally we used a dummy tail end whilst I did the backstrokes, making sure they caught low, with the left hand fully open, and then slowed it down slightly to the balance point. This was usually the second lesson.
There was plenty of bouncing and occasional missed catches when first putting both strokes together by themselves, but the lack of a breakable stay meant I could more or less leave them to it. They all experimented varying their pull until they knew exactly what happened if they overpulled, underpulled, caught the sally too early or late, or did not stretch up at back or pull the sally hard enough. By the third lesson everyone could ring steadily with few misses of the sally ... or bounces!
Easy setting
I got them each to bring the bell off the ‘stay’ a good 8-10”, without turning it fully over, then let it go back up again, slowing the rate of the bell’s movement until they could gently rest it back on the stay mechanism. The bell was hardly ever accidentally pulled off during this bit of learning. There is such a long feel of the bell just before setting, so they quickly learned to set it whenever I asked, and instantly and impressively to tower bells.
Ringing down
All very quickly learned to get the bell down safely by themselves. This is very easy on the dumbbell as it’s so quick that no coils are needed and they all made just one loop to stop the rope flapping.
Varied exercises are easy and quick
There was, of course, lots of stepping back to single pulls to work on technique; to help them feel what the right amount of pull on the sally felt like at backstroke when they were getting it wrong; returning to use of a dummy tail end; videoing to show developing faults and correct them quickly; etc. All these exercises are easy and quick on the dumbbell.
Quick progression to rounds
All started to ring rounds on four with Abel after just 5–6 lessons, each ringing the tenor. We started recording scores, each trying to beat their previous best!
Speed exercises
We worked on changing speed: ringing it fast, ringing it slow, holding up backstrokes or handstrokes, as in dodging, and placemaking. All this can be done with a simulator ringing the other bells, too.
Independence
After a while, as each person became able to ring steadily with open handstrokes (which you need to do on any chosen bell, with a simulator), to get the bell down safely, and rescue themselves if it went out of control, including catching a lost tail end, I allowed them to go and practice on it without me, as long as there were at least two of them there. This gave them more rope-time. This is how safe the dumbbell is! No stay to break, no chance of being dragged up by the rope – catch the sally at the wrong time and the bell just comes down!
Disadvantages of learning on the dumbbell
Nerves
They were very nervous for many sessions and this led to each of them stopping their pulls short, so as to be ready for the next action, and they kept ringing them down!
It didn’t take too long to adjust but it was a fault that continued and needed reminders for many weeks, and still does slip back in. At this stage, we used the dumbbell frequently, to refresh and refine their technique.
Effort
Ringing the bell up required what seemed to them an amazing amount of heavy pulling on the tail end, unlike the dumbbell, which goes up in just a few pulls. We needed to give constant reminders not to pull too hard when the bell was almost up, and still do at times.
Broken stays… but stay awareness nevertheless
Missing the sally occasionally, often after one of those massive hauls at backstroke, has led to several broken stays. Sometimes this was when the teacher with them wasn’t quick enough to grab it, and other times when we rang with only two or three helpers so that one or two of them had to ring without anyone standing with them.
One huge plus point was that each ringer was able to set their bell almost as and when asked, and each lowered it gently onto the stay.
This article was orginally published in the Ringing World on 24 August 2018
5.2. Workstations – single or multiple?
Simulators are very useful in the early stages of ringing as you do not need a band of experienced ringers around you to practise ringing rounds. A mixture of ringing with real people and practice on a simulator is an ideal combination to get you up and running quickly. New ringers can perfect their rounds and leading with an open handstroke lead without having the embarrassment of making mistakes in front of other people!
Single workstations
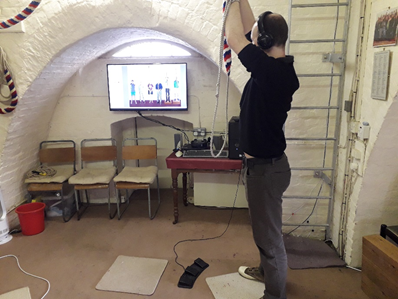
If you are teaching one or two new ringers at a time, or your more experienced ringers want to come and practise on their own, you only need a single workstation. One instructor can easily cope with two pupils taking turns to practise.
The single workstation can make use of a projector to project onto a large screen to give large life-like images to help develop ropesight. Alternatively, a large LCD TV screen can also give life-like images. However, in practice we have found that after a short while ringers soon rely less on the screen and more on listening, so a standard 18-inch LCD screen is more than adequate.
Often it is the ringers who have been ringing for some time, and who have become conditioned to ringing by watching rather than listening, who need the comfort of the screen.
Multiple workstations
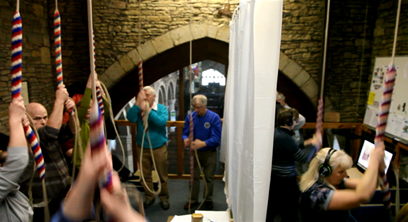
If you have more students, a multiple workstation set up may be more appropriate; several bells can be in use at any one time and different people can be practising separate things quite independently. All it needs is an additional splitter box or interface with the capability of sending signals to different computers and sets of headphones for each workstation.
With multiple workstations a small number of instructors can hold a 1½ to 2 hour intensive tied-bell session with a large number of students and each student can get a significant amount of ‘rope time’. Ideally the ratio of students to instructors should be about 2 to 1.
5.3. Accessories – headphones and footswitches
Headphones
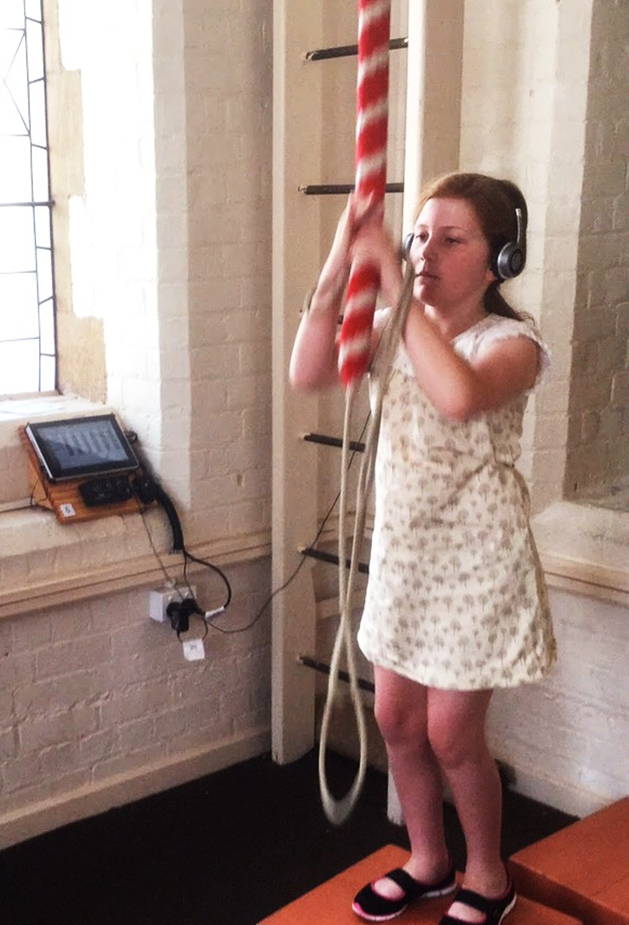
Bluetooth headphones have a latency (time delay) between the computer signal and hearing the sound in the headphones, although this can be compensated for by adjusting the sensor delay in the software. Pairing can also sometimes be troublesome.
Some wireless headphones can also have this issue, although the Thomson WHP3001BK Wireless Headphones are probably the best to use in a multi-workstation environment. They cost about £40 and operate on four different channels. If you intend to have more workstations you will need alternative systems. There is a button on the side of the headphones to switch channels, so you will need to instruct your pupils to press the button until they are tuned in to the right channel.
Alternatively, you can use a wired headphone, although trailing cables can be a nuisance and interfere with moving arms, unless the cables are long enough and carried around the rear of the body, or clipped with a clothes peg, or something similar. Stereo headphones with a 3 metre lead and 3.5mm jack can be purchased on the internet for as little as £3.75 (Kenable).
Ideally the teacher needs a headphone as well, to listen in to the pupil. This is straightforward with wireless headphones, and Bluetooth and 3.5mm splitters are available to enable two Bluetooth or two wired headphones to share the same computer.
Footswitches
Another refinement is to have foot-operated switches to control the software. Serial ‘push to make’ footswitches can be wired into a 9-pin connector for a COM Port, if your computer has one, or connected to a USB COM Port adapter. This can then be controlled by the interface on the software.
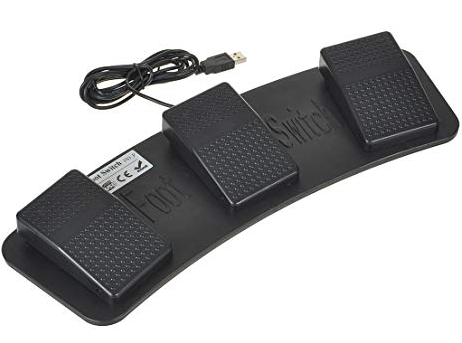
USB footswitches are cheap and readily available on the internet. Although single action footswitches are available and can be programmed for multiple commands, a triple action USB footswitch is not that much more expensive and allows rounds to be started, the ‘go’ command and ‘stand’, or any other combination of commands, to be operated by different switches.
The footswitches come with a driver on CD. You may need to install a tool such as ‘WinZip’ to unpack the driver first.
Rather than needing to set up the footswitch in the software, these footswitches work by activating the keyboard shortcuts in each application. Currently these shortcuts differ between applications, but there are quite a few shortcuts available and you can programme your own shortcuts for each footswitch (such as bob and single) using the driver interface.