Method Toolboxes for ringers
| Site: | ART Online |
| Course: | Method Toolboxes |
| Book: | Method Toolboxes for ringers |
| Printed by: | Guest user |
| Date: | Sunday, 24 November 2024, 2:18 AM |
1. Introduction
These resources have been developed to help you understand the theory behind ringing. They will help you from starting to ring rounds with others up to ringing your first methods and calling your first touches. They cover all the skills and knowledge that you need to develop in order to become a competent and confident bellringer.
People are comfortable learning things in different ways, so there's lots of videos as well as written and visual explanations included in the toolboxes. Finally, if you have access to a simulator take advantage of it – it's a great way of practising what you've learnt.
2. Foundation Skills Toolbox
What are the foundation skills?
When learning to ring it is important to develop good, basic foundation skills before you progress onto change ringing. The five foundation skills are:
- Bell control
- Listening
- Rhythm and striking
- Ropesight
- Understanding the theory
The first four of these cannot be learnt from a book; they are learnt through practice and experience. The more time you spend ringing, the more these skills develop. The better the quality of the ringing you participate in, the more quickly these skills develop.
This chapter explains the theory behind the foundation skills and describes exercises that you might be asked to perform by your teacher. Knowing what you are aiming for and what you're being asked to do, will allow you to make the most of your practice.
2.1. Rounds and leading
Once you have learned to handle a bell you will be ready to ring rounds with other ringers. You will be aiming to ring with even, rhythmic striking without any “clips” or “gaps”.
In rounds the bells are rung in a sequence of descending notes starting with the treble and finishing with the tenor in a row [a sequence in which every bell strikes once]. The gaps between the bells should all sound even:
1 2 3 4 5 6
In rounds the 1 [treble] rings first [or leads]. The 6 [tenor] rings last, is “ringing behind” or is “covering”. The 3 is ringing in 3rd place [a place is the position in which the bell sounds or strikes in the row]. The term 'tenor' is applied to the bell of deepest tone in any peal of bells but is also used to denote the last bell in the set being rung. For example, many 12 bell towers have a second number two bell tuned to a semitone higher than the normal bell. This allows for a light 8 to be rung on the front 8 of the 12 with this semitone bell instead of the normal number 2. Other combinations are possible in towers with more bells.
One aspect of ringing rounds that is variable is the gap between successive bells as the number of bells increases. For example, the gap between the 2nd and 3rd bell when ringing 12 is much smaller than if the same two bells were ringing rounds on 6.
Bell control and keeping in the right place in rounds
To ring rounds successfully you need to be able to change the speed of your ringing at both handstroke and backstroke. At first your teacher will tell you to ring more quickly or slowly to keep in time with the other ringers. Over time you will develop your own listening skills so that you can do this yourself. Find out more about developing listening skills.
If you need to ring more quickly
You will need to ring below the balance so that the bell moves through a smaller arc. Slow or check the sally or backstroke so the bell does not rise as high. You may need to:
- Check the sally and don’t let it rise so high at handstroke.
- Take some rope in (shorten the tail-end) at backstroke.
- Put more weight on the stroke to keep the bell up after you have checked the stroke.
If you need to ring more slowly
You need to ring at the balance so that the bell moves through a complete arc. Let the sally or backstroke rise to (or nearer) the balance. You may need to:
- Put more weight into the previous stroke.
- Let the sally rise a little higher at handstroke.
- Let some rope out (lengthen the tail-end).
Ringing with others for the first time
When all the ringers have taken hold of their ropes the treble ringer will say “Look to”, or “Look to the treble”. This is a warning that ringing is about to start. You should then put some tension on the sally to pull the bell off the stay towards the point of balance in preparation for an accurate pull off.
The treble ringer will then say “Treble’s going” (and will check that the ringers have looked to) followed by “She’s gone” as they pull the treble off. You should then pull off your bell in rounds immediately after the bell you are following.
To stop the ringing the conductor will call “Stand” or “Stand next time” when the treble is ringing at handstroke. You should ring that handstroke, the following backstroke and set the bell on the following handstroke.
Leading
When a bell is ringing in the first place of a row it is said to be leading. It does not follow a bell in the same way that the other bells do, and striking it well requires practice.
You can learn about leading from watching and listening to the treble in rounds:
- Stand behind the treble.
- Watch how it follows the tenor at the opposite stroke.
- Listen to the handstroke gap – is it open or closed?
There are two types of leading – closed or open. Generally method ringing bands ring with open handstroke leads, whilst those from the Devon Call Change tradition ring with closed handstroke leads.
Open handstroke leads
Listen to these simulated rounds and you'll hear a one-beat gap after every twelve blows. This is the handstroke gap
The backstroke change follows on immediately after the handstroke row. However, before the treble leads again at handstroke there is a gap or space of one blow. This is known as the handstroke gap or lead.
The bell that is leading cannot look at and follow the bell in front of it in the change. Instead it must lead by following the last rope to come down on the opposite stroke. When leading at handstroke the bell follows the backstroke of the last rope down and when leading at backstroke the bell follows the handstroke of the last rope down. To start with, your teacher will usually ensure that this is the tenor.
Closed handstroke leads
Now listen to these simulated rounds where there isn't a gap after every twelve blows. This type of leading is known as a closed handstroke lead, or cartwheeling.
Video resources
What exactly is good striking? Watch this video to hear some examples of good striking and listen for errors. The handstroke gap is also explained and demonstrated.
2.2. Ropesight, listening and striking
Once you start to ring your bell with others you will learn how to put your bell in the right place. You need to know where in the row to ring your bell and develop the techniques to place it accurately in this place:
- Listening – you need to be able to hear your bell in the row.
- Ropesight – you need to be able to see which bell you are going to follow next in the row.
- Rhythm – you need to develop a feeling for the rhythm of the row.
None of these skills can be learnt by reading a book and they develop over time. Some ringers find them easier to acquire than others. Like many skills in ringing they are best learned in small stages.
Your goal is to be able to produce rows that are evenly spaced with no “clips” or “gaps”. This is good striking.
Listening
You need to be able to hear your bell when ringing rounds. That is you should be able to pick out the bell you are ringing and where it is sounding in the row. You should listen to the rounds and to the position [place] your bell is sounding in and adjust it to ensure an even rhythm. You should count the place it is sounding in as you ring.
It is easier to hear your bell when ringing rounds as the sound is so simple and familiar. Moving on to ringing changes before you can hear your bell strike in rounds will make it very difficult for you to learn to hear your bell later on.
If you are not sure whether it is your bell which is sounding too close to another bell or is leaving a gap you can use a technique called “crash and gap”. You ring your bell closer to or further from the one in front until you hear a crash or a gap. This helps you identify which bell is yours.
Some towers have simulators; the sound is generated electronically and sounds in the ringing room through speakers. The bells are tied and no sound is heard outside. Using a simulator will help develop your listening skills and give feedback on your progress.
Ropesight
Ropesight is the ability to see in which position your rope is moving amongst the other ropes. You will learn to see which bell you are following and find which bell to follow next from the movement of the ropes. This video resource describes ropesight using a dynamic diagram of Plain Hunt on five bells. You can then watch this being rung in a tower.
Ropesight takes time to develop and you will get better as your ringing progresses. Some ringers find it easier to acquire than others. Like many skills in ringing it is best learned in small stages.
The easiest way to start developing ropesight is by staying in the same place in the row – in call changes, kaleidoscope ringing or covering. Initially, you may find it easier to see the bells being followed when sitting out.
Covering allows you to develop ropesight by seeing bells change places below you. You will have started to do this when learning to ring call changes when two bells change places below you. You may not have been ringing the tenor. As you ring the tenor count the changes below you sounding your bell in your head in the last place of the change.
1 2 3 4 5 6
Again, if your tower has a simulator your teacher may give you an opportunity to ring the tenor on the simulator. This is good practice for developing rhythm on 6 bells.
Once you can ring the tenor rhythmically to rounds and call changes your teacher may move you on to covering to Plain Hunt and other methods.
You cannot learn ropesight by learning the numbers of the bells that you follow. When ringing the treble to methods (the next step) the treble rings the same line as in Plain Hunt but the order of the bells you strike over will vary in ways that you won’t be able to learn.
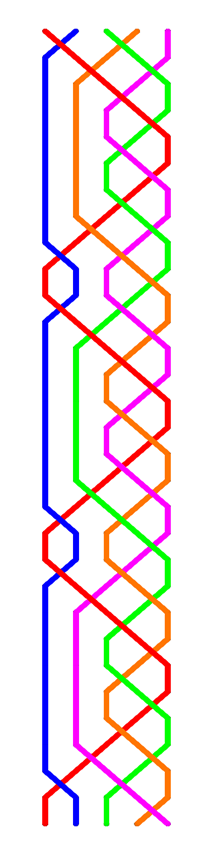
Watch this touch of Plain Bob Doubles, stood behind the treble and try and work out which bell the treble must follow next. The video plays through twice, once at full speed, once slowed down. This video was created for the purposes of developing ropesight.
Rhythm and striking
Ringing good rounds will help you develop a sense of feel for the rhythm of the bells as will counting the bells as they sound. Always put an emphasis on the place you are ringing in. For example if you are ringing the 4 in rounds you would say to yourself:
1 2 3 4 5 6
Using words (sentences) may help you to get the feeling of the rhythm. Choose a sentence which has twice the number of syllables than the number of bells being rung. For instance on six you could choose “We all love fish and chips, I want some for my tea” or “I want to go to town, to buy some fish and chips”.

When you move on to Plain Hunt, your first aim is to learn the “feeling” of moving slowly up to the back, lying for two blows, ringing more quickly down to the front and then leading. After practice your body will learn this “feeling” or rhythm and know automatically when to change speed and how much to pull or check to make the bell ring at the required speed and strike in the right place.
Listening to your ringing will help you hear if there are gaps or clashes and then to adjust your blows to make the sound even and rhythmic. The hardest part to master is when the speed of ringing changes.
To develop the physical skill of hunting, to begin with you need to know which bells to follow. However, you should always count the place your bell is in the row rather than say the number of the bell you are following in your head.
You can practise counting your place when you are not ringing by watching another ringer; it is sometimes surprisingly difficult to count backwards when coming down to the lead.
Changing the speed of your bell
Once you can hear your bell, you can alter your ringing until the spaces between the bells all sound evenly.
If you need to ring more quickly
You need to ring below the balance so that the bell moves through a smaller arc. Slow or check the sally or backstroke so the bell does not rise as high. You may need to:
- Check the sally and don’t let it rise so high at handstroke.
- Take some rope in (shorten the tail-end) at backstroke.
- Put more weight on the stroke to keep the bell up after you have checked the stroke.
If you need to ring more slowly
You need to ring at the balance so that the bell moves though a complete arc. Let the sally or backstroke rise to (or nearer) the balance. You may need to:
- Put more weight into the previous stroke.
- Let the sally rise a little higher at handstroke.
- Let some rope out (lengthen the tail-end).
2.3. Call Change Toolbox
What are call changes?
If you want to learn about ringing and calling call changes then the online learning portal has a course just on this subject. If you register onto the site, you can start straight-away. Search for the Understanding Call Changes online course.
Some call changes have special names e.g. Queens or Whittingtons. We have compiled a list of named musical rows which are are known across the country, but be aware that there are one or two regional variations.
Ringing your bell in the right place
Try to ring call changes off as many bells as you can, with the proviso that you need to be able to control the bell to be able to position it in the right place in the row. This will be the first time that you will have had to change the position of your bell in the row, which requires you to ring your bell at three different speeds. This change of speed takes place at one stroke (usually handstroke).
How to change the speed of your bell
When you are called up you will need to hold up and ring slightly slower than in rounds for one blow:
- The conductor will call the change at handstroke.
- Put more weight on the backstroke before the change is made, in order to get more energy into the rope.
- At the handstroke in which the change is made, let the sally rise a little higher so that you ring after the bell you've moved over.
When you are are called down towards the front, you will need to ring slightly quicker than in rounds for one blow:
- The conductor will call the change at handstroke.
- At the handstroke in which the change is made, check or slow the sally so the bell does not rise as high. Put more weight on the handstroke to prevent the next backstroke from dropping.
When leading and lying, ring at the same speed as in rounds. Remember the open handstroke lead – that is the little extra gap at the handstroke lead (equivalent to one blow).
Video resource
The St Martin's Guild ring a call change sequence (between named musical rows) starting with raising the bells in peal and ending with a lower.
Calling call changes
This might well be your first opportunity to speak whilst ringing, which can be a lot harder than it sounds. Tips and exercises are given in the Understanding Call Changes course. Remember to speak loudly, speak clearly and speak at the right time.
You can start by calling the changes from outside the circle when you're not ringing a bell. When you call whilst ringing, ring a bell that doesn't move much and only move one bell one or two places and back again. You'll know you're an expert when other members of the band randomly call changes and you can then call them back to rounds. Some very experienced ringers have difficulty doing that!
You can find a more detailed explanation of how to call changes here.
If you need help working out how to call to named rows, the following downloads will help:
Learning aids
You can consolidate your understanding of the theory of call changes using these exercises and games:
- Call Changes – calling up (written exercises)
- Call Changes – calling down (written exercises)
- Call Changes quiz – calling up
- Call Changes quiz – calling down
- Call Changes - dominoes
- Call Changes - crossword
Beyond call changes
2.4. Kaleidoscope Toolbox
What is kaleidoscope ringing?
Kaleidoscope ringing is a series of exercises made within two places. Places and dodges are usually started at handstroke, but they could also be called to take effect at backstroke. Try to practise both.
Kaleidoscope ringing differs from call changes in two ways:
- You only move one place (up or down) from your starting position – the ropesight is easier.
- You continue making the change until told to stop – developing your bell control.
What’s a place and what’s a dodge?
Long and short places
Places requires a bell to ring two or more blows in a single place. The simplest kaleidoscope exercises are:
- Long places – four blows in one place, followed by four blows in either a place higher or lower in the row.
- Short places – two blows (one whole pull), rung in a single place, followed by two blows either a place higher or lower in the row.
Dodges
Dodging requires a bell to move from place to place on every stroke (handstroke and backstroke). Good bell control is needed to strike the changes accurately. Dodging on heavier bells can provide an opportunity to practise adjusting the tail end position to speed up or slow down the bell.
- Find out more about places and dodges
- Download and print a sheet of basic kaleidoscope works to use in the tower
Ringing your bell in the right place
Try to ring kaleidoscope exercises off as many bells as you can, with the proviso that you need to be able to control the bell to be able to position it in the right place in the row. You will have to change the position of your bell in the row, which requires you to ring your bell at three different speeds. Changes of place (whether up or down) need to be crisp – you should aim to move exactly one place in the row on just the one stroke.
How to change the speed of your bell
Ringing call changes will have taught you how to move you bell up and down one place, which will be good practice for striking long and short places successfully. When these basic manoeuvres have been mastered, you will move on to dodging. To dodge successfully you need to be able to change the speed of your ringing at both handstroke and backstroke. At first your teacher will tell you when to ring quicker or slower to strike your bell in the right place. However you will quickly be expected to do this yourself by using your listening skills.
Striking a dodge accurately is a difficult skill to master. Why not look at our successful dodging tips to help you get there.
Using kaleidoscope exercises
Having learnt and successfully rung some of the easier kaleidoscope exercises you can invent your own more complex sequences.
Longer kaleidoscope exercises can also be useful for ringers who want to practise pieces of work found later on in method ringing.
Kaleidoscope variations
There are a couple of named kaleidoscope exercises that will test you and your band. They can be rung for services and weddings, adding variety, whilst sounding interesting.
3. Covering Toolbox
What is covering?
Covering, also known as ringing behind, means ringing in the same position, continually at the end of every row, whilst the other bells ring a method. Usually, the tenor covers to methods rung on an odd number of bells. When a tenor bell is covering, it helps to provide a steady, rhythmic pace to the ringing and an accurate tenor provides a point of reference for the working bells as they lead.
If you are unable to ring the tenor in your tower, then you can still cover using another bell which is called into the last place in the row. It might sound a bit funny but it will allow you to develop all the other skills that covering helps to build.
Successful covering
Covering requires good bell control, an ability to ring steadily in one place, good listening skills, and ropesight. Most ringers use a combination of listening skills and ropesight to strike the tenor accurately when covering. These skills might develop together, or you might start off with one sense doing most of the work.
Ringing steadily and listening skills
Practising ringing the tenor bell steadily is a good preparatory exercise, in rounds and call changes. Develop listening skills by counting your bell striking in the last place, hearing whether it is either late or early, then adjusting.
Try this exercise with your teacher. Stand behind the tenor whilst it is ringing rounds. The tenor ringer will adjust their speed to ring more slowly, or ring more quickly. Try to spot what happens to the ringing generally and how the other ringers adjust. Notice just how much the pace of the tenor can affect the ringing.
You can also stand behind someone who is covering to a method. The tenor will always be the last bell down, but see if you can notice any pattern to the bells that are being followed. Ask to see a diagram of the method afterwards, and compare this to your observations.
Developing ropesight
If you are ringing the tenor to call changes, you can maintain a steady rhythm using your listening skills, but try to spot the bells changing below you. Do you notice any pattern? Start with trying to spot the last bell down. As you get comfortable with this, you may find you increase the number of bells you’re able to spot and the order they fall. Don’t worry if this is not immediately apparent, most ringers develop this skill gradually over some time as peripheral vision develops.
Remember that even very experienced ringers don’t always know in advance which bell they will be ringing over at the back, they will ring steadily and just have an awareness of which is the last bell down.
Learning using a simulator
If you have access to a ringing simulator you can practise covering in two ways: by watching to help develop your ropesight, and by listening to develop your sense of rhythm. The video demonstrations use the Abel software, however other ringing simulator packages can be used just as easily.
Covering by watching using Abel
Covering by listening using Abel
Calling from the tenor
Once you’re comfortable ringing the tenor behind to Plain Hunt or simple methods, try calling some call changes, or saying go and stop to something simple like Plain Hunt. Listen out for it coming into rounds and make sure you get that’s all in the right place. Don’t worry if this doesn’t go according to plan the first time you try it. It’s amazing how much extra brain power even saying go and stop can take, but like all skills, it usually gets much easier once you’ve tried it a few times.
You can even conduct from the tenor. If you're covering to Plain Bob Doubles, look out for a particular bell which is about to make long fifths and call a bob. This is a great way to start developing ropesight – looking for one of the bells.
You will need to say go, call three bobs for a touch of 120 and call that’s all at the end. It’s a great introduction to using your voice whilst ringing.
Jargon
Some of the ways people might try to help if you get out of place can vary from tower to tower. Here are some of the words of advice you might hear…
- Wider please (leave a larger gap after the bell in front of you)
- Closer please (close the gap and ring a little nearer to the bell in front of you)
- You’re drifting in (you’ve got a little too fast, try to slow up)
- You’re upside down (you’ve ended up on the wrong stroke)
3.1. Handling heavier bells
Covering requires you to ring the heaviest bell in the tower (the tenor). Some ringers have the misconception that ringing the tenor takes great physical strength, but it is in fact more dependent on technique. Plenty of slightly built ringers can be excellent tenor ringers because their bell handling is efficient. If you are invited to ring in rounds and call changes, ask whether it’s possible to ring the tenor so that you can gain experience at ringing a larger, slower bell.
If you are learning to ring at a tower with quite large bells, you may need to gain confidence ringing the back bells, as they turn more slowly than the lighter bells at the front. As pulling off in rounds requires more forward planning with a larger bell, it’s worth spending some time polishing this skill before embarking on change ringing. If the tenor at your tower is rung standing on a box this could also take some getting used to. If you’ve only rung lighter bells before, you may wish to build up to ringing progressively larger bells.
This excellent video from Julia Cater at the St Martin’s Guild has plenty of useful tips about ringing larger bells.
4. Plain Hunt Toolbox
Having conquered the challenge of starting to manipulate your bell amongst the others by understanding and responding to the changes as they are called by the conductor, you can now move on to the next stage of learning to ring.
This phase will develop your skills in learning and ringing sequences of changes, using sets of rules learned in advance. Instead of the conductor calling each change, with a period of settle time allowed before moving on, you now have to learn the principles underlying continuous change ringing where each row is different from the one before. It is the way in which consecutive rows differ that give us the many methods and principles of bellringing.
What's new about Plain Hunt?
Plain Hunt will probably be the first time that you will have to move your bell at every change. It is the simplest form of change ringing but it will require you to learn and apply various new concepts, all at the same time:
- You will have to remember a sequence of places – there is no conductor telling you which place to ring in, as happens in call or kaleidoscope changes.
- It is important to know in which position in the change your bell is ringing, and helpful to be aware of which bell you are following (known as ropesight).
- This may be the first time that you will need to adjust the speed of your bell at every stroke, moving at both handstroke and backstroke.
- Unlike call changes, all the bells change position (place) in the row on each and every stroke, except when leading or lying when they ring two blows in the same place.
Plain Hunt explained
- To find out more about plain hunt, read Plain Hunt explained.
- Then download the Plain Hunt chart, and look at the path of all the bells. They ring the same line or order of places starting in a different place.
- Plain Hunt brings with it a whole new set of terms, which are explained in the Plain Hunt jargon buster.
Ringing Plain Hunt
The conductor will calls “Go Plain Hunt” on a handstroke. You ring the following backstroke in rounds and your first change is the next handstroke. When the conductor wishes you to stop ringing Plain Hunt, they will call "That's all" and rounds is rung. Remember:
- Odd bells go out – they hunt up to the back, starting with slow blows.
- Even bells go in – they hunt down to the front, starting with quick blows.
Note that when ringing Plain Hunt on an odd number of bells, the last bell (the 5 in doubles and the 7 in triples) starts by making a place.
Ringing your bell in the right place
Try to ring Plain Hunt on as many different bells as you can, with the proviso that you need to be able to control the bell to be able to position it in the right place in the change. You will have practised changing the position of your bell whilst ringing call and kaleidoscope changes, which required you to ring your bell at three different speeds.
Learning aids
Beyond Plain Hunt Doubles
Learning using a simulator
Plain Hunt introduces some new skills – ropesight and hearing your bell as you move place – which you can practise using a ringing simulator. Here are some tips about setting up a simulator to help you hear your bell and see which bells you are passing.
Changing the volume of a single bell
This will allow you to pick out the sound of your own bell. Later on in your learning journey you might wish to increase the volume of the treble so that you can hear its position in the change.
Using ropesight flashes
This is probably the simulator equivalent of a live ringer "giving you the nod" helping to pick out when you should be following them in the change.
4.1. Plain Hunt explained
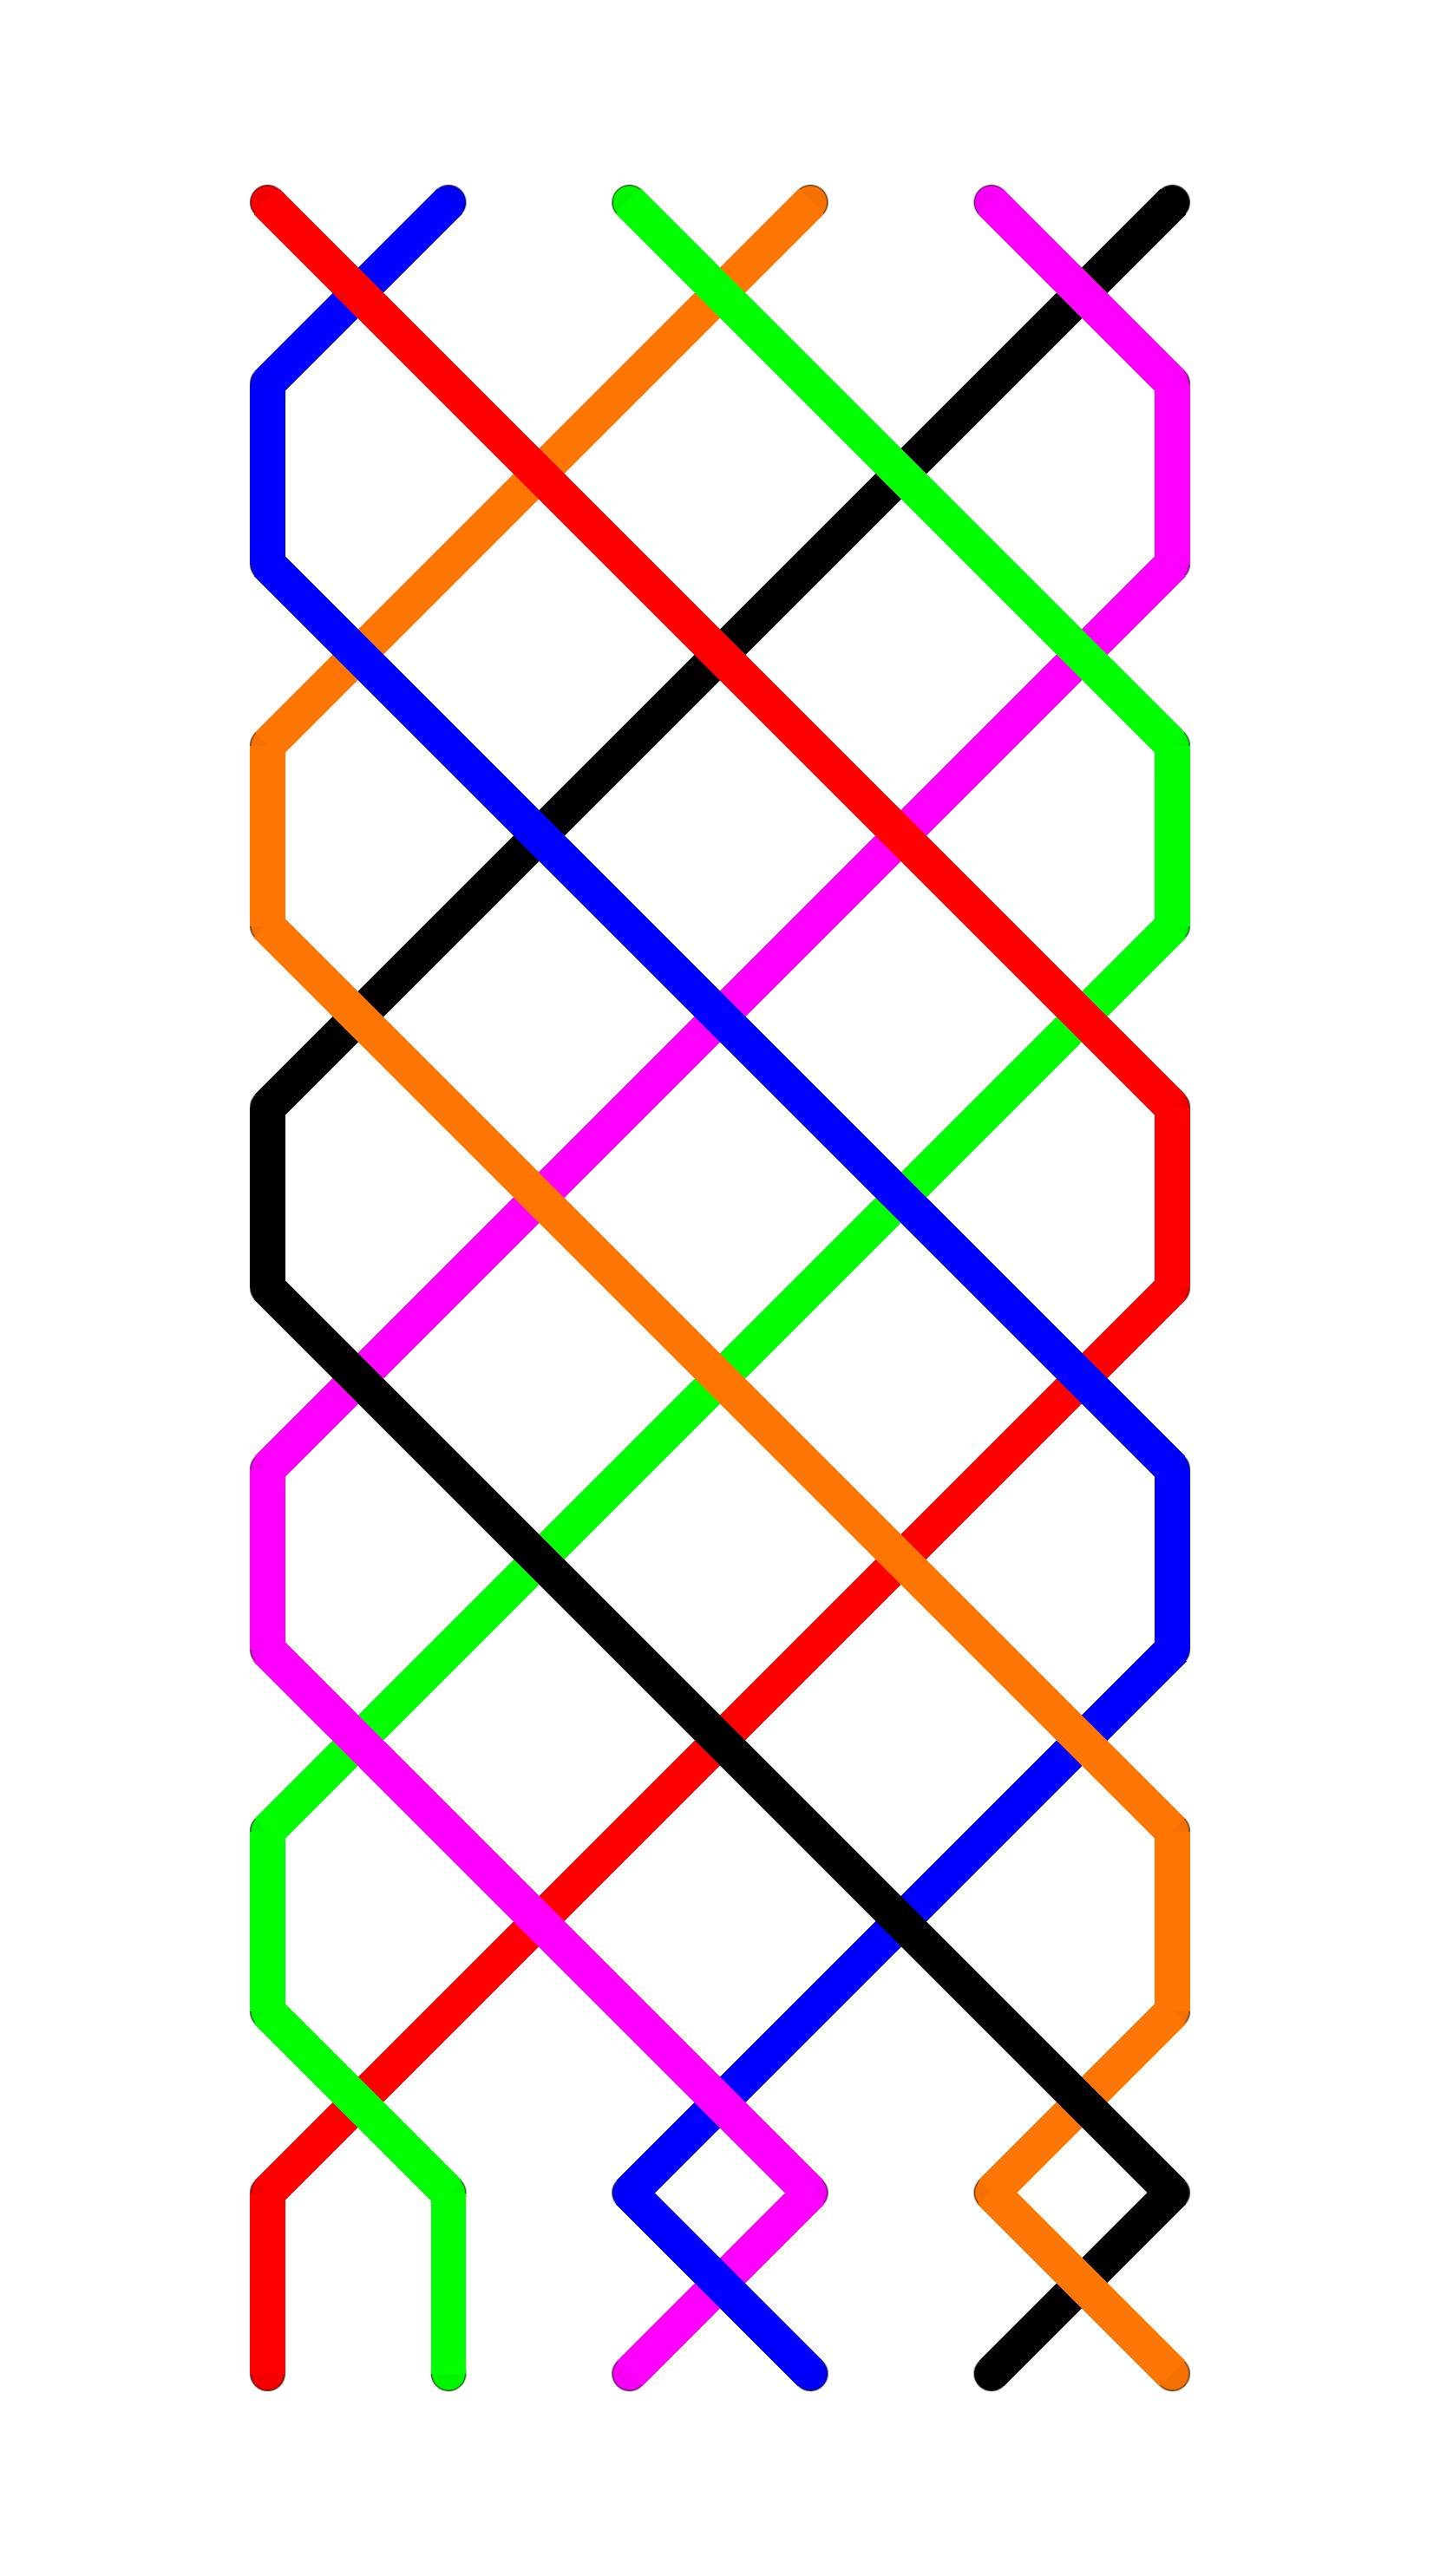
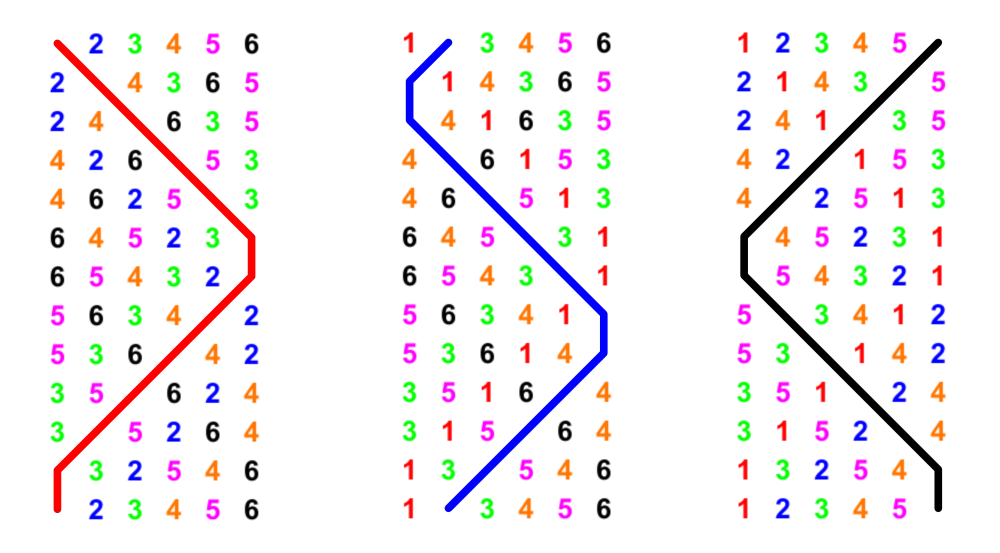
The path of the bells can be shown in the form of a line that represents the movement of each bell amongst the others. This line, for historical reasons, is known as the blue line although it is frequently represented by various colours. The diagram (below) shows the path of the treble, marked in red, plain hunting on five bells. It represents one lead. Each bell follows the same path but starts in a different place.
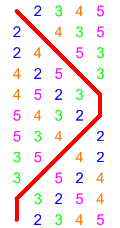 |
For example, the treble starts by ringing rounds in first place. When Plain Hunt starts it rings in seconds, thirds, fourths and fifths place on consecutive strokes. It rings a second blow in fifths place (know as lying) and then hunts down to the front, ringing in fourths, thirds, seconds and then first place. Plain Hunt comes round when the treble rings its second blow in first place (leading). Now, for example, look at the path of the 5. When Plain Hunt starts it rings a second blow in fifths places and then hunts down to the front, ringing in fourths, thirds, seconds and then first place. It rings a second blow in first place and then rings in seconds, thirds, fourths and fifths place. Plain Hunt comes round when the fifth rings its first blow in fifth place (lying). |
Download the Plain Hunt chart, and look at the path of the other bells. All the bells ring the same line or order of places starting in a different place.
Plain Hunt brings with it a whole new set of terms, which are explained in the Plain Hunt jargon buster.
If you find the diagram of Plain Hunt confusing, you can find out more about how methods are written out.
4.2. Ringing at three different speeds
Ringing Plain Hunt will probably be the first time that you will have to move the position of your bell at every change.
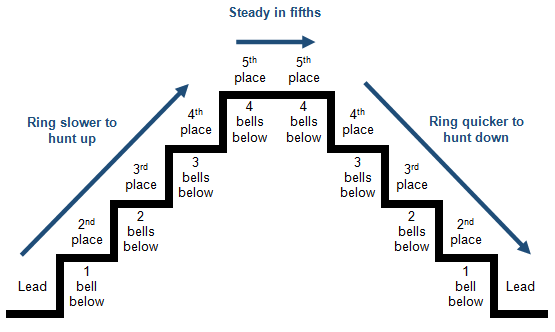
To do this succesfully you need to be able to control and change the speed of your bell. At different times you will need to ring at rounds speed, slower than rounds speed and quicker than rounds speed:
- To hunt up – ring slower than rounds speed.
- To lie behind and lead – ring at rounds speed.
- To hunt down – ring quicker than rounds speed.
Why three different speeds?
In rounds on six bells, a bell has to allow five bells to be rung before striking in the home place. It rings at the same speed in each row. When ringing in the same place five bells must strike before you ring again.
1 2 3 4 5 6
1 2 3 4 5 6
When a bell moves up a place it has to ring more slowly. It has to allow six blows to be rung before striking in the new place. When hunting up six bells must strike before you ring again.
1 2 3 4 5 6
1 2 3 4 5 6
When a bell moves down a place it has to ring more quickly. It has to allow four blows to be rung before striking in the new place. When hunting down four bells must strike before you ring again.
1 2 3 4 5 6
1 2 3 4 5 6
How to change the speed of your ringing
When going out towards the back, hold up and ring slightly slower than in rounds:
- At handstroke, put more weight on the previous backstroke to get more energy into the rope. Let the sally rise a little higher.
- At backstroke, put more weight on the previous handstroke. Let the rope rise a little higher. Stretch up!
When coming down towards the front, ring slightly quicker than in rounds:
- At handstroke check the sally.
- At backstroke, don’t let the rope go up quite as far or take a bit of rope in to shorten it so that the rope cannot rise as much.
When leading and lying ring at the same speed as in rounds. Remember the open handstroke lead. That is the little extra gap at the handstroke lead (equivalent to one blow). You will need to follow through on the backstroke lead a little more to put a bit more energy into the rope to get the next handstroke up into second place.
Video resources
Changing speed in Plain Hunt
Watch the treble ring Plain Hunt on five bells whilst the other bells ring a method – Plain Bob Doubles. Note the ropesight and the the changes of speed.
Ringing quicker and slower than rounds speed
Find out more about more about why and by how much you need to change the speed of your bell by watching this short video.
4.3. Course and after bells
Have you heard the expression “follow your course bell” and not had a clue what this bit of bell ringing wisdom meant or what to do with it? Like a lot of things in ringing, the concept of coursing order and course and after bells is quite simple to understand but it is routinely very poorly explained, if it is explained at all.
Definitions
- Coursing is a way of describing how bells follow each other around in a method. One way to think of it is the order in which bells arrive at the front and the back.
- Your course bell is the bell that you course or follow down to the lead – so you might hear someone say “take your course bell off the lead.” The bell ahead of you when you arrive at the lead, or the back is your course bell.
- Your after bell is the bell that follows you down to lead – hence the instruction “your after bell takes you off the back”. This is the bell behind you, which leads after you, or arrives at the back after you.
Examples
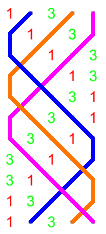
In Plain Hunt the bells come down to the lead in a certain order. In this example (on the right) we are showing Plain Hunt on five bells.
- Your course bell is the bell you ring over before you lead.
- You take it off the lead.
- If you are ringing the 4 it is the 2.
- Your after bell is the bell you ring over in 2nd place after leading.
- It takes you off the lead.
- If you are ringing the 4 it is the 5.
Supporting resource
A one page worksheet in which you can write out the grid for Plain Hunt Doubles and work out various course and after bells.
What about when you’re not ringing Plain Hunt?
Developing an awareness of course and after bells when ringing is helpful later on when progressing on to ringing methods. Your course bells are the same whichever method you are ringing. However when you meet them and what work you do with them varies with the method you are ringing. Your course and after bells will change when a bob or single is called.
Knowing which bells are your course and after bell helps you ring in the same way that knowing the work you do with the treble helps you ring:
- If you know that you are doing a piece of work with one of these bells then you don’t have to worry so much about ropesight.
- It gives reassurance – you’re in the right place.
- If you’re not quite sure then knowing how you work with your course and after bell can help you get it right.
5. Slow course methods
What are slow course methods?
Slow course methods are a group of methods in which one bell rings a simple, repetitive pattern until a call is made.
Brecon Place Doubles is shown on the right. It might initially look complicated, but if you look at the second (blue) it repeatedly leads for 8 blows and then makes seconds over the treble. That's a kaleidoscope exercise which you repeat whilst the other bells do the complicated stuff.
At a practice, ringing slow course methods provides opportunities for a mixed ability band to ring methods which cater for a wide range of abilities. As a new ringer you will ring the slow course bell which is like ringing a kaleidoscope exercise, with an additional ropesight challenge, as you will need to ring over and with different bells. Not only will you be learning, but the more experienced members of the band can ring something that might be new to them, and be supporting you. A win, win!
The slow course methods in this collection vary in their degree of difficulty. A simple method like Brecon Bob Doubles has long leading with places made under the treble, whilst others have more challenging slow course work such as Welford Bob Doubles, where alternate long thirds and long fifths are made by the slow course bell.
From providing a little variety on a practice night to enabling bands to ring together without anyone sitting out, slow course methods are a fun way of developing skills and ropesight as a team.
Method progression
Methods are graded on difficulty of the slow course work, rather than difficulty of the method.
Entry level
Progressing
Tricky
Really Tricky
6. Method ringing
Having mastered plain hunt the next step to becoming a change ringer is to learn your first method. There is no set method to learn first, but ringers usually start with Plain Bob Doubles or Grandsire Doubles. Some bands ring mostly minor and will choose to take that route, however it is a slightly harder route, as there is no fixed bell (the tenor) to lead off. An alternative approach is to ring minimus methods (changes on four bells) with one or two covers.
Whichever method you ring first, and whichever methods you then progress on to, you will need to types of skill.
Understanding the theory
You need to understand the theory so that you know what to do. This is a mental skill. Your teacher will explain the theory to you and you can then consolidate this learning at home. There are apps for mobiles and tablets which can assist with this learning, along with these resources.
Bell control
You need to have the necessary bell handling skills to move your bell accurately during the ringing. This is a physical skill and can only be learned in the tower. Simulator practice is also useful to perfect technique.
6.1. How methods are written out
 The blue line
The following explanations are illustrated using Plain Bob Minor, however they apply to all methods.
Methods are often represented by the blue line and you will see this used in publications such as the Ringing World diary or online resources. It is called the blue line for historical reasons, although it is frequently represented by other colours.
The blue line represents the path of the bell visually. The rows are written out and a line is drawn to show the path of the chosen bell. In this case the line is drawn through the 2. The red line represents the path of the treble.
When ringing a method all the inside, or working, bells follow the same blue line, ringing the same work but starting in a different place on that line. A place bell represents the work done by each bell in the first lead of the method. All working bells ring the same work but start that work in a different place on the blue line.
If you follow the line of the 2 you will see that when it has completed the 3-4 down dodge it is in 4th place. It now continues to follow the blue line but it is now ringing the work that the 4 rang in the first lead. It has become 4th place bell. At the following lead end it becomes 6th place bell and rings the work the 6 would have ring in the first lead. The following leads it becomes first 5th and then 3rd place bells. At the end of the last lead it comes back to its starting position becoming 2nd place bell. The bells come back into rounds and the whole method can start again.
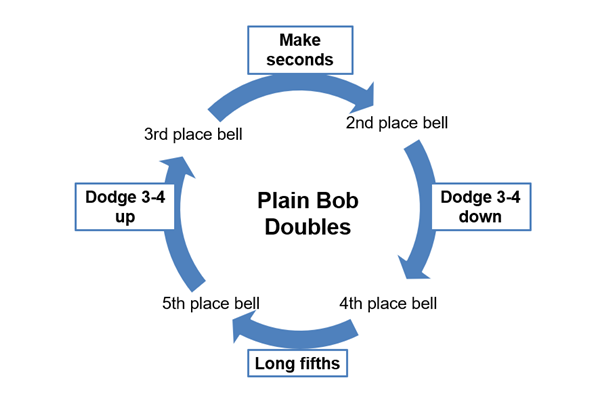
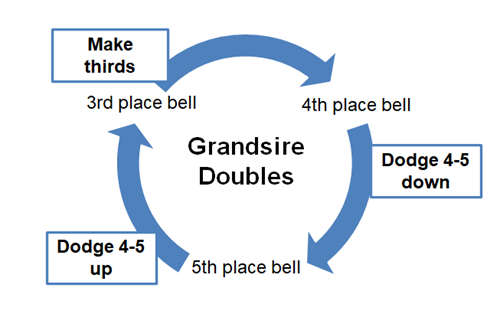
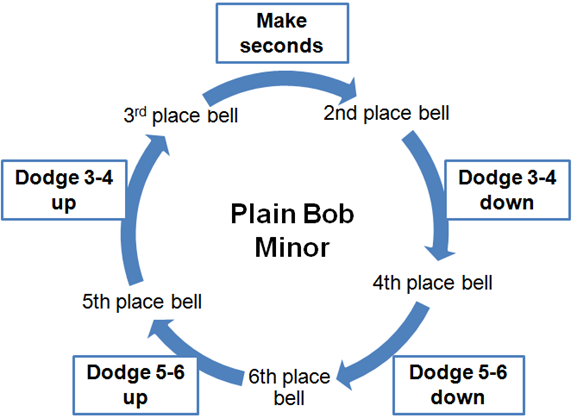
Another way of thinking about the method is through the cycle of work which is the order of work for Plain Bob Minor from the 2:
- Dodge 3-4 down, become 4th place bell
- Dodge 5-6 down, become 6th place bell
- Dodge 5-6 up, become 5th place bell
- Dodge 3-4 up, become 3rd place bell
- Ring two blows in 2nd place [make seconds]
The grid
 |
The grid is a way of representing a method visually by drawing the line through the paths of all the place bells for just one lead. The grid for Plain Bob Minor (on the right) is the same as for Plain Hunt except at the lead end. The grid can be constructed from the place notation. |
Place notation
Place notation is a way of representing a method mathematically allowing the grid to be constructed from a series of numbers which describe the method structure.
In Plain Bob Minor places are made in 1st and 6th place, indicated by the numbers 16. In the other rows all bells swap places, indicated by an x. A comma separates the lead end notation.
The notation is written for the first half of the lead and then applied in reverse order up to the lead end. The place notation for Plain Bob Minor is x16x16x16,12 At the lead end places are made in 1st and 2nd, indicated by the numbers 12.
If there are rows where places are made on every row the numbers are separated by a dot. So for Plain Bob Doubles the notation is 5.1.5.1 5, 125.
6.2. How to learn the theory
Teachers are looking more and more to research in cognitive psychology to inform their practice. Cognitive psychology is usually defined as the study of the mind, including perception, attention and memory. This field of research can help us to understand learning by testing hypotheses about learning strategies that are developed based on what we already know about the mind (Weinstein & Sumeracki, 2019). There are four important learning strategies that have recently moved from theory into practice and which have implications for all teachers. These learning strategies are outlined below with suggestions on how they relate to learning to ring.
Cognitive Load Theory
There are two important components of memory – long-term memory and working memory. Working memory is where thinking takes place, where information that is actively being processed before it moves to long-term memory for hopefully long-term storage. Working memory is finite. On average, your working memory can hold about seven ‘bits’ of information and only holds them for approximately 20 seconds. This limit of working memory means that it can quickly become over-loaded when dealing with new tasks. This is known as cognitive load theory. Structuring complex tasks by limiting the amount of new information can reduce this cognitive load.
One way to reduce cognitive load when teaching ringing is to break down a task so that the student can tackle it step-by-step. The ART Training Scheme already breaks down activities into several small steps. For example, teaching bell handling is broken down into many stages and exercises. More stages than in the way many of us were perhaps taught; by learning the backstroke, the handstroke and then both strokes together.
This theory of breaking tasks down will work for all stages of ringing, such as Call Changes, Plain Hunt and even the most complex of methods. Learning a place bell, calls, circle of work, etc. are all steps that can be learnt in stages rather than everything at once.
It is important to help students to shift learning from working to long-term memory. The next three theories suggest strategies for doing just this.
Spaced Review
Learning everything to do with a topic during a single time period is not as effective as distributed learning (Dunlosky et al., 2013). Spaced review involves revisiting a topic after a ‘forgetting gap’ and strengthens long-term memory. A simple way to manage this is to build in review time to each teaching session, including reviewing learning from the previous week, month and/or further ago.
As we all know, intensive sessions work. Less of a gap between handling sessions in particular will help ensure that working memory moves to long-term memory. It is ok to revisit some of the smaller, earlier stages again and build them back together. For example, if a new ringer has managed to ring alone during the previous lesson, a good starting point would be to revisit single strokes at the beginning of the lesson before putting them together again. This will also build confidence. It is also good to review the learner’s logbook to remind them what they have learnt already.
For method ringing, good examples would be to practise a plain course before ringing a touch or waiting until the latest point before adding a call. Practising half a course or ringing a different bell to practise different place bells is also a good idea.
Retrieval Practice
Repeatedly re-reading a text is not an effective way of learning. It is much more effective to try to retrieve what you already know from memory (Roedinger & Karpicke, 2006). Retrieval practice involves retrieving something you have learnt in the past and bringing it back to mind. Students are using retrieval practice every time they undertake a test. Using frequent, short and importantly, low-stakes tests causes students to retrieve knowledge on a regular basis. Any activities that require students to draw on past knowledge can have the same effect.
Theory is so important! Ringers will learn methods quicker and move onto more complex methods if they understand them. Writing methods out, the circle of work, treble passing are all good ways to make theory stick, far better than retaining memory from being talked at or reading text. Quick fire questions are also a great way to check understanding and to check reaction times that will need to be much quicker when they are actually ringing. “You’re ringing Plain Bob Doubles, you’re about to do a 3-4 up dodge, you hear the conductor call “bob!”, what do you do?” “Make the bob/make 4ths & in?” “Correct! What do you do next?” If they can recall the correct answers quickly, then they stand a far better chance of being able to remember when ringing it.
Elaborative Interrogation
Elaboration involves describing and explaining in detail something that you have learnt. This approach supports learning by integrating new information with existing prior knowledge, helping to embed it in long-term memory. A well-studied form of elaboration is elaborative interrogation, which involves prompting students to generate an explanation by being asked ‘why?’ and ‘how?’ Studies have shown that learning effects are stronger when students generate answers to these questions themselves rather than being provided with the explanations.
In summary, regular reviews of learning, using low-stakes tests and asking students to explain what they have learnt can be very beneficial, helping to move learning from working memory to long-term memory. If they can hold on to that new knowledge and/or skill in their long-term memory then they have really learnt something. This is how we all learn new skills and methods and does not just apply to new ringers.
This theory can be used to check the learner’s understanding of how what they do on the end of a rope affects what the bell does and how a single stroke affects the next one. For example, it is sometimes counter-intuitive that to slow a bell down and ring a slow stroke, that you have to put more effort as opposed to riding a bike where less effort will make you go slower.
You can also check a ringer’s understanding of methods by getting them to recite what to do and randomly shout, “bob!” You can ask them to explain why they have to do what they do at a call. Recite a different place bell, etc. etc.
References
Dunlosky, J. et al. (2013). Improving pupils’ learning with effective learning techniques: Promising directions from cognitive and educational psychology. Psychological Science in the Public Interest, 14 (1) pp4-58.
Roedinger H. L. & Karpicke, J.D. (2006). Test enhanced learning: Taking memory tests improves long-term retention. Psychological Science 17, pp249-255.
Weinstein, Y. & Sumeracki, M. (2019). Understanding how we learn. Routledge, Oxon.
Jenny Wynn and Moira Johnson
6.3. Successful dodging
What is a dodge?

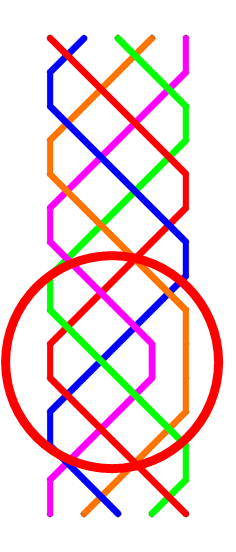
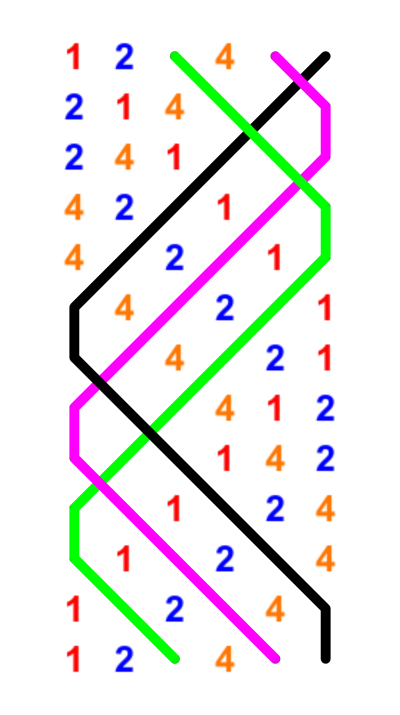
A dodge occurs when a bell which is hunting takes a step backwards and then continues to hunt in the original direction.
The diagram shows the line of two bells dodging. The bell represented by the blue line is ringing a dodge while hunting down. This is known as a down dodge. The bell represented by the red line is ringing a dodge while hunting up. This is known as an up dodge.
Practising dodging
You can practise dodging using specific kaleidoscope ringing exercises or by ringing Treble Bob Hunt. Both concentrate the dodges into a small number of changes giving you plenty of practice and ropesight is simplified.
Bell control and striking in the right place whilst dodging
To dodge successfully you need to be able to change the speed of your ringing at both handstroke and backstroke. At first your teacher will tell you when to ring quicker or slower to strike your bell in the right place. However you will quickly be expected to do this yourself by using your listening skills.
When dodging 3/4 down you hunt down from the back – all the blows are quick blows with the exception of one:
- A quick blow at backstroke down in to 4th place
- A quick blow at handstroke down to 3rd place – put a little more weight on the rope
- A slow blow back up to 4th place at backstroke – put a little less weight on the rope
- A quick blow down into 3rd place at handstroke
- Then continue with the quicker blows to the lead
When dodging 3/4 up you hunt up from the lead – all the blows are slow blows with the exception of one:
- A slow blow up into 2nd place at handstroke
- A slow blow up to 3rd place at backstroke
- A slow blow up to 4th place at handstroke – put a little less weight on the rope
- A quick blow down into 3rd place at backstroke – put a little more weight on the rope
- A slow blow up to 4th place at handstroke
- Then continue to hunt up to the back
Ropesight whilst dodging
Good ropesight whilst dodging takes time to develop. The first step is recognising which bell you are dodging with. You will always strike over this bell twice – at handstroke when dodging up and at backstroke when dodging down.
It is harder to see which bell you are striking over on the other stroke as this depends on the work that the other bell is doing (see above). If you are finding this difficult study the method being rung by the other bells and learn what the pattern is. Eventually you will be able to see the bells without doing this.
7. Minimus Toolbox
What is minimus?
Methods that are rung on four bells are an excellent introduction to method ringing. They are quick to ring and with only three other bells to watch, the ropesight is easier to aquire.
Change ringing on four bells is quite physically demanding, requiring larger changes of speed. It therefore helps develop the habit of forward planning in placing a bell correctly. On lower numbers, changes of place need to be made well in advance – the larger gaps between blows make it less easy to quickly adjust to the bell in front of you. Ringing well on four bells is an excellent test of bell handling, striking, and thinking ahead.
Plain minimus methods (where the treble plain hunts from first to fourth place and back) are only 24 changes long, so it is possible to develop ringing skills without having to learn too much method work. Why 24 changes? This is the maximum number of permutations of four things and hence four bells:
4! = 4 x 3 x 2 x1 = 24 changes
Although there are fewer methods available for four bells, each one offers a new challenge and introduces concepts such as awareness of treble passing, dodging, ringing a reverse method, understanding a double method, making internal places, wrong-hunting, counting blows, striking and ropesight.
Standard plain minimus methods do not require any calls to ring a full extent as all 24 possible changes are rung in a plain course.
Methods
The standard 11 minimus methods are: Plain Bob, Reverse Bob, Double Bob, Canterbury, Reverse Canterbury, Double Canterbury, St Nicholas, Reverse St Nicholas, Single Court, Reverse Court and Double Court.
There are plenty more types of minimus methods to explore which are less commonly rung, including principles, alliance methods, treble bob methods, differential methods, twin hunt methods and methods which don’t have palindromic symmetry.
Supporting resources
- Successful dodging – what is a dodge and how to strike it successfully
- How are methods written out?
Method Progression
Entry Level
Progressing
Tricky
Really Tricky
8. Plain Bob Doubles Toolbox
What is Plain Bob Doubles?
Plain Bob Doubles is often one of the first methods that you learn after you have mastered Plain Hunt. The treble plain hunts up to fifth place and back and there are four working bells which complete a cycle of four pieces of work. Often it is rung on six bells with the tenor covering. This gives a visual and auditory cue to help accurate leading.
There is more to learn to ring a plain course than in Grandsire Doubles but touches are simpler. The plain course is four leads long, compared to three leads for Grandsire Doubles.
Plain Bob Doubles explained
To find out more about Plain Bob Doubles – the blue line, the circle of work and treble signposts – read Plain Bob Doubles explained.
You can also download these cribsheets for further study or for use in the tower.
Introducing bobs
The extent or maximum number of changes of 5 bells (doubles) without repetition is 120:
5! = 5 x 4 x 3 x 2 x 1 = 120
To ring the whole extent of a method, touches are rung. Touches alter the order of the bells using bobs and singles. When ringing touches of Plain Bob Doubles, you will almost always only encounter bobs, but singles do exist.
Move on to the next sub-chapter to find out more about bobs in Plain Bob Doubles.
You can download and print out the Bobs explained cribsheet to revise and use in the tower.
Ringing your bell in the right place
The dodges in Plain Bob are very different to those in Grandsire:
- Plain Bob Doubles – the 3-4 dodge requires the "step back" to be made at backstroke.
- Grandsire Doubles – the 4-5 dodge requires the "step back" to be made at handstroke.
Switching between the two methods can be confusing unless you rigorously count your place and have learnt when the "step back" or dodge is made in each method.
Calling Plain Bob Doubles
If you wish to learn how to call yourself, there is an interactive online learning course designed for you taking you from finding your voice for the first time to calling your first touches and even a quarter peal. Search for the First steps in calling bobs online course.
Supporting resources
- Successful dodging – what is a dodge and how to strike it successfully
- How are methods written out?
Learning aids
- Plain Bob Doubles dominoes
- Plain Bob Doubles happy families
- Plain Bob Doubles crossword
- Plain Bob Doubles wordsearch
Learn by watching
Watch Plain Bob Doubles being rung. Select a bell and watch it go through the cycle of work.
8.1. The plain course explained
 |
Method structureThe blue line of Plain Bob Doubles is shown on the left, with the treble coloured red and the second coloured blue. It is four leads long. The treble plain hunts to fifths and back The working bells ring a cycle of work – making seconds, dodging 3-4 down, making long fifths and dodging 3-4 up.
Starts
Treble signposts
|
Tip
In the plain course, either the treble or one other bell will take you off the lead. This is your after bell. If you are ringing the 3 this will be the 2.
Cribsheet
Download the Plain Bob Doubles cribsheet for further study or for use in the tower.
8.2. Bobs explained
Bob structureAs the treble leads (at what is known as the lead end) fourths place is made, instead of the seconds place made in the plain course. At the bobCall are made when the treble (red) is in seconds place, hunting down to the lead. The bob changes what three of the bells do at the lead end.
|
 |
Touches
There are three bobs in a standard extent (or touch) of 120 changes. Shorter touches can also be called.
Cribsheet
Download the Plain Bob Doubles – effect of the bob cribsheet for further study or for use in the tower.
9. Grandsire Doubles Toolbox
What is Grandsire Doubles?
Grandsire Doubles has two bells that plain hunt; in a plain course they are the treble and the second. For this reason it is known as a twin-hunt method, and the bell that is plain hunting in addition to the treble is know as the hunt bell. Grandsire Doubles has three working bells (the 3, 4 and 5) and therefore only three pieces of work. There is less to learn to ring a plain course than Plain Bob Doubles but touches are more complex. Because the second plain hunts throughout, the plain course is only three leads long, compared to four leads for Plain Bob Doubles.
Calling Grandsire
Touches of Grandsire contain both bobs and singles. The call is made at handstroke when the treble is in thirds place hunting down to the front. It takes effect the following handstroke which is one blow earlier than in Plain Bob Doubles.
Ringing your bell in the right place
The dodges in Grandsire feel very different to those in Plain Bob. In:
- Plain Bob Doubles – the 3-4 dodge requires the "step back" to be made at backstroke.
- Grandsire Doubles – the 4-5 dodge requires the "step back" to be made at handstroke.
Switching between the two methods can be confusing unless you rigorously count your place and have learnt when the "step back" or dodge is made in each method.
Learning aids
Stepping stone methods
Beyond Grandsire Doubles
9.1. The plain course explained
 Method structure
The blue line of Grandsire Doubles is shown on the right, with the treble coloured red and the second coloured blue.
Grandsire Doubles is a twin hunt method. In the plain course, the treble and 2 both plain hunt. Apart from the treble, the other bell plain hunting is known as the hunt bell. In a plain course, only the 3, 4, and 5 are working bells. At only 30 changes long, the plain course comes back into rounds quite quickly.
The treble and 2 plain hunt. Bells 3, 4 and 5 ring a cycle of work: dodge 4-5 down, dodge 4-5 up, make thirds.
Starts
Grandsire starts are more complicated that Plain Bob starts.
- The hunt bell (2) leads.
- The third (3) strikes one blow in thirds and then hunts down to the front.
- The fourth and fifth (4 and 5) complete the dodge and then hunt.
Treble signposts
When ringing Grandsire Doubles, treble signposts are particularly useful.
- If the treble takes your bell off lead, make two blows in thirds place and
return to lead. - If your bell passes the treble in 2-3, dodge 4-5 up.
- If your bell passes the treble in 3-4, dodge 4-5 down.
- If your bell passes the treble in 4-5, you are the hunt bell.
Tip
After your bell has passed the treble, the next bell you pass is always the hunt bell.
Cribsheet
Download the Grandsire Doubles cribsheet for further study or for use in the tower.
9.2. Bobs and singles explained
Bobs and singles are called at handstroke when the treble is in thirds place, hunting down to lead. This is a blow earlier than would happen in many other doubles methods, including Plain Bob.
The call is earlier because the bob/single is made just before the treble reaches the lead. At the back the bells dodge for the call, then you ring the normal work which is why there is a double dodge
At the bobCall are made when the treble (red) is in thirds place, hunting down to the lead. The bob changes what three of the bells do at the lead end.
|
 |
At the singleThe bells in first and seconds place do different work at a single.
|
 |
Touches
To ring an extent (120 changes), two different calls are required – a bob and a single. Shorter touches can be rung with only one type of call.
Cribsheet
Download the Grandsire Doubles – effect of bobs and singles cribsheet for further study or for use in the tower.
10. Exploring doubles methods
Once you have mastered Grandsire and Plain Bob Doubles there is a whole world of doubles ringing for you to play with. There are new methods to learn and then variations to explore.
Doubles methods
Concentrating first on doubles methods, there are groups of methods in which each method has a native type of call. You've seen that already – a Grandsire bob is very different to a Plain Bob bob. So, with each method you also need to learn which bobs or singles belong to the method. Methods are grouped into the type of bob used, e.g. a Plain Bob bob or a Reverse Canterbury bob.
Sounds a bit complicated, but just like any other form of ringing if you start learning the methods in a logical progression, it's easier to see what's happening and slowly add to your method repertoire. Most people start by learning Reverse Canterbury which is very closely related to Plain Bob.
Doubles variations
As a way of extending their doubles repertoire, many enjoy ringing variations. These are usually standard doubles methods, rung with a call that is normally associated with a different method. For example, St Simon’s Doubles rung with a Reverse Canterbury bob is called Eynsham. If it’s rung with an old single (or Plain Bob single), it’s called Cassington.
Doubles variations do not usually take very long to learn, but they can be interesting to call and require fast reactions, especially if they involve more than one type of call in each extent.
If there are only five ringers and the band would like a bit of variety, ringing variations is good fun. Ringers who regularly ring variations usually develop fast mental agility and an ability to respond to treble passing positions as the work comes round quickly and is constantly changing.
Conducting doubles methods
- Conducting All Saints
- Conducting April Day
- Conducting Reverse Canterbury
- Conducting Reverse St Bartholomew
- Conducting the St Martin's group
- Conducting the Winchendon Place group
Learning aids
Method progression
Getting going
Progressing
St Martin's group
Methods rung with Plain Bob bobs. Each method has a different front work.
Winchendon Place group
Methods rung with Reverse Canterbury bobs. The front works for each method are exactly as for the St Martin's group, but these are rung with places in 3-4, different bobs and the 3 and 4 starts are different.
11. Plain Bob Minor Toolbox
What is Plain Bob Minor?
Plain Bob Minor is a widely rung method on six bells and a common progression from ringing Plain Bob Doubles. The treble plain hunts up to sixth place and back and there are five working bells which complete a cycle of five pieces of work. Each of these pieces of work happens at the treble lead, when seconds place is made over the treble. In between each of these pieces of work, each bell plain hunts.
As the tenor rings the method rather than covering, there is no longer a constant visual and auditory cue to help accurate leading.
Method structure
- Find out more by reading Plain Bob Minor explained
Calling Plain Bob Minor
Calling Plain Bob introduces concepts such as wrong and home which are used in other minor methods and their extensions on higher numbers.
Learning Aids
11.1. Plain Bob Minor explained
Method structureThe blue line of Plain Bob Minor is shown on the right, with the treble coloured red and the second coloured blue. The treble plain hunts. The working bells ring a repetitive pattern with a piece of work each time the treble is leading: dodging 3-4 down, 5-6 down, 5-6 up, 3-4 up, make seconds.
Treble passing positions
|
 |
11.2. Understanding coursing order
Have you heard the expression “follow your course bell” and not had a clue what this bit of bell ringing wisdom meant or what to do with it? Like a lot of things in ringing, the concept of coursing order is quite simple to understand but it is routinely very poorly explained, if it is explained at all.
In Plain Hunt and Plain Bob, the coursing order is the order in which you follow the bells, although it is in fact a much deeper property of the way methods are constructed, and so the concept of coursing order can be applied to other methods too.
The easiest way to see the coursing order is by looking at the order that specific bells (e.g. the treble, the 2 and the 6) pass the other bells in Plain Hunt.
You will notice a circular pattern:
- The treble passes bells in the order – 2 4 6 5 3
- The 2 passes bells in the order – 1 4 6 5 3
- The 3 passes bells in the order – 5 3 1 2 4
The 5 always courses (comes after) the 6, the 3 courses the 5 and the treble courses the 3 etc. This is the coursing order and on six bells:
5 3 1 2 4 6
Extending to higher numbers the coursing order is always the odd bells descending followed by the even bells ascending, so on ten bells the plain course coursing order is:
9 7 5 3 1 2 4 6 8 0
In Plain Hunt and Plain Bob, the coursing order is the order in which many things happen:
- You ring over the other bells in the coursing order.
- The bells come to the front in the coursing order.
- The bells go to the back in the coursing order.
Coursing order is a convenient way of describing how the bells follow each other around in a method, which remains constant between calls. It is easiest to see in plain hunt where it is the order in which the bells come to the front and to the back, (i.e. 531246 in Minor). The order is cyclic, so it repeats and could be written down starting at any point.
In a method the coursing order is defined with the treble omitted (so the above becomes 53246). In Plain Bob this order is constant through all leads of the plain course. Because the coursing order is cyclic – it is conventional to consider the tenor to be at the end (or beginning) and to omit it when written down (so 53246 is written 5324).
Transposition
Have you ever wondered how conductors keep people right or know if two bells have swapped over? Well ... transposition is the answer. It is a method of calculating and writing out touches of methods in a shorthand-way and tells you the order that the place bells occur at each lead head of a method. It might sound complicated but it is easy to do and very useful.
Every time a call (bob or single) is made, the coursing order of the bells changes. Transposition allows you to work out the new coursing order and hence keep people right if they go wrong or tell if two bells have swapped over.
Ask an experienced conductor in your tower or local area to sit down and show you how transposition works; it shouldn’t take more than five minutes so you can do it between touches at a practice. Alternatively there are some good online resources that you can use to teach yourself at home.
Exercises
Get out your coloured pens and paper and write out Plain Hunt on 12 or 20 bells and work out the coursing order. You should be able to see how the coursing order extends to all numbers of bells.
Course and after bells
Your course bell is the bell you follow down to the lead – so you might hear someone say “take your course bell off the lead.” Your after bell is the bell that follows you down to lead – hence the instruction “your after bell takes you off the back”.
The coursing order on 6 bells is 6 5 3 1 2 4 i.e. the 5 courses the 6, the 3 courses the 5 and the treble courses the the 3.
If you're ringing the 5, your course bell is the 6 and your after bell is the 3.
If you're ringing the 3, your course bell is the 5 and your after bell is the treble.
12. Stedman Doubles Toolbox
What is Stedman?
Stedman is not a method, it is a principle – the treble does the same work as the other working bells. It extends easily to ringing on higher numbers and offers opportunities for many musical compositions.
Ringing Stedman feels quite different from anything else you may have rung. Partly this is due to it being a principle with no treble to look out for at the lead end. But the leading will also feel unfamiliar: sometimes you lead at handstroke followed by backstroke (leading right) which is what you will be used to; sometimes you lead at backstroke followed by handstroke (leading wrong) and sometimes you only lead for one blow at either handstroke or backstroke (snap lead). When learning the method it is very useful to know which leads are right and which ones wrong.
Method Structure
Unlike most other methods Stedman is divided into sixes (rather than leads). The three front bells hunt for six blows and above this the bells in 4-5 double dodge behind. These six changes can be rung in two different ways – a slow six in which the bell in thirds place rings a second blow in thirds place and then runs in to lead back/hand (wrong) and a quick six in which the bell in thirds place runs straight in and leads hand/back (right).
These two sixes are rung alternately – each six starting with a handstroke blow. When the six changes have been rung one bell leaves the front and one of the bells which has been dodging behind comes down to take its place.
Quick or Slow – which way do you go in?
The question of whether you go in to the frontwork quick or slow provides many opportunities for confusion in Stedman, especially after a call. Ringers have different preferred ways of remembering, from moving their feet in certain ways to watching for a particular bell in the coursing order.
Some tips that might help:
- Unless there has been a call, you will be doing the opposite of what you did last – if you went in quick last time, it will be slow and vice versa.
- If the bell which you double-dodged with in 4-5 up (your course bell) passes you as you move from 4-5 down towards the lead you must be a slow bell (because it was a quick bell). The converse is true, if it is still on the front it was slow bell so you must be a quick bell.
- When you are hunting down from the double dodge in 4-5 down, if the bells are leading right (handstroke and backstroke) its a quick six so the next one will be a slow six – you will go in slow – and vice versa.
- As a last resort – as you move from thirds place towards the lead you will follow each of the two remaining bells one after the other. That may mean holding in thirds if they swap places, meaning you go in slow. If you didn't hold in thirds you go in quick.
Calling Stedman Doubles
The only call used in Stedman Doubles is the single. Calls affect the bell about to double dodge 4-5 down and the bell leaving the front, and has the effect of swapping the bells in 4-5. The bells doing the frontwork are unaffected.
Calls are made at handstroke and are made two blows before a six end. The download indicates all the calling positions.
Learning aids
Learn by watching
Find out more about Stedman by watching these St Martin's Guild YouTube videos.